
How to Stop Tables and Rows from Splitting Across Pages
Tables in Microsoft Word often split across pages in ways that affect readability, layout consistency, and document quality. This behavior is common in long or complex documents and is usually caused by table settings rather than visible formatting issues. Learn how to stop tables and rows from splitting across pages in Word easily.
Why Tables in Micorosft Word Split Across Pages (Rows Breaking Across Pages in Word)
Section titled “Why Tables in Micorosft Word Split Across Pages (Rows Breaking Across Pages in Word)”A common issue occurs when a table row is divided between two pages. Part of the row appears at the bottom of one page, while the rest continues on the next page. This can make the content difficult to read and may appear unstructured or unprofessional.
This behavior is controlled by a table setting in Microsoft Word that allows rows to break across pages.
How the “Allow Row to Break Across Pages” Setting Affects Tables in Word
Section titled “How the “Allow Row to Break Across Pages” Setting Affects Tables in Word”Each row in a Microsoft Word table has a setting that determines whether it can split across pages. If this setting is enabled, Word allows the row to break at the page boundary, even if the result appears visually incorrect.
This issue commonly occurs when tables are copied from external sources, when formatting is inconsistent, or when default settings are not adjusted.
How to Fix Table Rows in Word Splitting Across Pages (Step by Step)
Section titled “How to Fix Table Rows in Word Splitting Across Pages (Step by Step)”Disable “Allow Row to Break Across Pages”
Section titled “Disable “Allow Row to Break Across Pages””- Select the entire table.
- Right-click the table and select Table Properties.
- Open the Row tab.
- Clear the ‘Allow row to break across pages’ check box.
- Select OK.
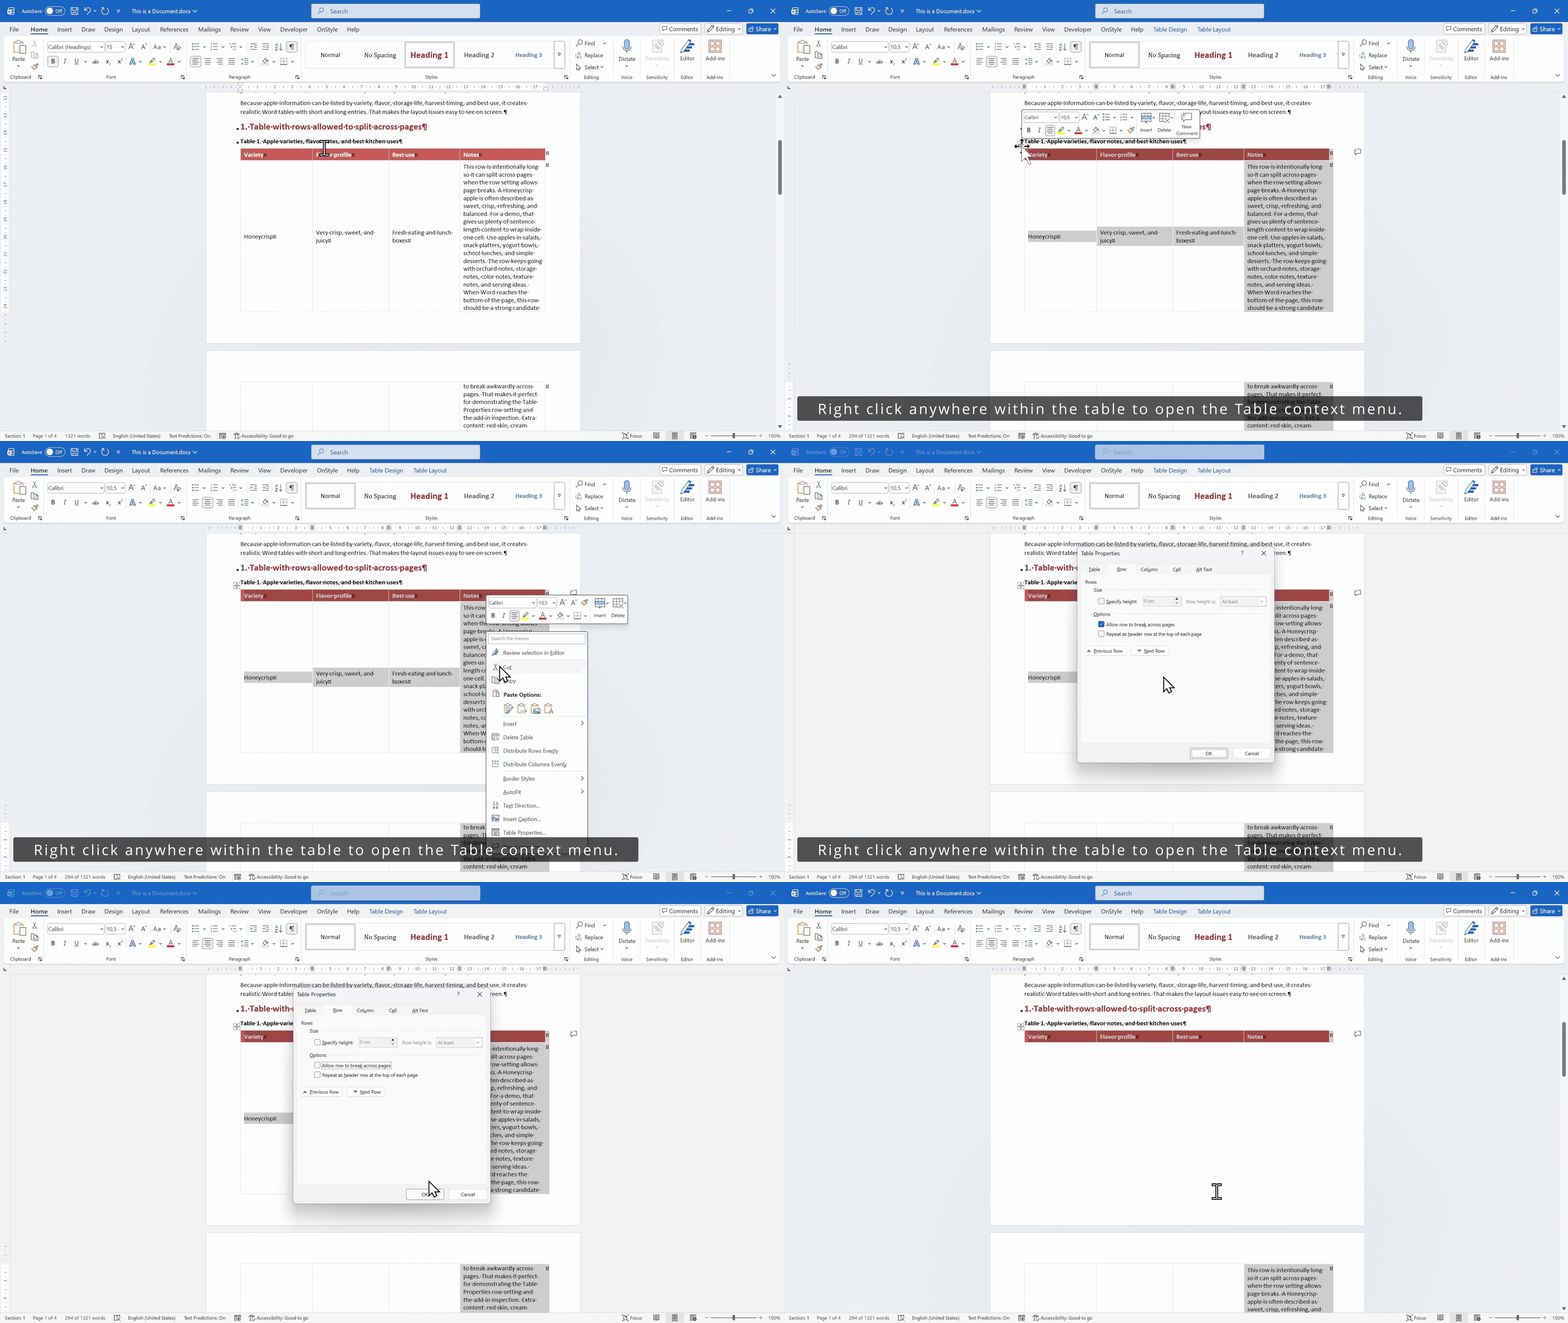
This ensures that each row remains on a single page and prevents rows from splitting across page boundaries.
How to Fix Table Layout in Word: Issues Caused by Text Wrapping
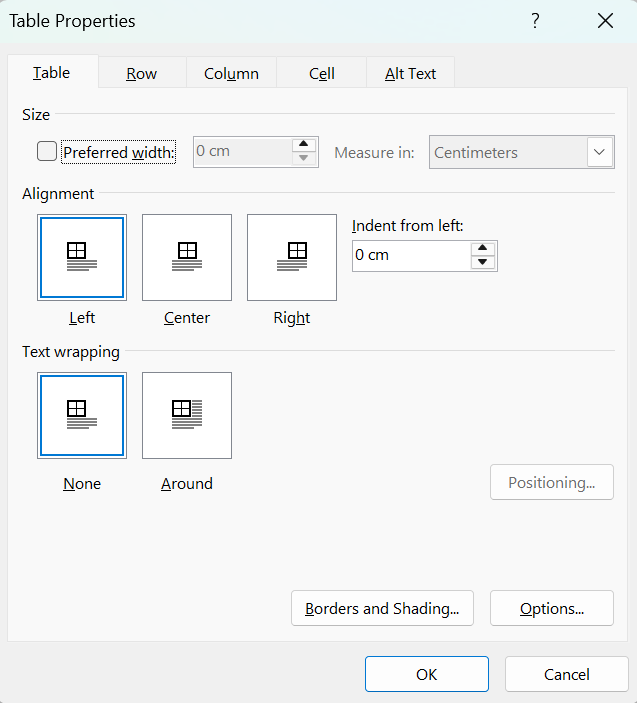
Section titled “How to Fix Table Layout in Word: Issues Caused by Text Wrapping”If rows continue to split across pages or the table behaves unexpectedly:
- Right-click the table and select Table Properties
- Open the Table tab
- Check whether Text wrapping is set to None
How to Fix Header Row Splitting and Separation Issues in Word Tables
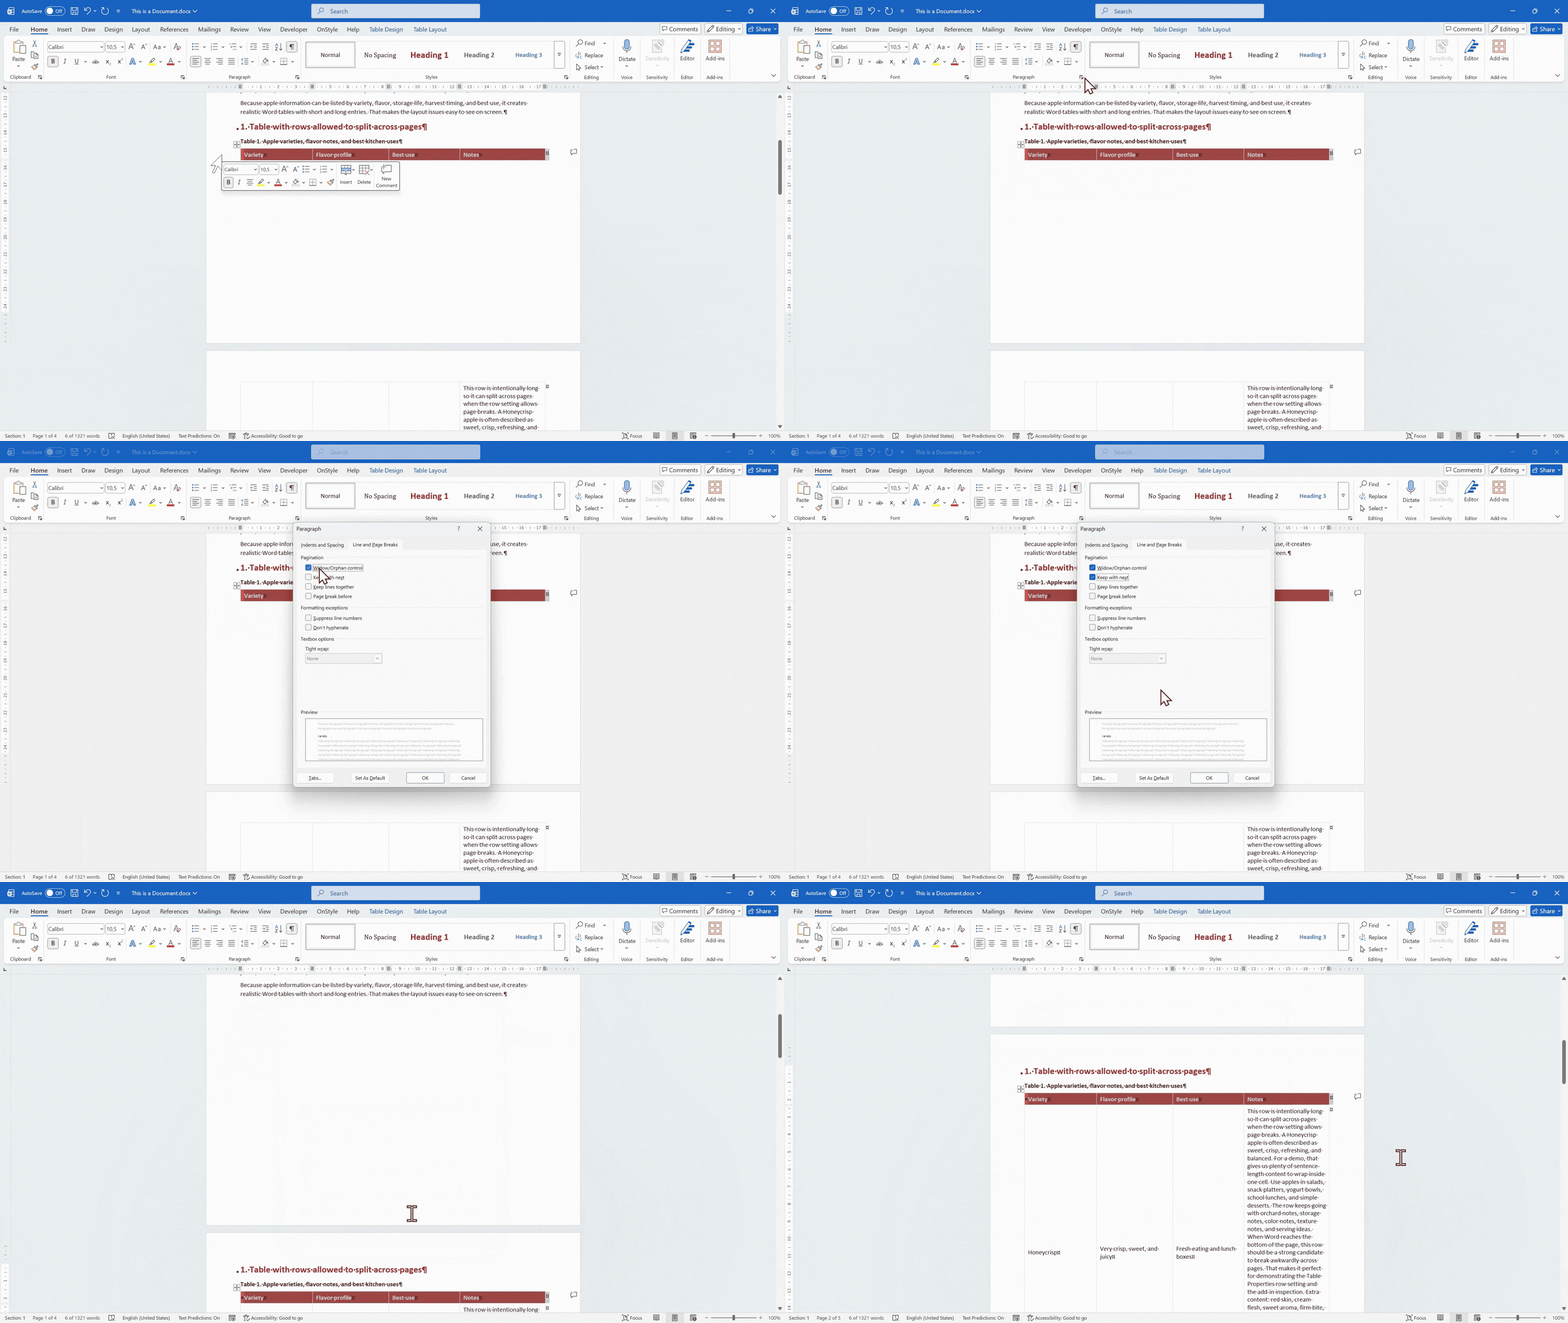
Section titled “How to Fix Header Row Splitting and Separation Issues in Word Tables”After disabling row splitting, the header row may remain on the previous page while the table content moves to the next page. This creates a separation between the header and the table content.
Step 1: Keep the Header Row with the Table Content
Section titled “Step 1: Keep the Header Row with the Table Content”- Select the header row.
- Open the Paragraph dialog box.
- On the Line and Page Breaks tab, enable ‘Keep with next’.
- Select OK.
This ensures that the header row remains attached to the following table content and does not separate across pages.
Step 2: Keep the Entire Table on One Page (Optional)
Section titled “Step 2: Keep the Entire Table on One Page (Optional)”- Select the entire table.
- Open the Paragraph dialog box.
- Enable ‘Keep with next’.
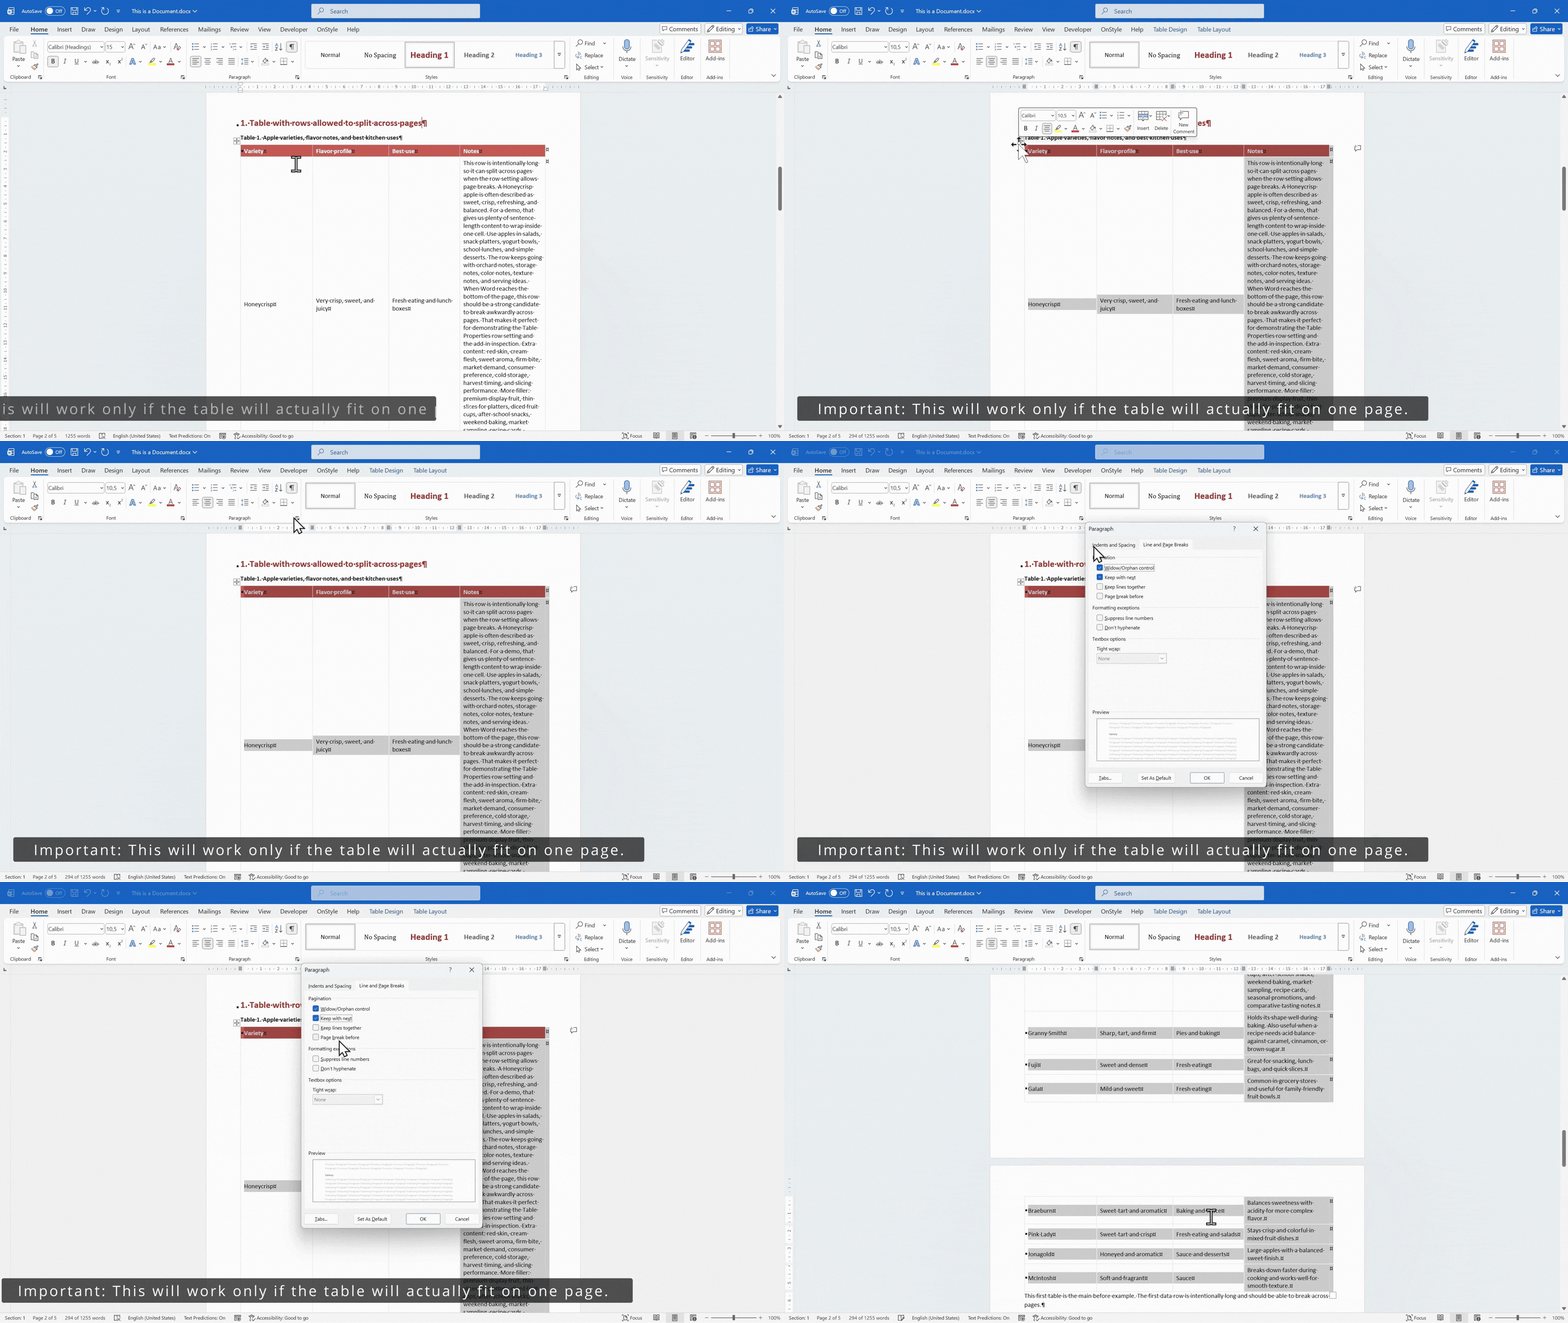
This prevents the table from splitting across pages and keeps it together as a single block.
Step 3: Repeat Header Rows on Each Page in Word Tables
Section titled “Step 3: Repeat Header Rows on Each Page in Word Tables”- Select the header row.
- Right-click and select Table Properties.
- Open the Row tab.
- Enable ‘Repeat as header row at the top of each page’.
- Select OK.
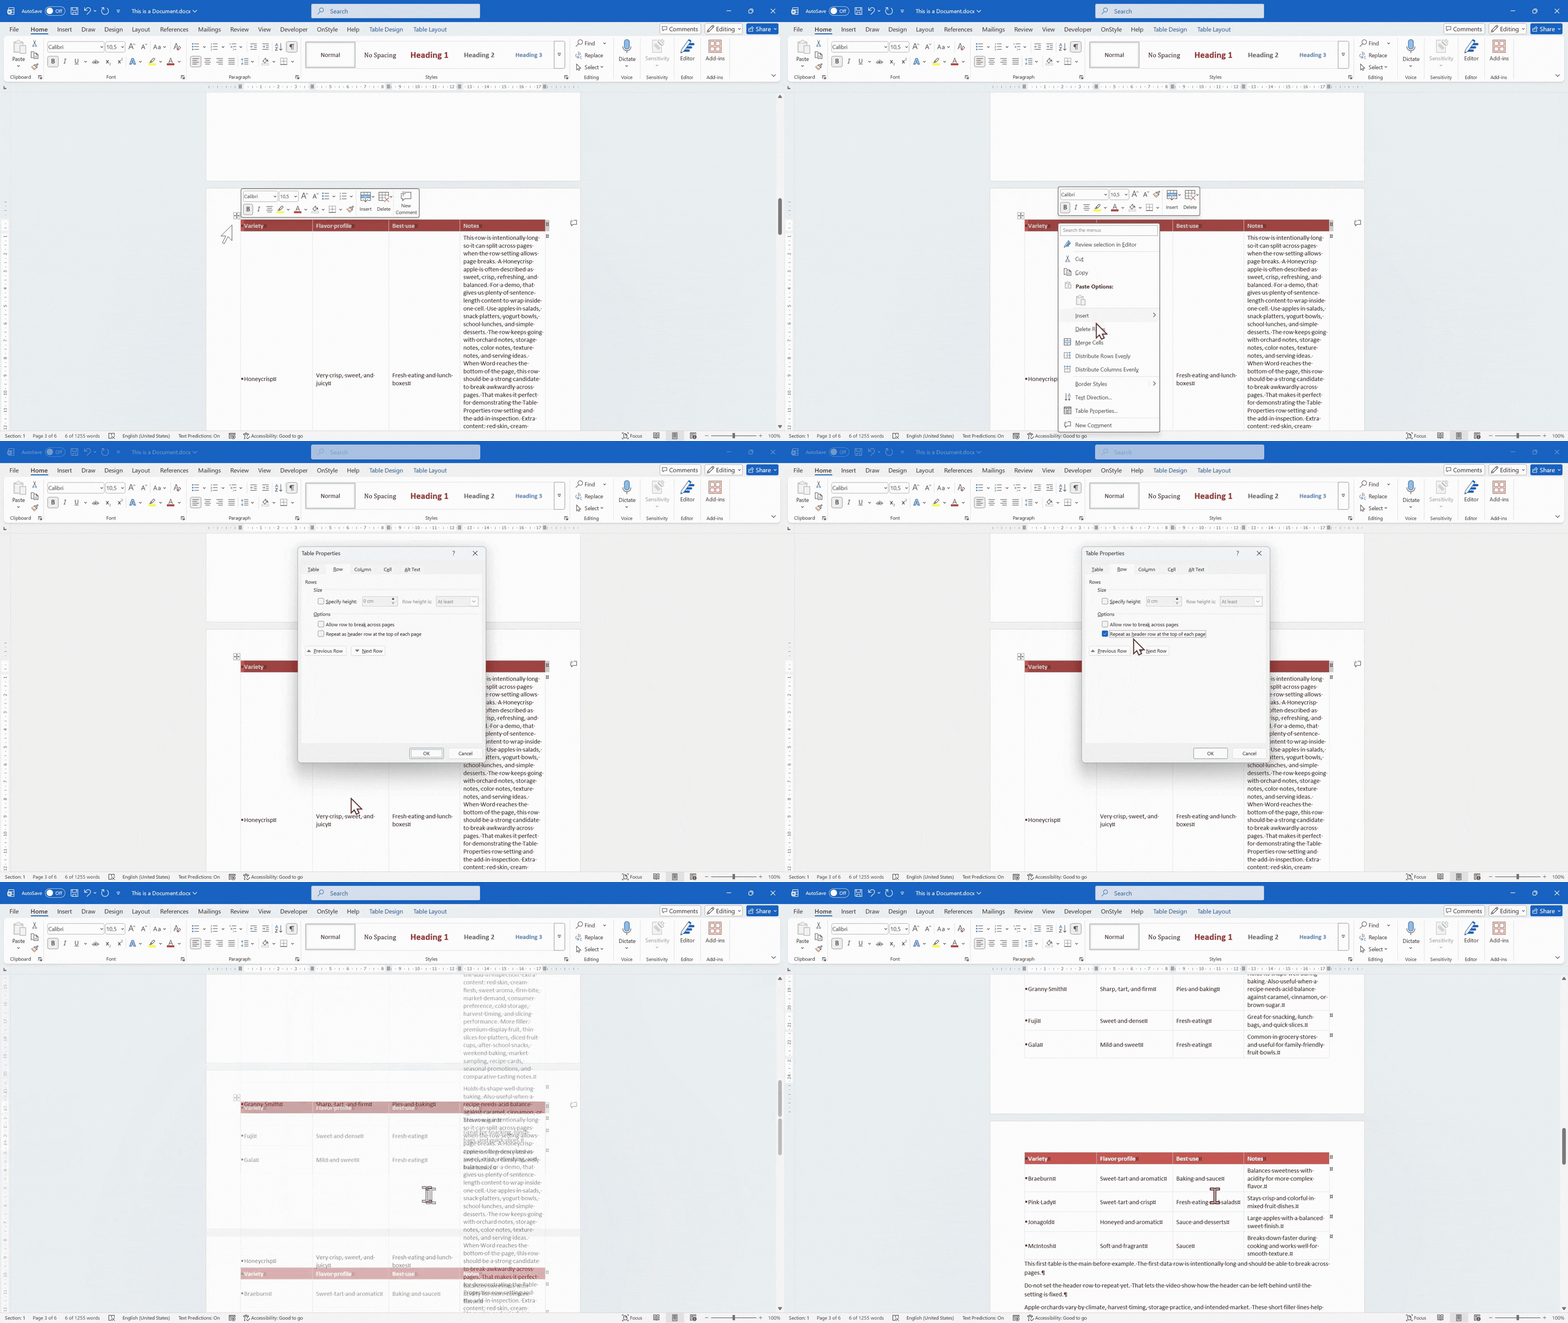
This ensures that the header row appears at the top of each page when the table spans multiple pages.
How to Use Formatting Marks to Fix Table Layout Issues in Word
Section titled “How to Use Formatting Marks to Fix Table Layout Issues in Word”Hidden formatting elements can affect how tables behave across pages. Non-printing characters should be enabled when troubleshooting layout issues.
Press Ctrl + Shift + 8 or select the ¶ (Show/Hide) button on the Home tab of the Ribbon to display formatting marks. Review paragraph markers before and after the table and check in the Paragraph dialog box, on the Line and Page Breaks tab, whether settings such as “Keep with next” are applied to those paragraphs.
Common Table Formatting Issues in Microsoft Word
Section titled “Common Table Formatting Issues in Microsoft Word”In complex documents, multiple tables may exist with different formatting settings. Some rows may behave correctly while others do not. Tables copied from external sources may contain inconsistent formatting or hidden settings.
Microsoft Word does not provide built-in tools to identify which rows allow page breaks or to detect inconsistent table settings across a document.
This makes manual correction time-consuming and increases the risk of inconsistent formatting.
Automate Table Formatting Fixes in Word Using OnStyle
Section titled “Automate Table Formatting Fixes in Word Using OnStyle”The OnStyle Word Add-in provides tools to detect and correct table-related formatting issues automatically. It allows multiple checks and corrections to be performed in a controlled and repeatable workflow.
How OnStyle Detects Table Formatting Issues
Section titled “How OnStyle Detects Table Formatting Issues”Table-related issues are identified using configurable inspection modules.
- On the OnStyle tab of the Ribbon, select the relevant inspection modules.
- Add table-related checks to a favorites or inspection group if required.
- Run the inspection.
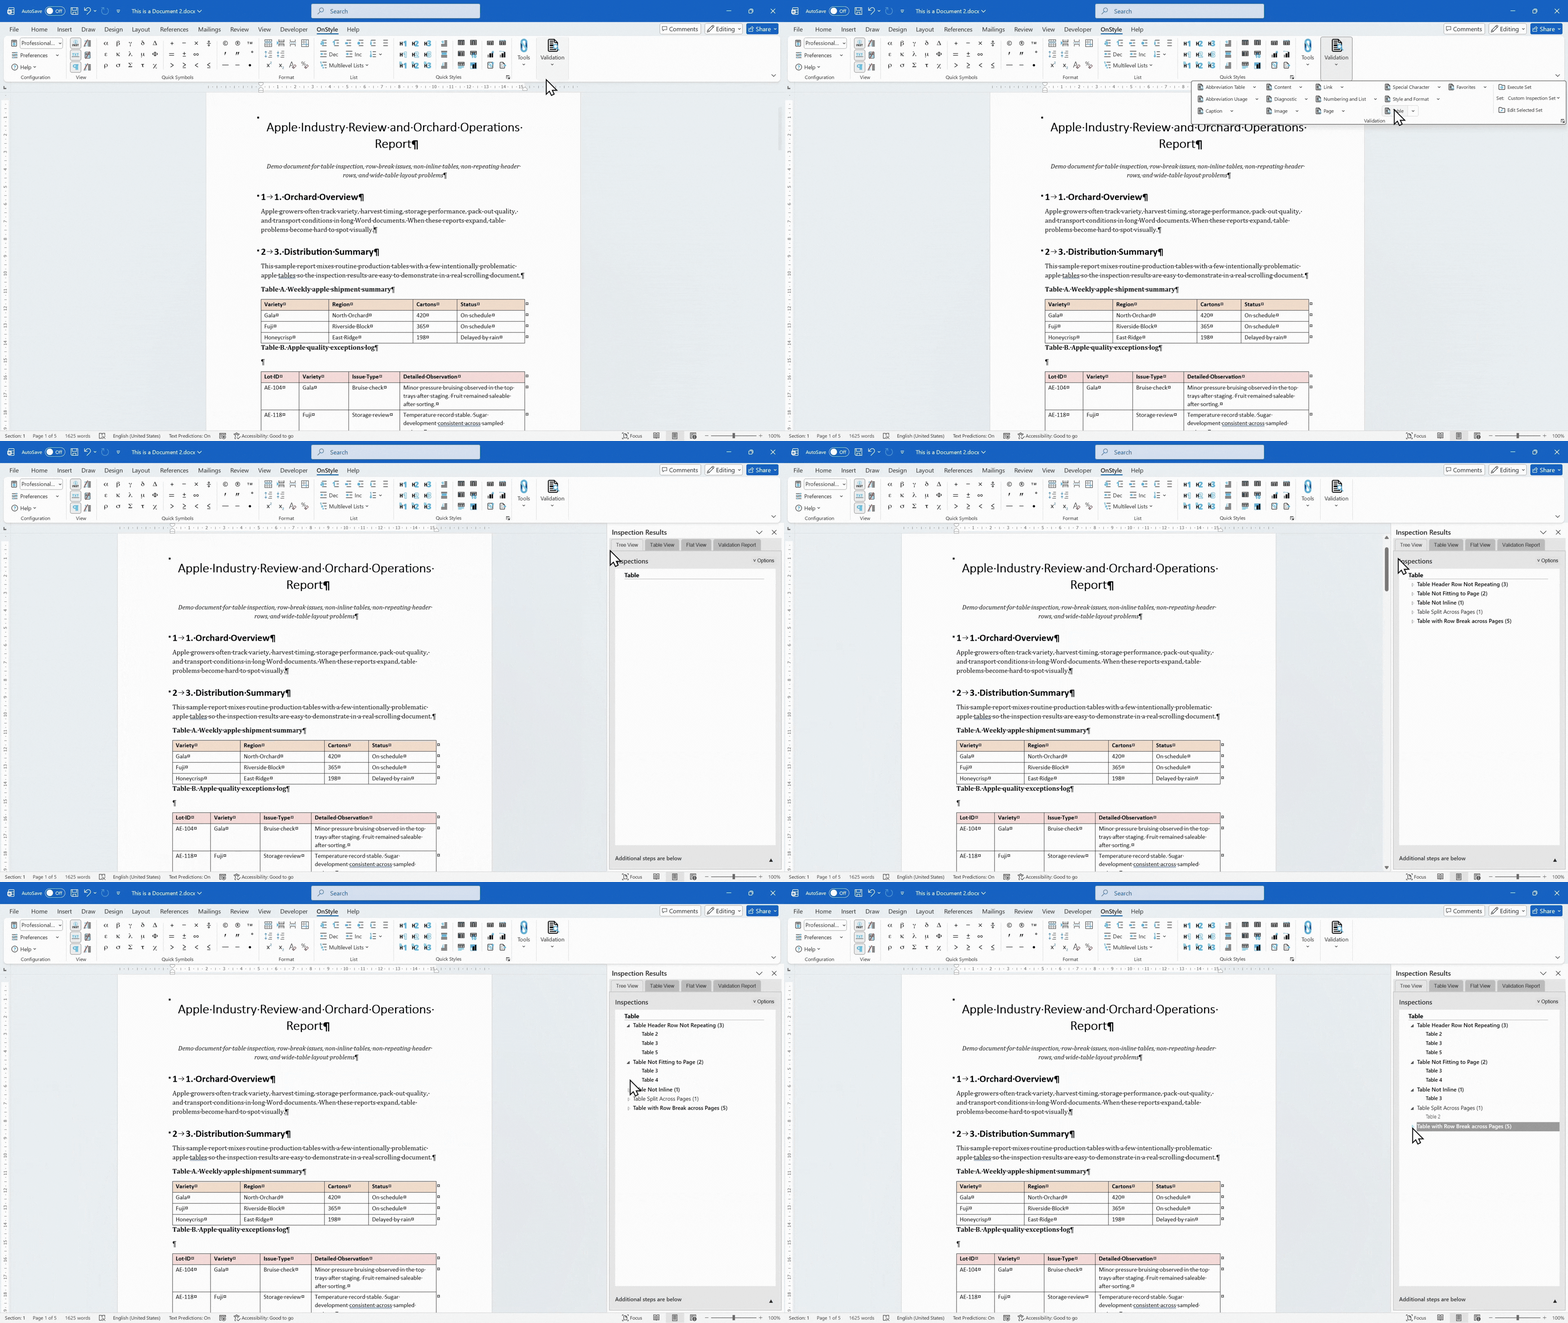
OnStyle can detect:
- Rows that are allowed to break across pages
- Tables with incorrect text wrapping (floating tables)
- Header rows that are not set to repeat
- Tables that split incorrectly across pages
- Tables that do not fit properly within page margins
- Inconsistent table formatting across the document
How to Fix Table Formatting Issues Using OnStyle
Section titled “How to Fix Table Formatting Issues Using OnStyle”Corrections can be applied in different ways depending on the workflow.
- Individual correction
Each issue can be reviewed and corrected one by one - Batch correction
Multiple issues can be fixed simultaneously
How to Apply Table Formatting Corrections
Section titled “How to Apply Table Formatting Corrections”- Select the issue in the results pane.
- Navigate to the affected table.
- Apply the recommended correction.
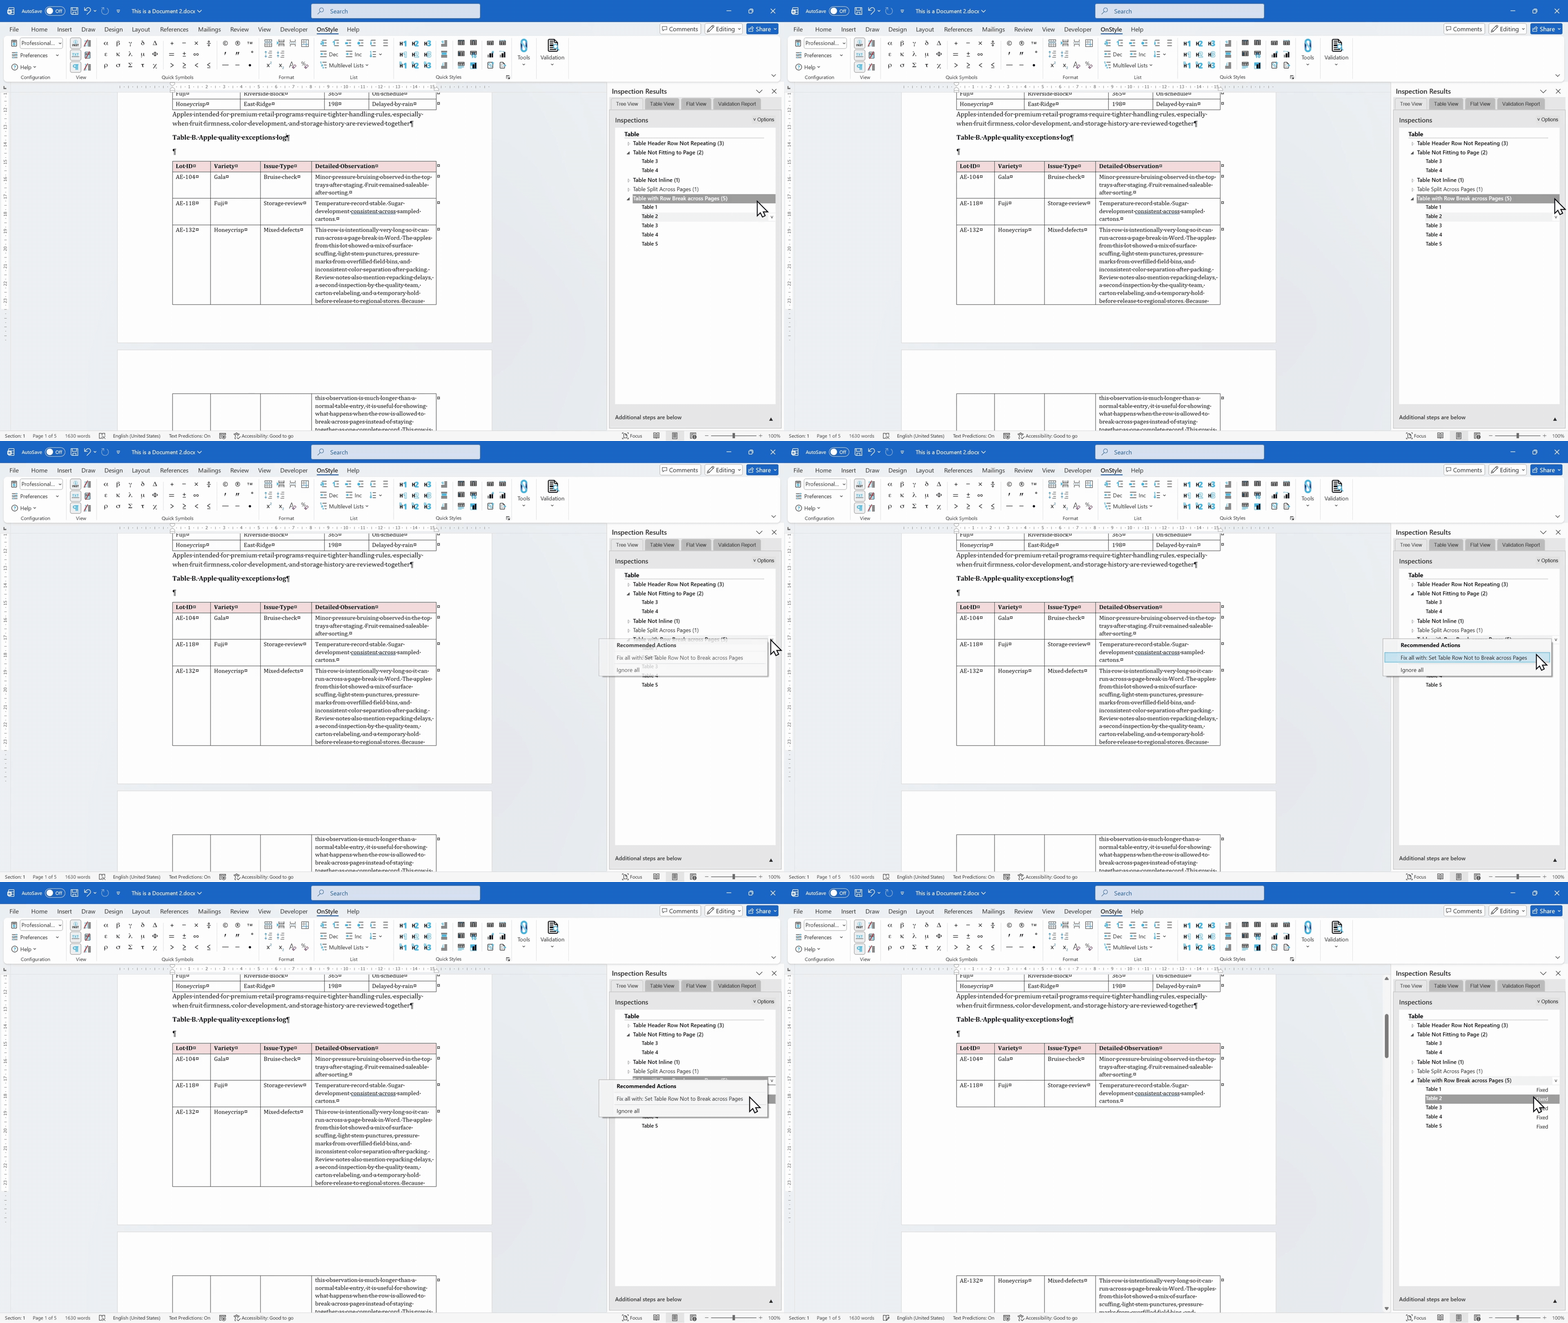
Alternatively, apply corrections in batch where supported.
Summary
Section titled “Summary”Table rows and tables in Microsoft Word splitting across pages is caused by row and table settings that allow content to break at page boundaries. Disabling row breaking, setting text wrapping to None, using paragraph controls such as ‘Keep with next’, and repeating header rows ensures consistent table layout. In complex documents, automation tools improve efficiency, consistency, and document quality control.