
How to Use the Ruler in Word
Knowing how to use the ruler in Word helps align document content without opening multiple dialog boxes. It is one of the fastest tools for adjusting margins, indents, and tab stops in reports, essays, reference lists, price lists, and everyday Word documents.
If a Word document does not line up correctly, the ruler is often the missing tool. Once the ruler markers are understood, formatting becomes faster, cleaner, and more predictable.
This guide explains how to show the ruler in Word, enable the vertical ruler, adjust margins, create first-line and hanging indents, set tab stops, and avoid common ruler mistakes.
Microsoft Word Ruler Bar Tutorial for Beginners
Section titled “Microsoft Word Ruler Bar Tutorial for Beginners”Before learning how to use the ruler in Word for margins, indents, or tabs, it must be visible in the document window.
Step 1: Show the Ruler Bar in Word
Section titled “Step 1: Show the Ruler Bar in Word”- Open the document in Print Layout view.
- On the View tab of the Ribbon, select Ruler.
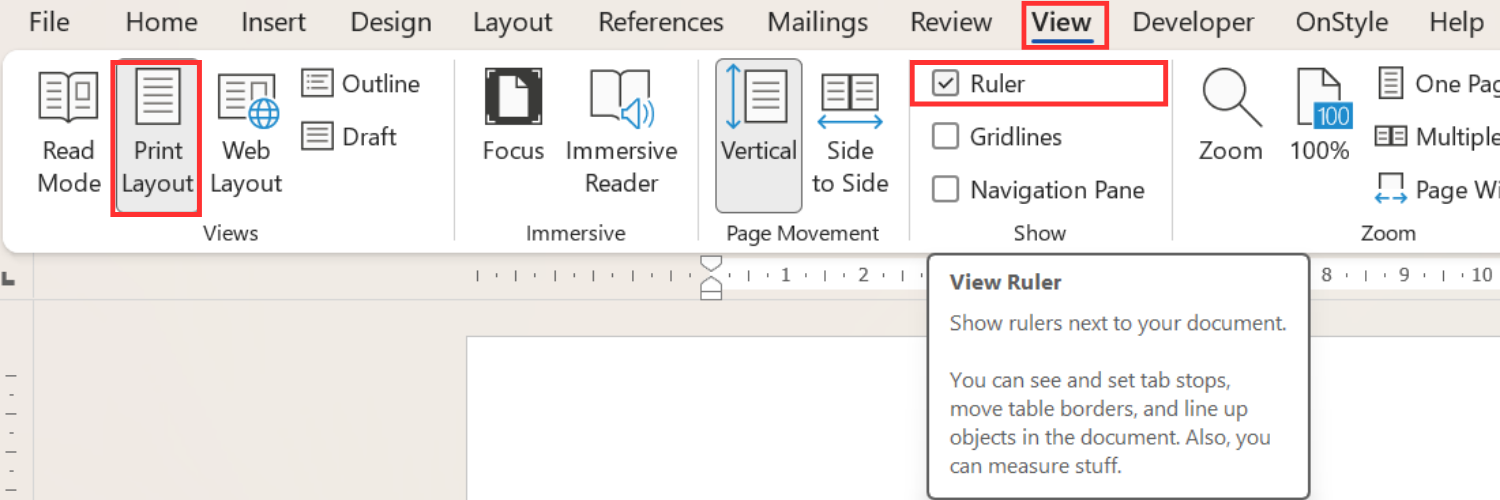
The horizontal ruler appears across the top of the document.
Step 2: Enable the Vertical Ruler in Word
Section titled “Step 2: Enable the Vertical Ruler in Word”If the vertical ruler does not appear on the left side of the page, enable it in Word Options.
- Open the File tab.
- Select Options.
- In the Word Options dialog box, select Advanced.
- In the Display section, enable Show vertical ruler in Print Layout view.
- Select OK.
The vertical ruler appears on the left side of the page. This ruler can be used to drag-and-drop top and bottom margins, adjust table row heights, and manage vertical alignment in headers or footers, but most paragraph formatting is done with the horizontal ruler.
How to Use the Ruler in Word: Ruler Markers
Section titled “How to Use the Ruler in Word: Ruler Markers”The ruler contains several markers that control different parts of paragraph formatting. Understanding these markers is important because moving the wrong marker can change the layout in an unintended way.
- The upper triangle controls the first-line indent.
- The lower triangle controls the hanging indent.
- The small rectangle below the triangles controls the left indent for the entire paragraph.
- The marker on the right side controls the right indent.
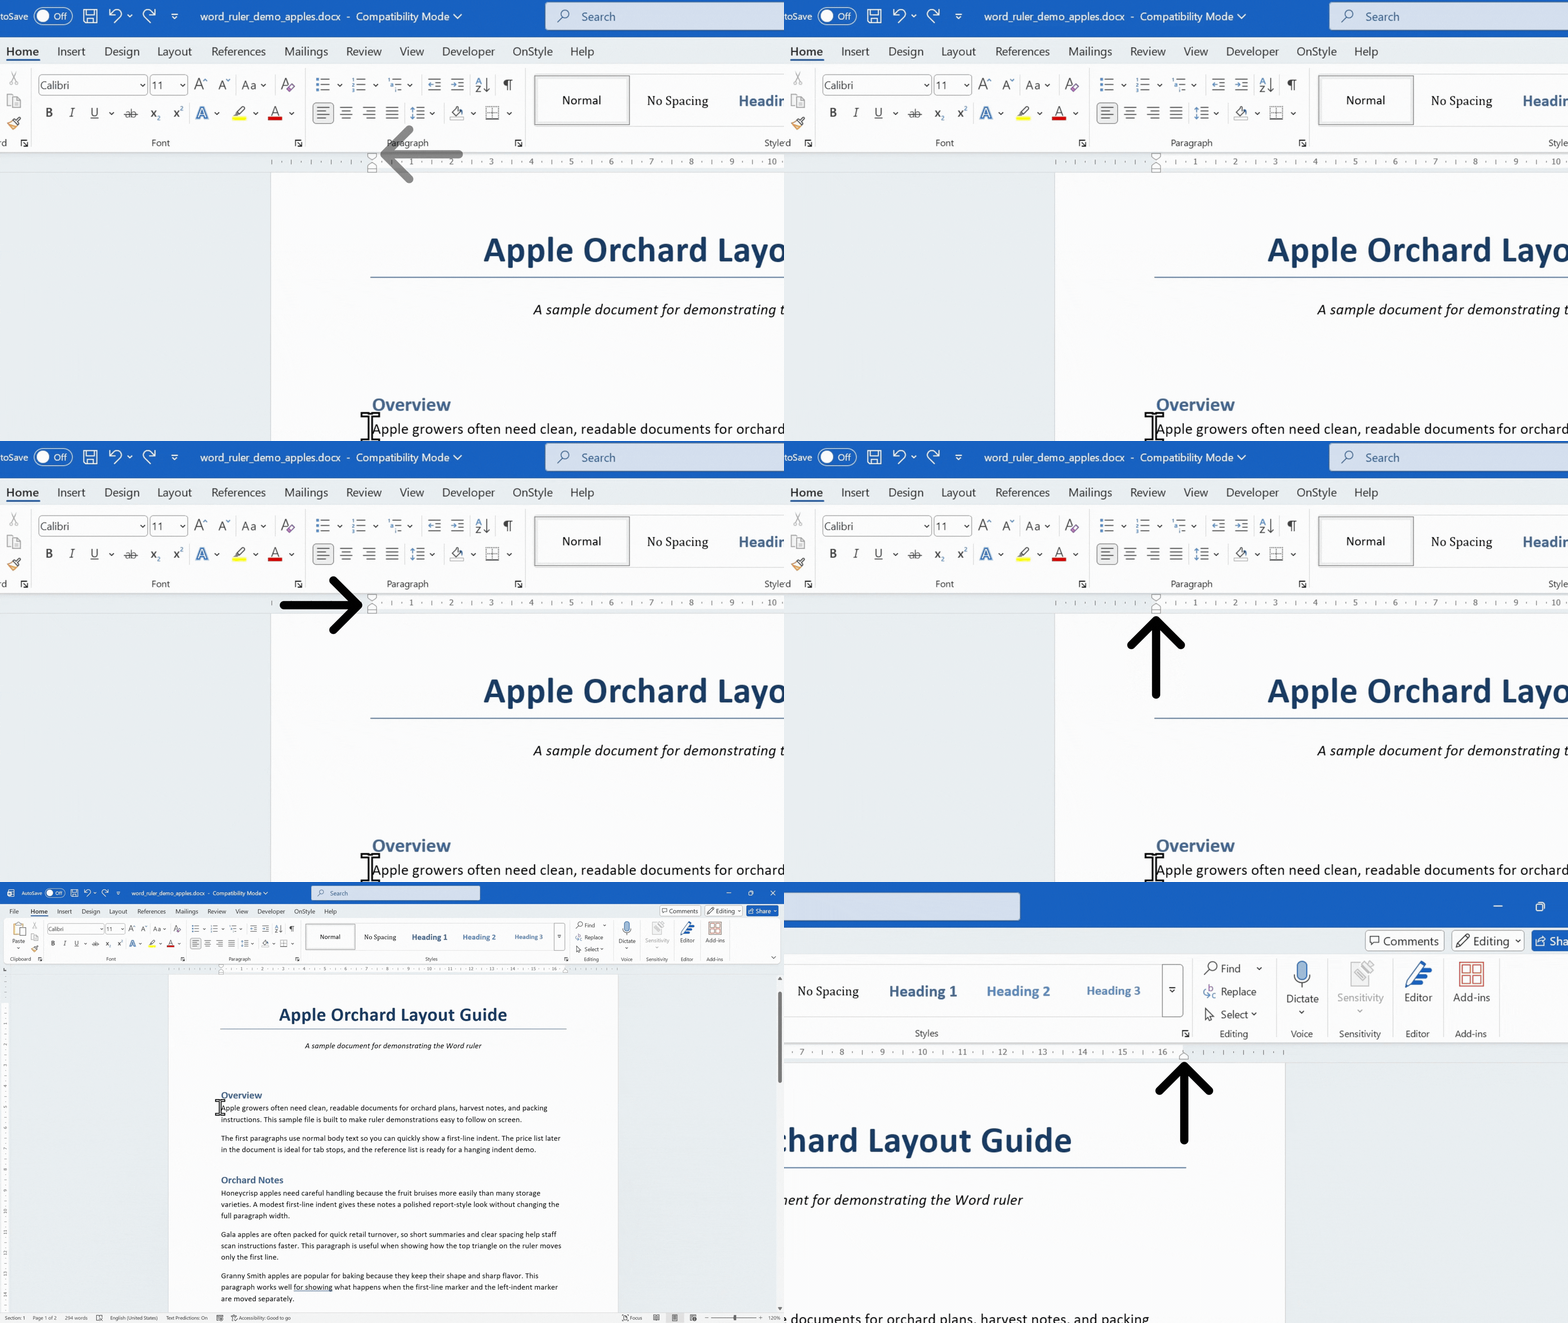
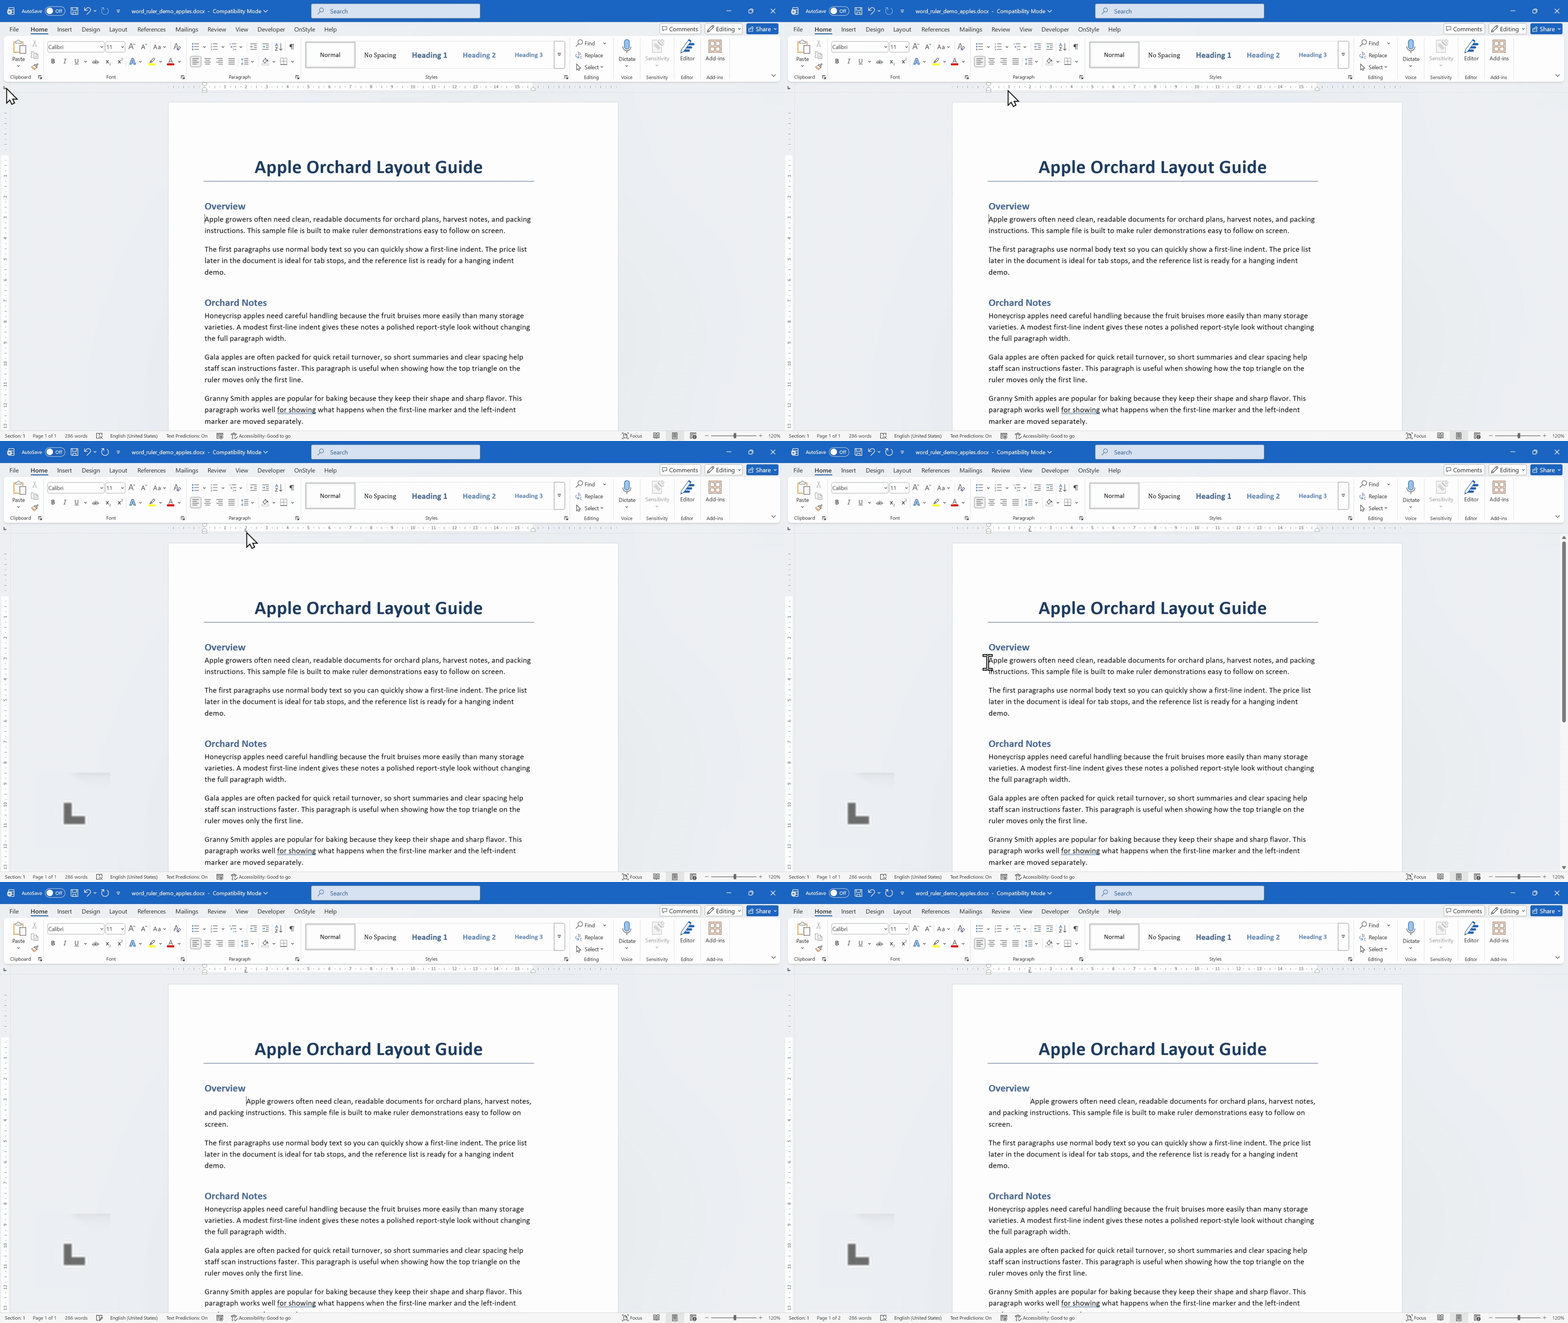
The behavior of the ruler markers depends on which marker is moved. If the upper triangle is moved, only the first line of the paragraph moves. If the lower triangle is moved, the remaining lines of the paragraph move. If the small rectangle is moved, the entire paragraph shifts together.
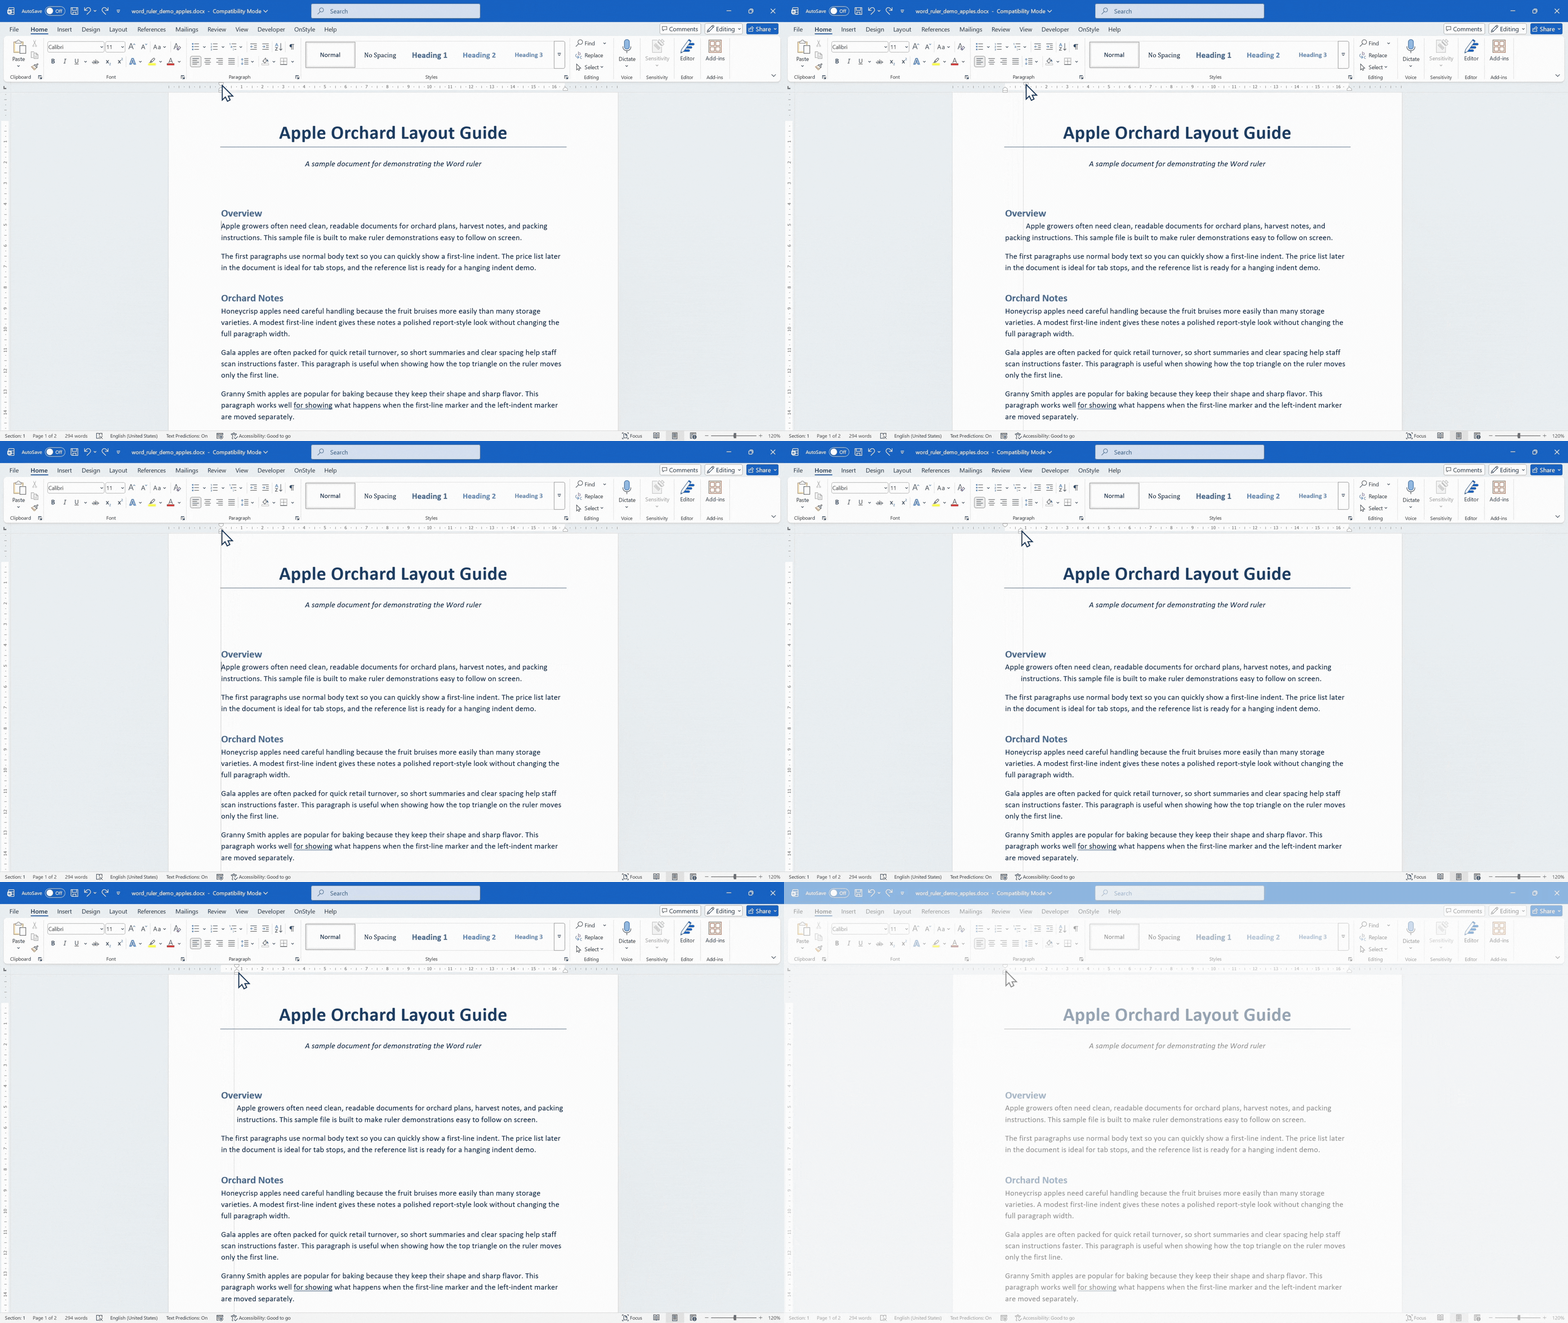
For a standard first-line paragraph indent, use the upper triangle on the ruler. The lower triangle controls the hanging indent and affects the remaining lines of the paragraph. The small rectangle below the lower triangle moves the entire paragraph indent, shifting both markers together.
How to Select Similar Paragraphs Before Adjusting the Ruler
Section titled “How to Select Similar Paragraphs Before Adjusting the Ruler”In long documents, manually selecting every paragraph can be inefficient. Word can select text with similar formatting, which makes it possible to adjust several paragraphs together when styles and formatting have been applied consistently.
Step 1: Select Text with Similar Formatting
Section titled “Step 1: Select Text with Similar Formatting”- Click inside a paragraph.
- On the Home tab of the Ribbon, select Select.
- Select Select Text with Similar Formatting.
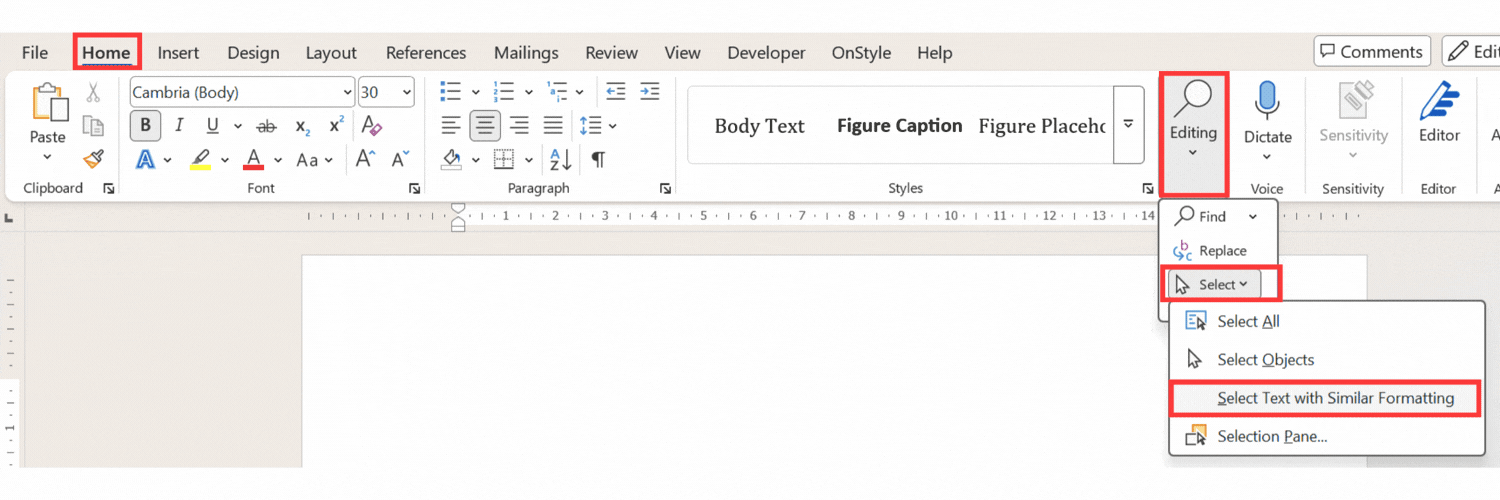
Word selects text that has similar formatting. If paragraph styles are used correctly, this can make large-scale ruler adjustments faster while excluding text with other styles.
How to Change Margins in Word with the Ruler
Section titled “How to Change Margins in Word with the Ruler”The ruler can be used to adjust page margins visually. This is useful when a layout needs more or less text on each line.
Step 1: Locate the Margin Boundary
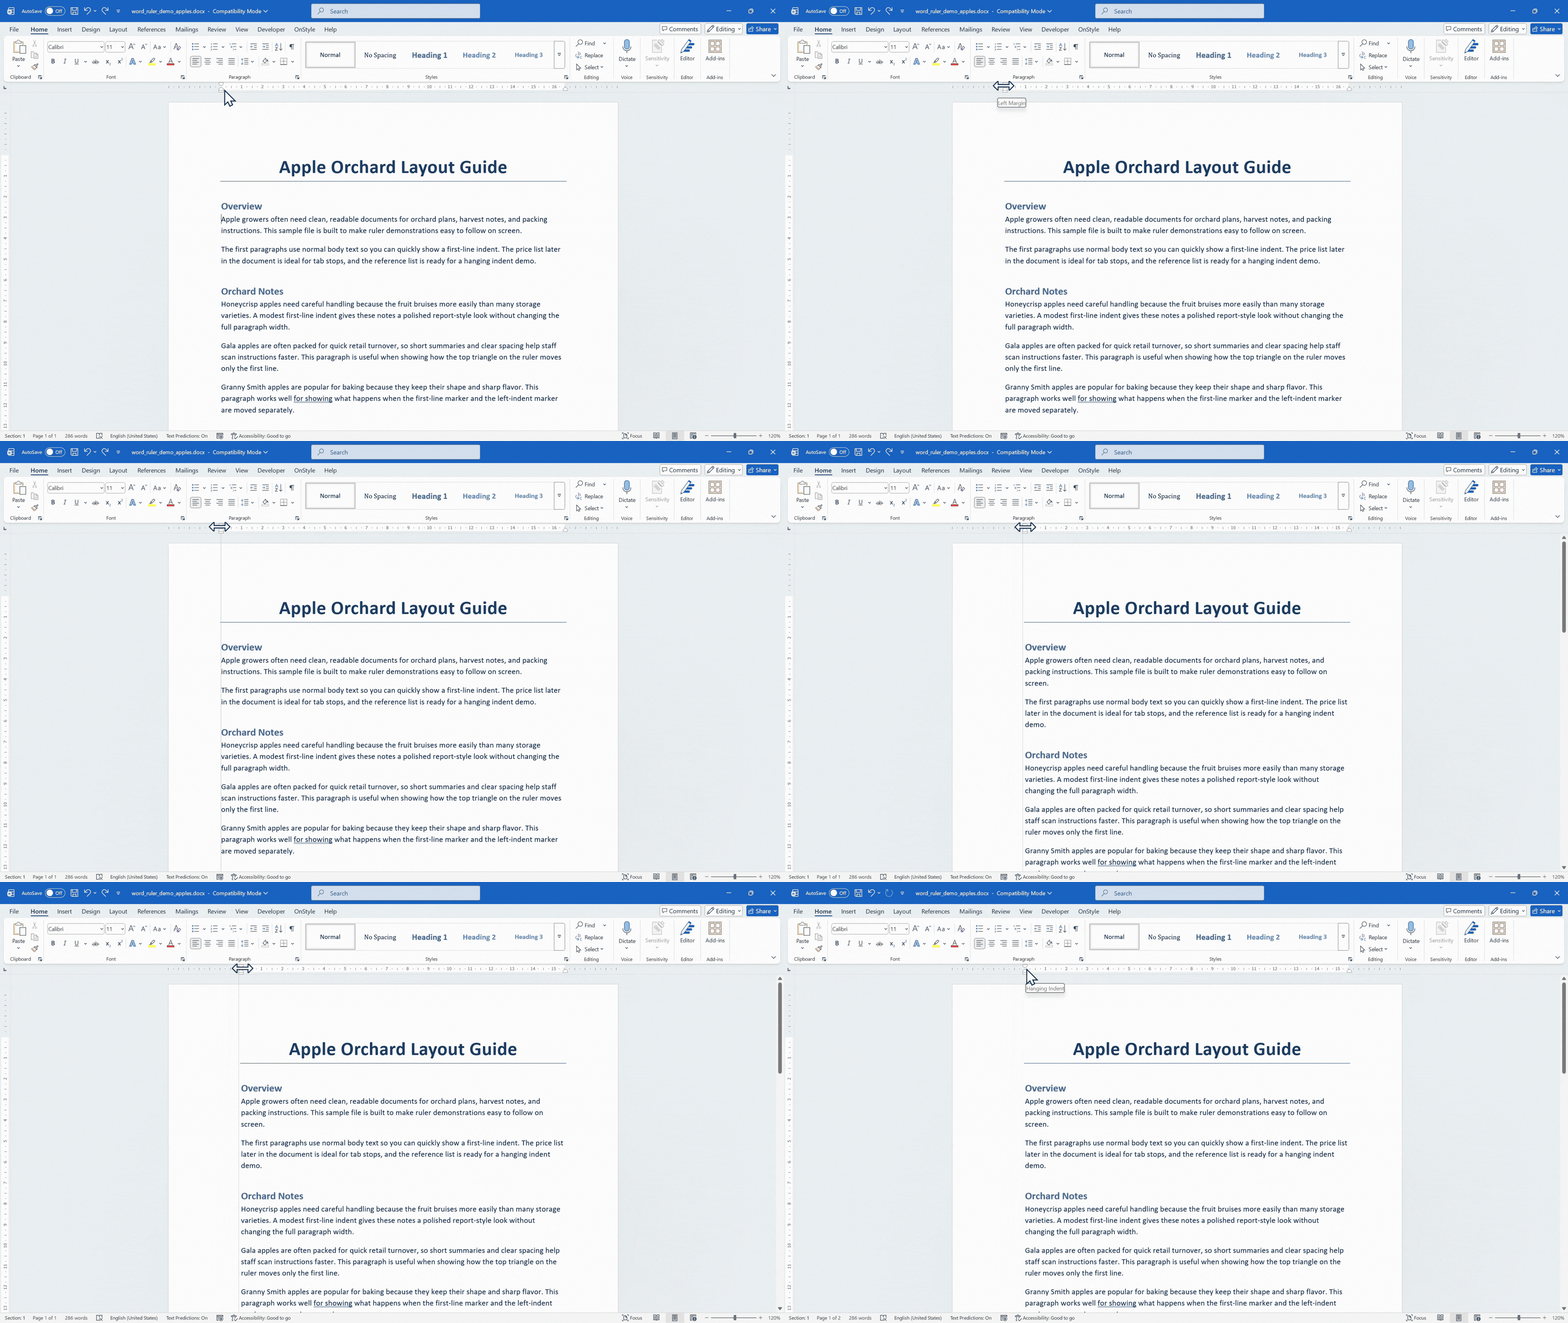
Section titled “Step 1: Locate the Margin Boundary”Move the pointer to the edge where the white and gray areas meet on the horizontal ruler.
Step 2: Drag the Margin Boundary
Section titled “Step 2: Drag the Margin Boundary”When the pointer changes to a double arrow, click and drag the boundary.
- Drag the left boundary to adjust the left margin.
- Drag the right boundary to adjust the right margin.
The text reflows as the margin changes.
Step 3: Use Precise Margin Placement
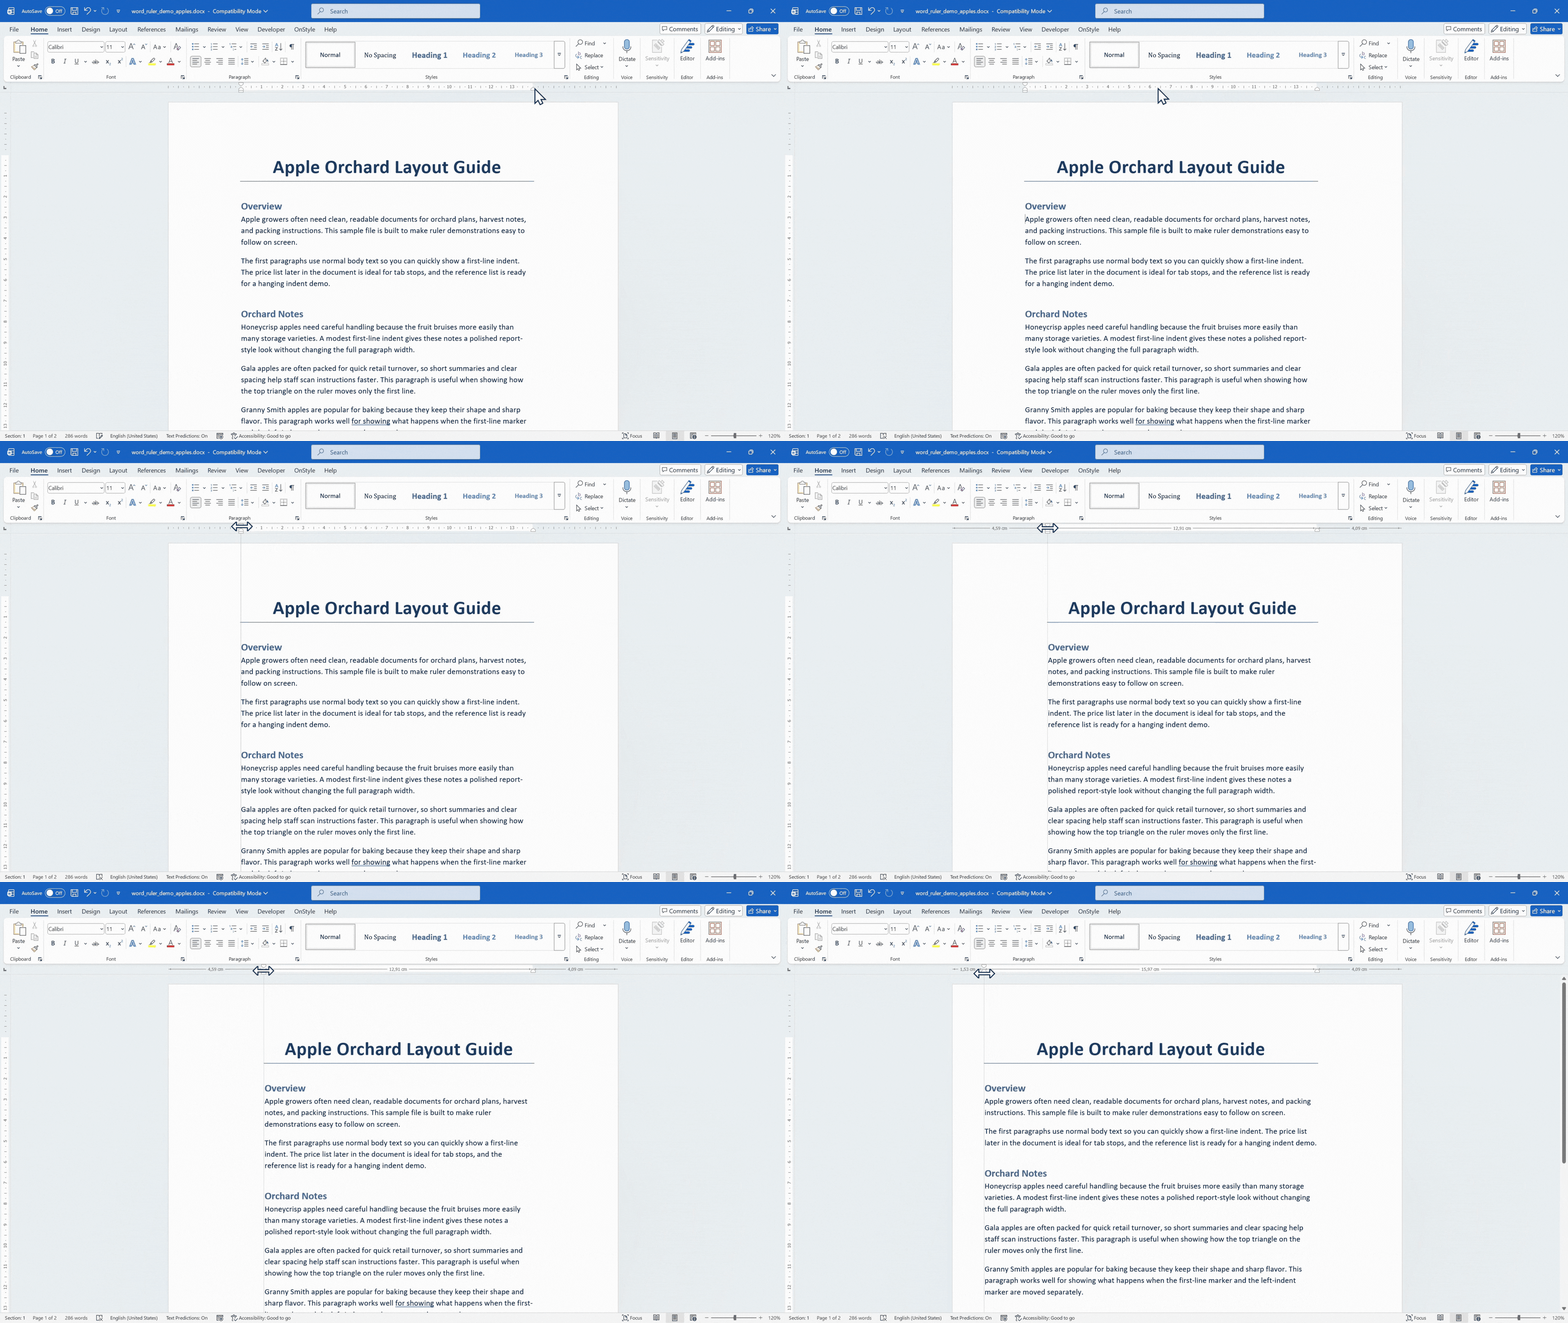
Section titled “Step 3: Use Precise Margin Placement”Hold Alt while dragging to display exact measurements as the margin is moved.
Important
Do not confuse page margins with paragraph indents. Margins control page layout, while indents control paragraph position inside the margins.
How to Set Tabs on the Ruler in Word
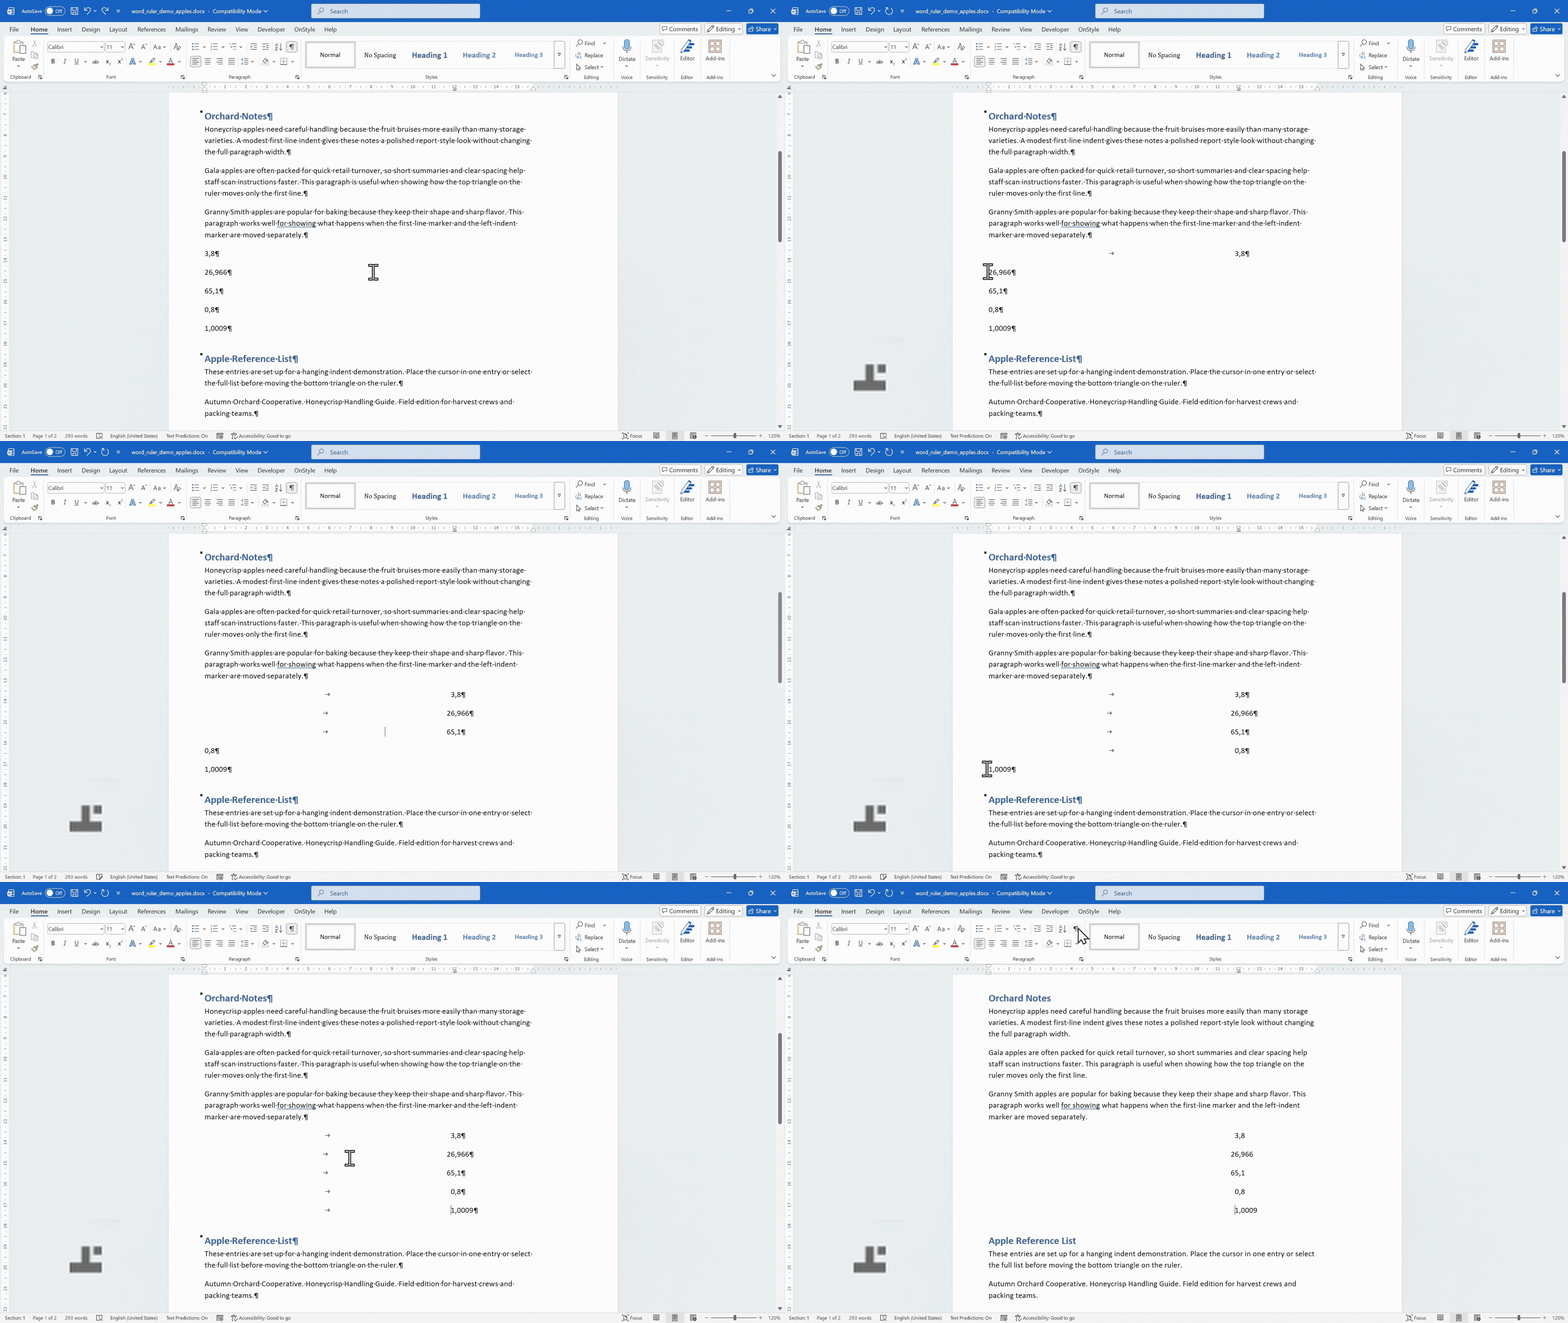
Section titled “How to Set Tabs on the Ruler in Word”Tab stops are useful when text needs to line up neatly across a page without building a table. They work well for simple alignment, such as packing lists, prices, labels, short headings, or simple reference lines.
Step 1: Choose a Tab Type
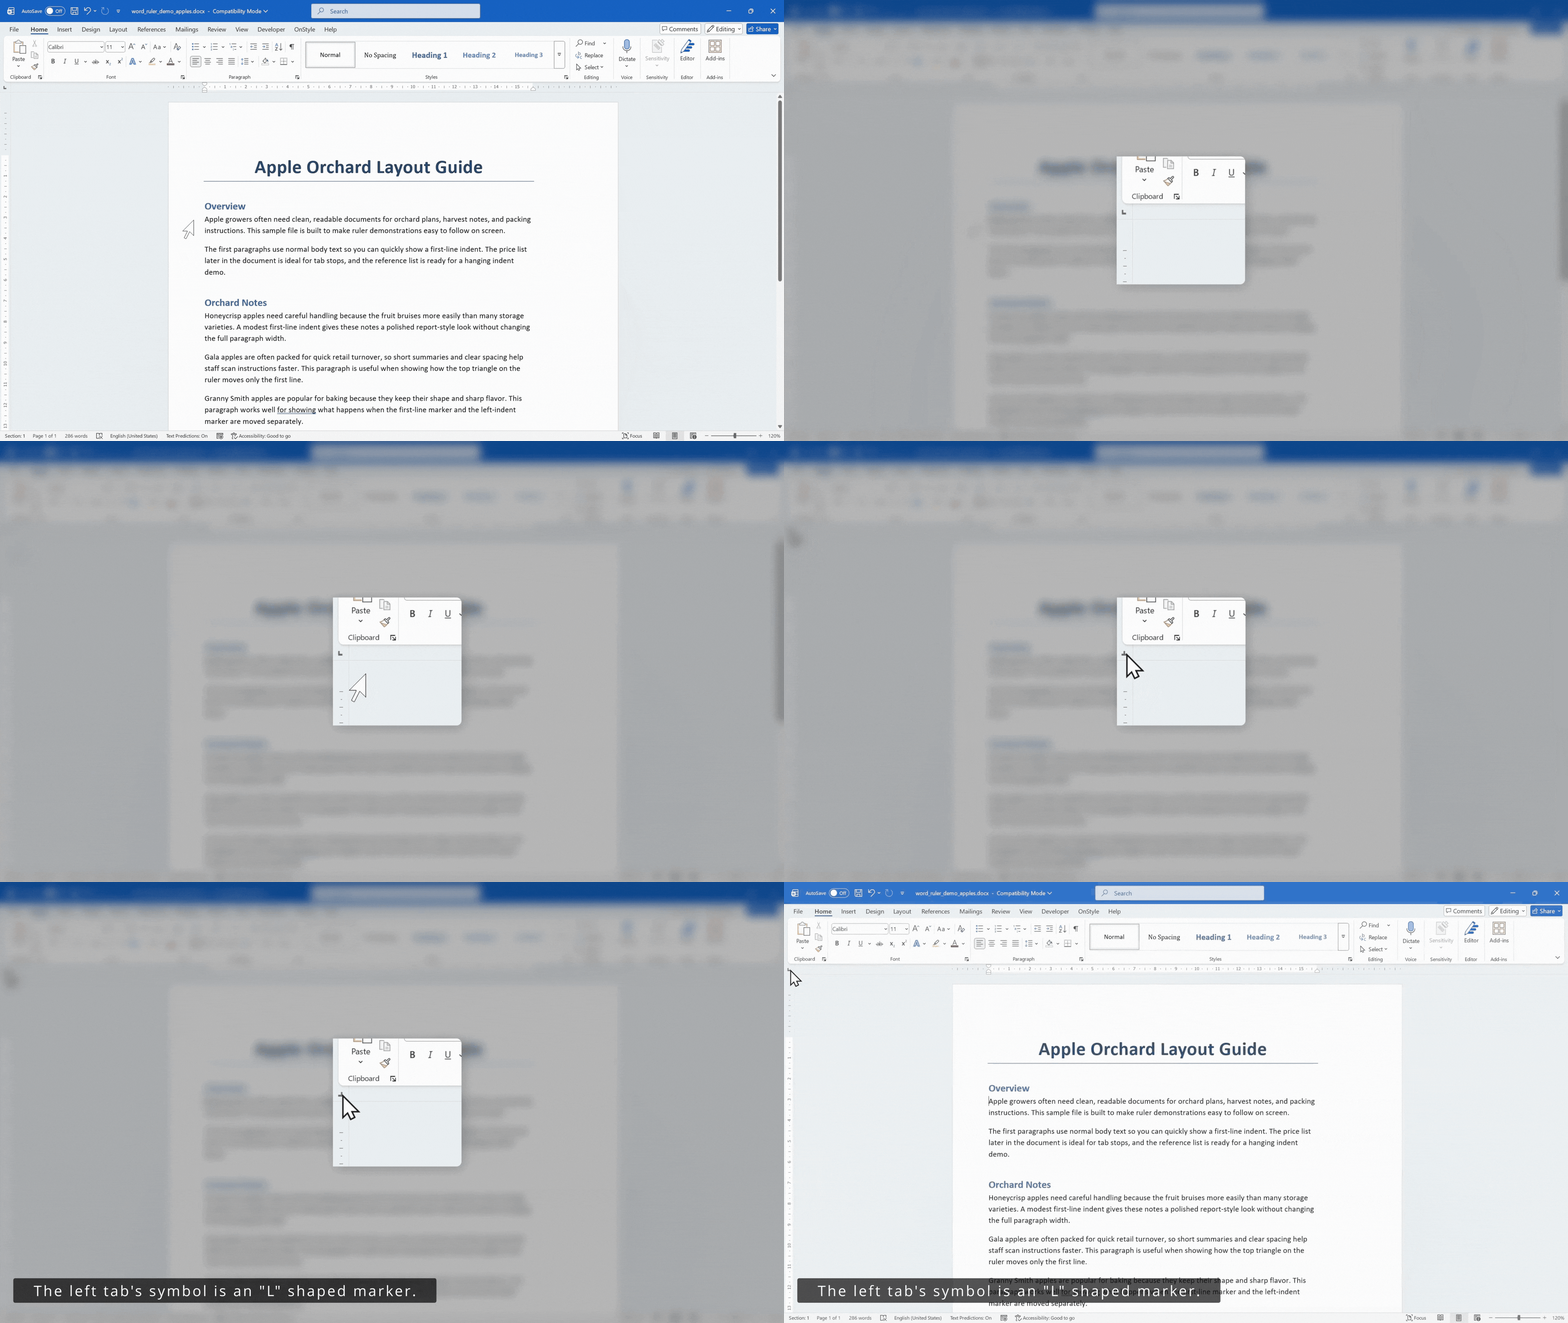
Section titled “Step 1: Choose a Tab Type”At the far left of the ruler, select the tab selector to cycle through the available tab types.
- Left tab
- Center tab
- Right tab
- Decimal tab
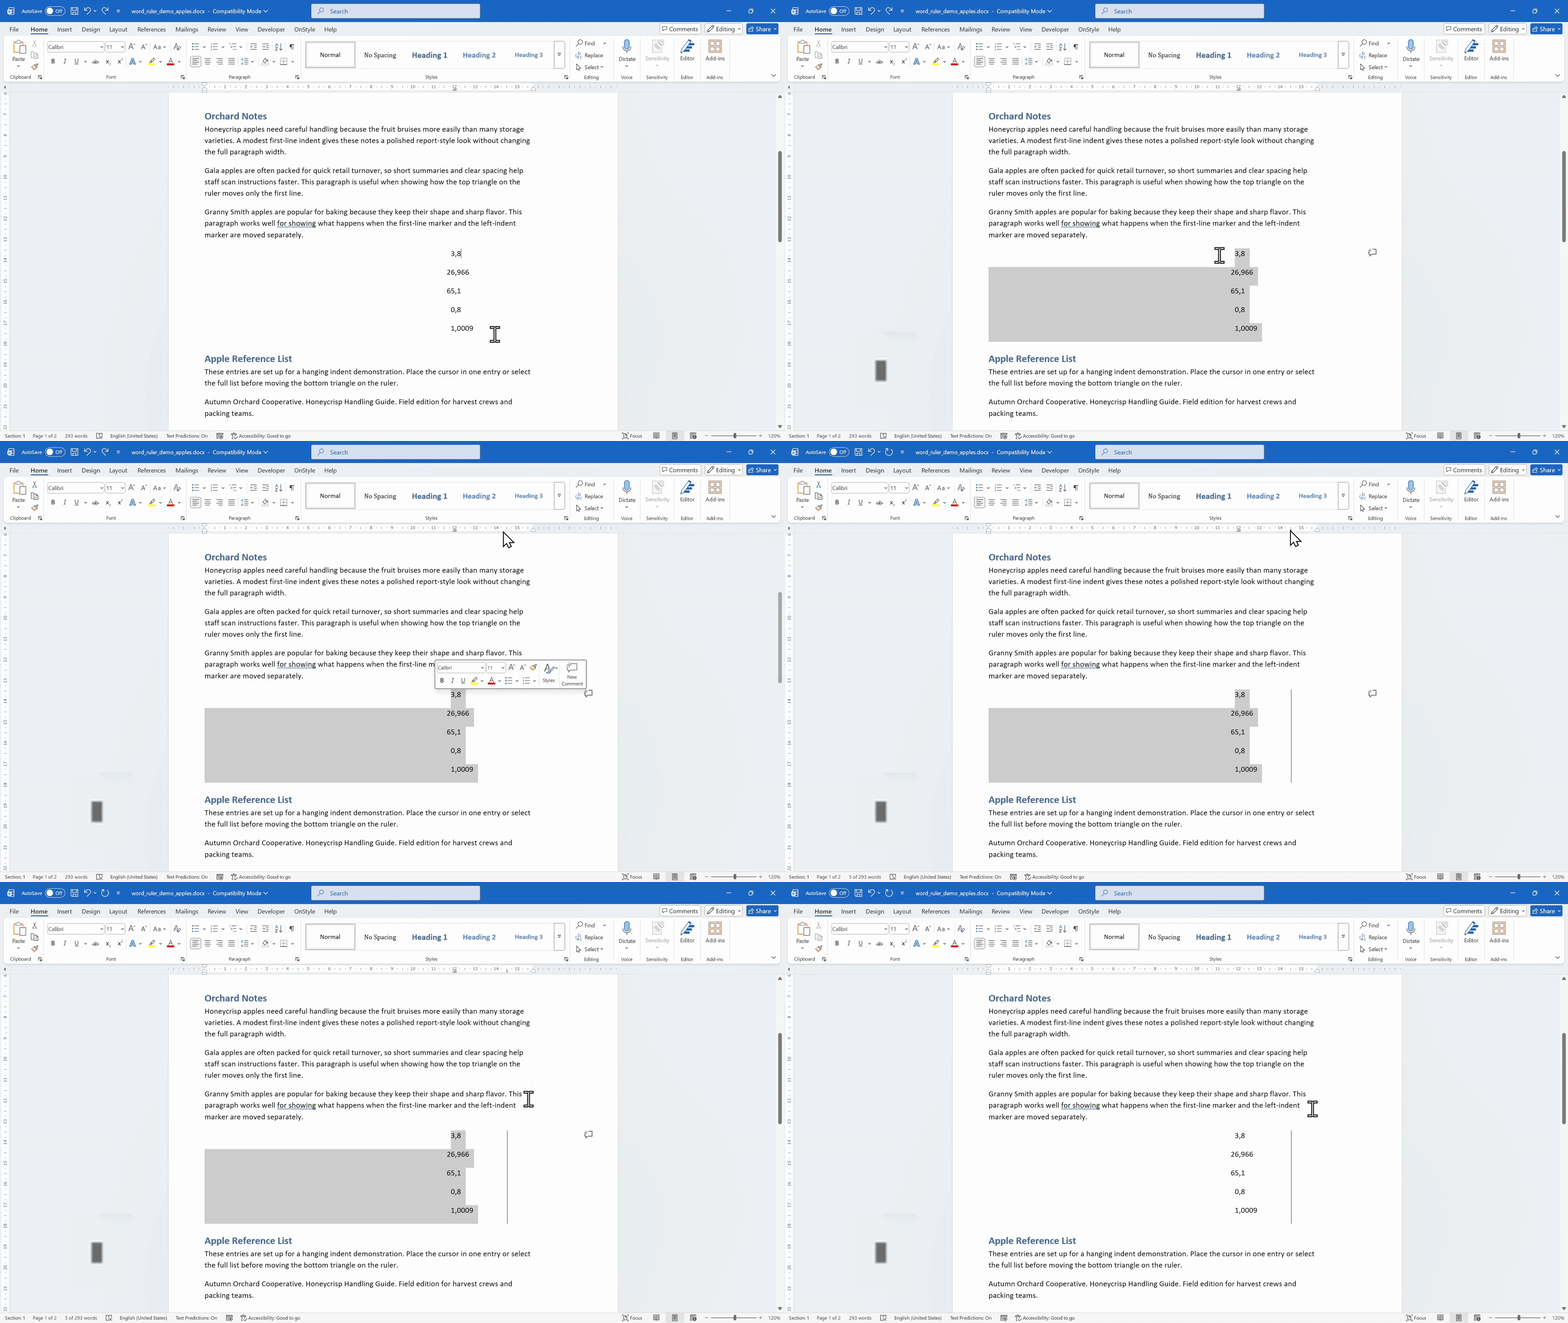
- Bar tab
Step 2: Add a Tab Stop
Section titled “Step 2: Add a Tab Stop”- Select the paragraph or place the cursor in the paragraph.
- Select the required tab type.
- Click the ruler where the tab stop should appear.
A tab stop belongs to the paragraph where the cursor is placed or to the selected paragraphs.
Step 3: Use the Tab Stop
Section titled “Step 3: Use the Tab Stop”- Place the cursor in the line.
- Press Tab.
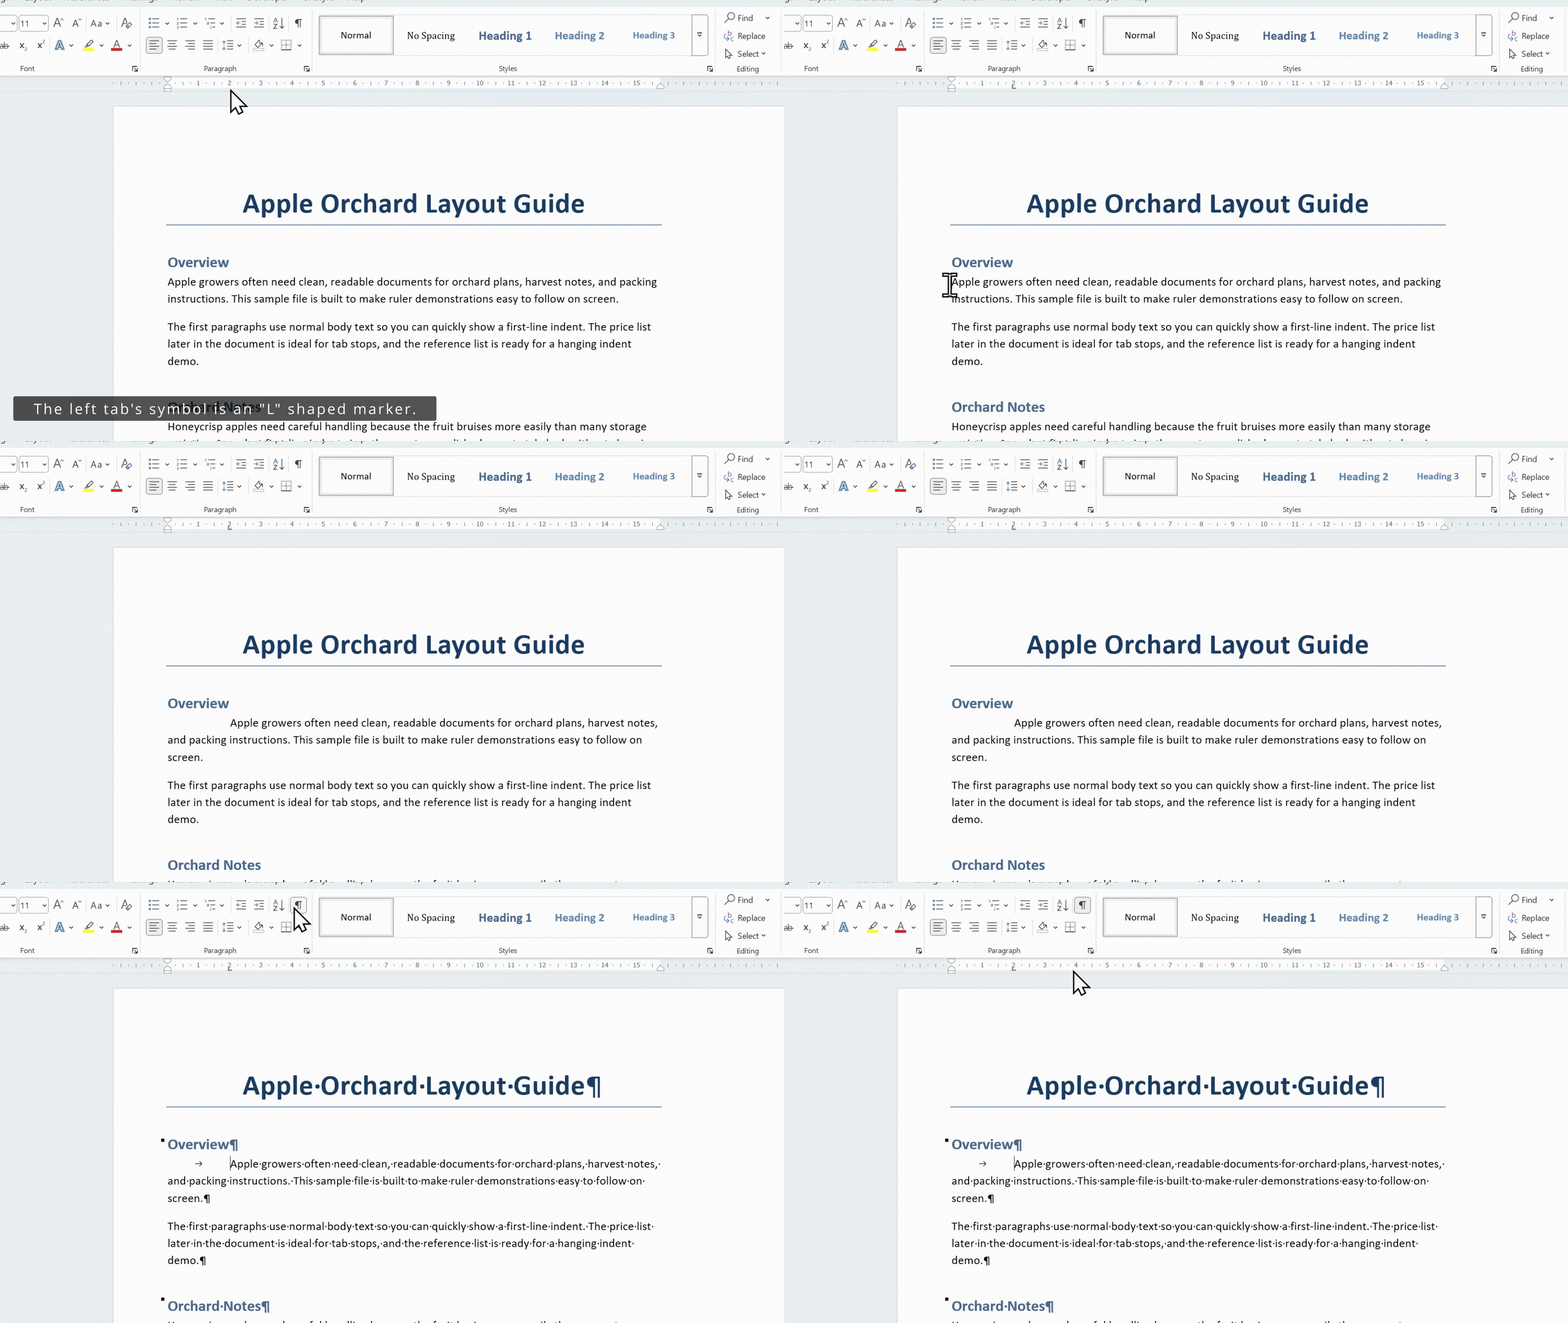
The cursor and following text move to the selected tab stop position.
Step 4: Show Tab Characters
Section titled “Step 4: Show Tab Characters”- On the Home tab of the Ribbon, in the Paragraph group, select Show/Hide ¶.
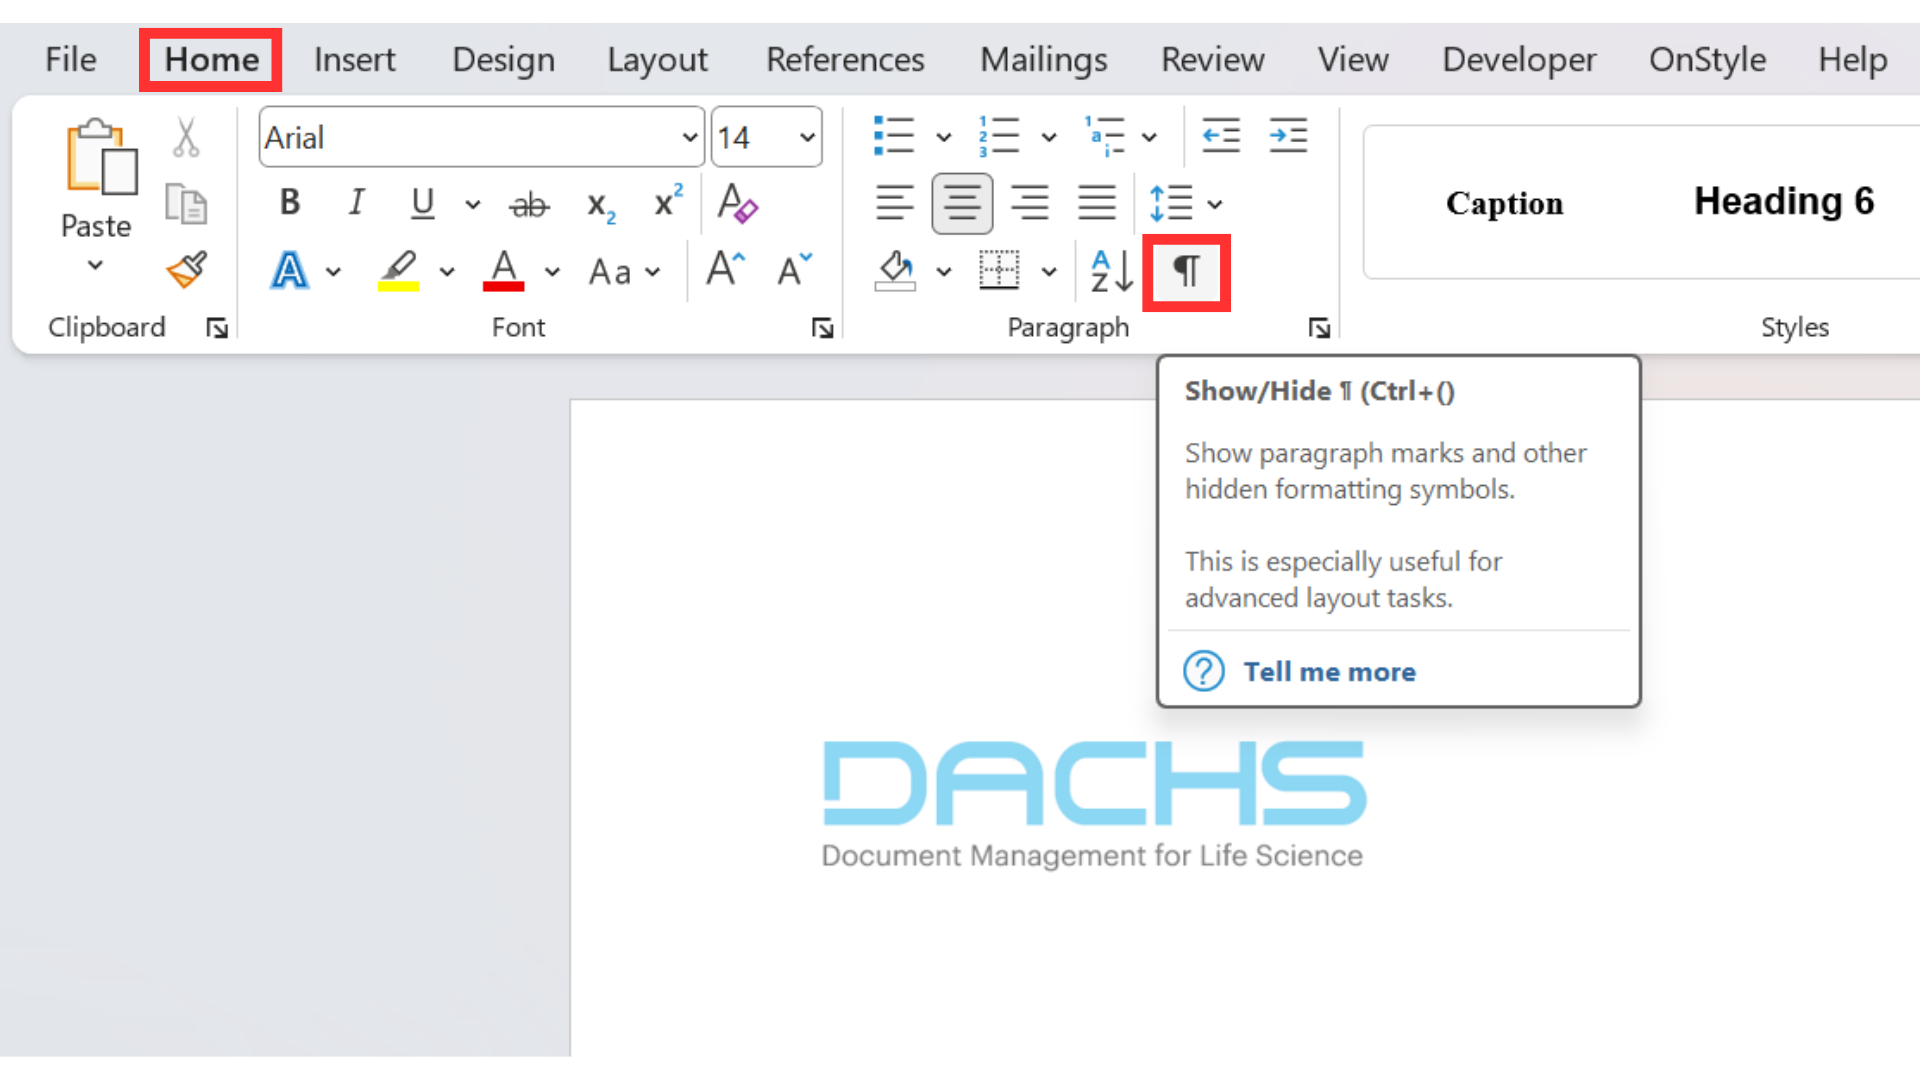
Tab characters appear as arrows. This helps identify whether text is aligned with tabs or with spaces.
Step 5: Remove a Tab Stop
Section titled “Step 5: Remove a Tab Stop”Drag the tab stop down off the ruler and release it.
All Tab Types in Microsoft Word Explained
Section titled “All Tab Types in Microsoft Word Explained”Different tab types align text in different ways. Choosing the correct tab type helps avoid manual spacing and inconsistent alignment.
- Left Tab: Text starts at the tab stop and continues to the right. This is the most common tab type.
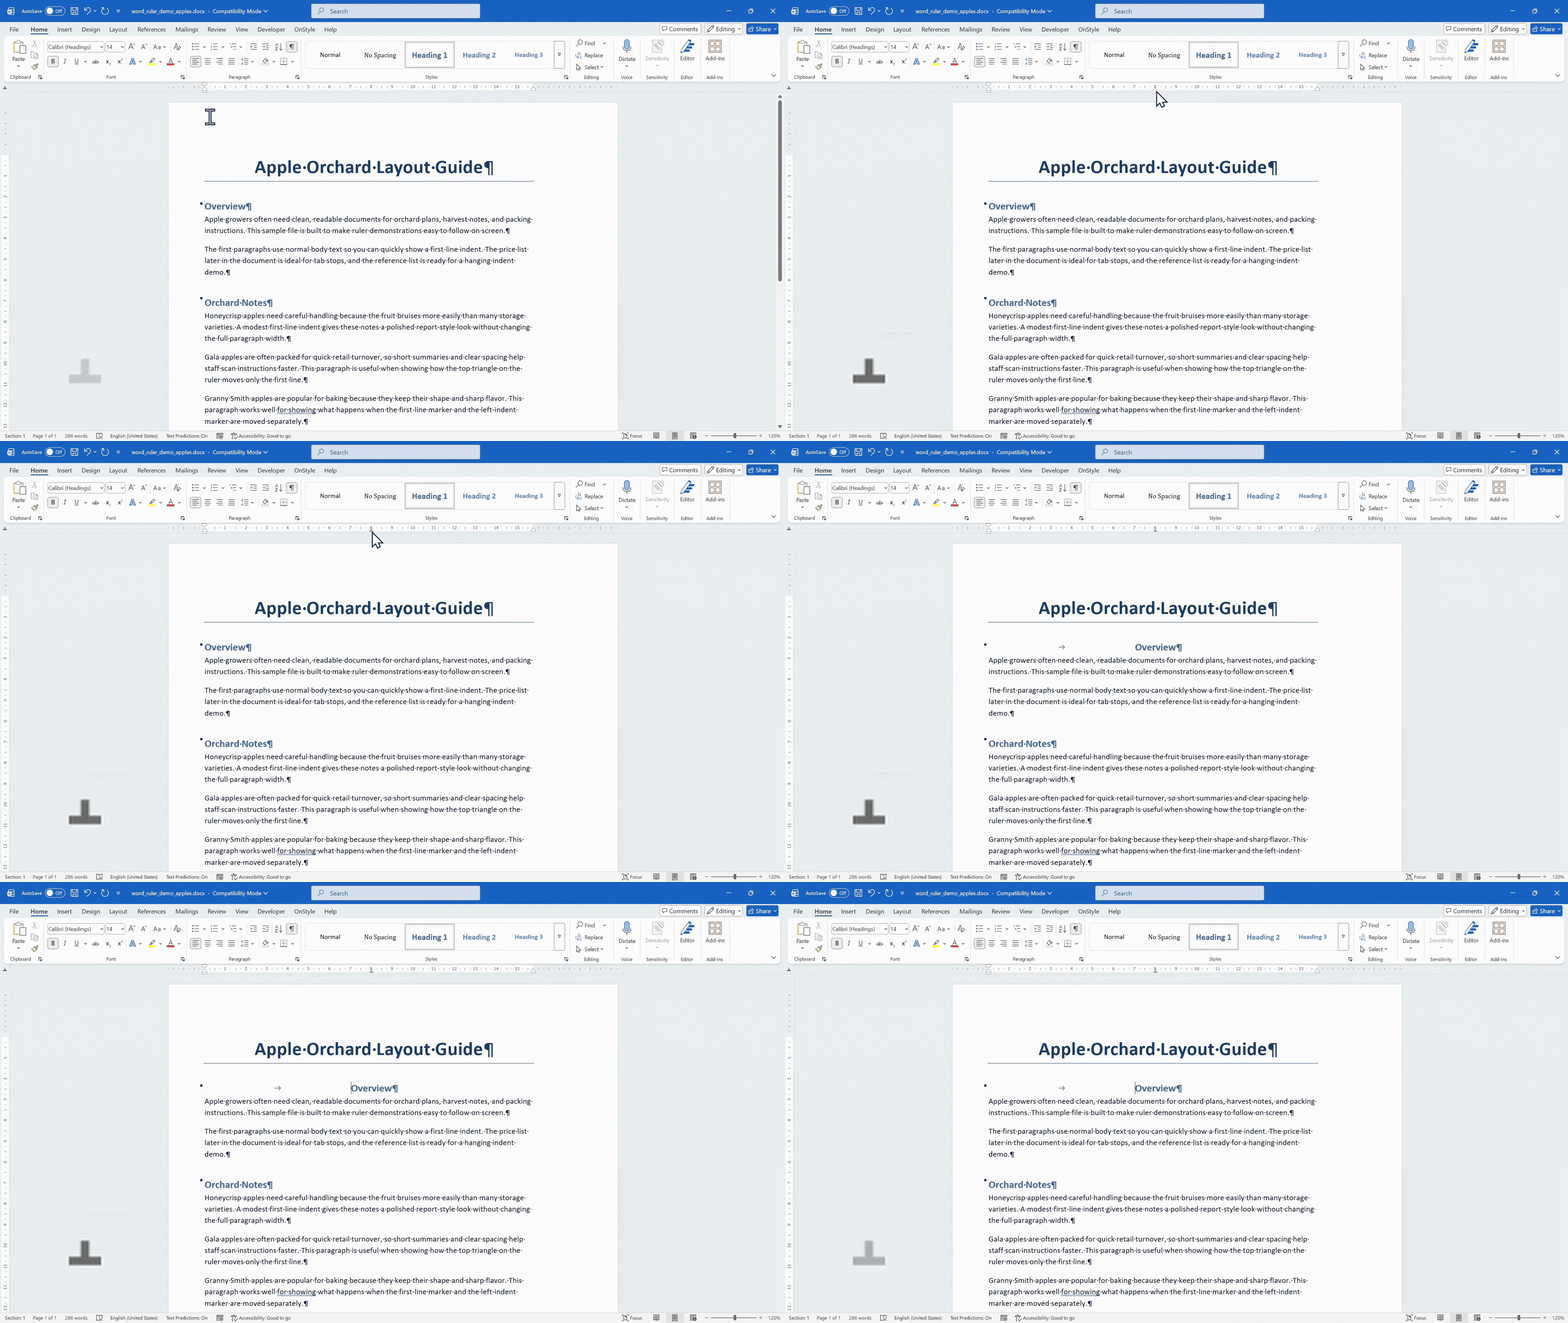
- Center Tab: Text is centered on the tab stop. This is useful for centered labels or short headings on a line.
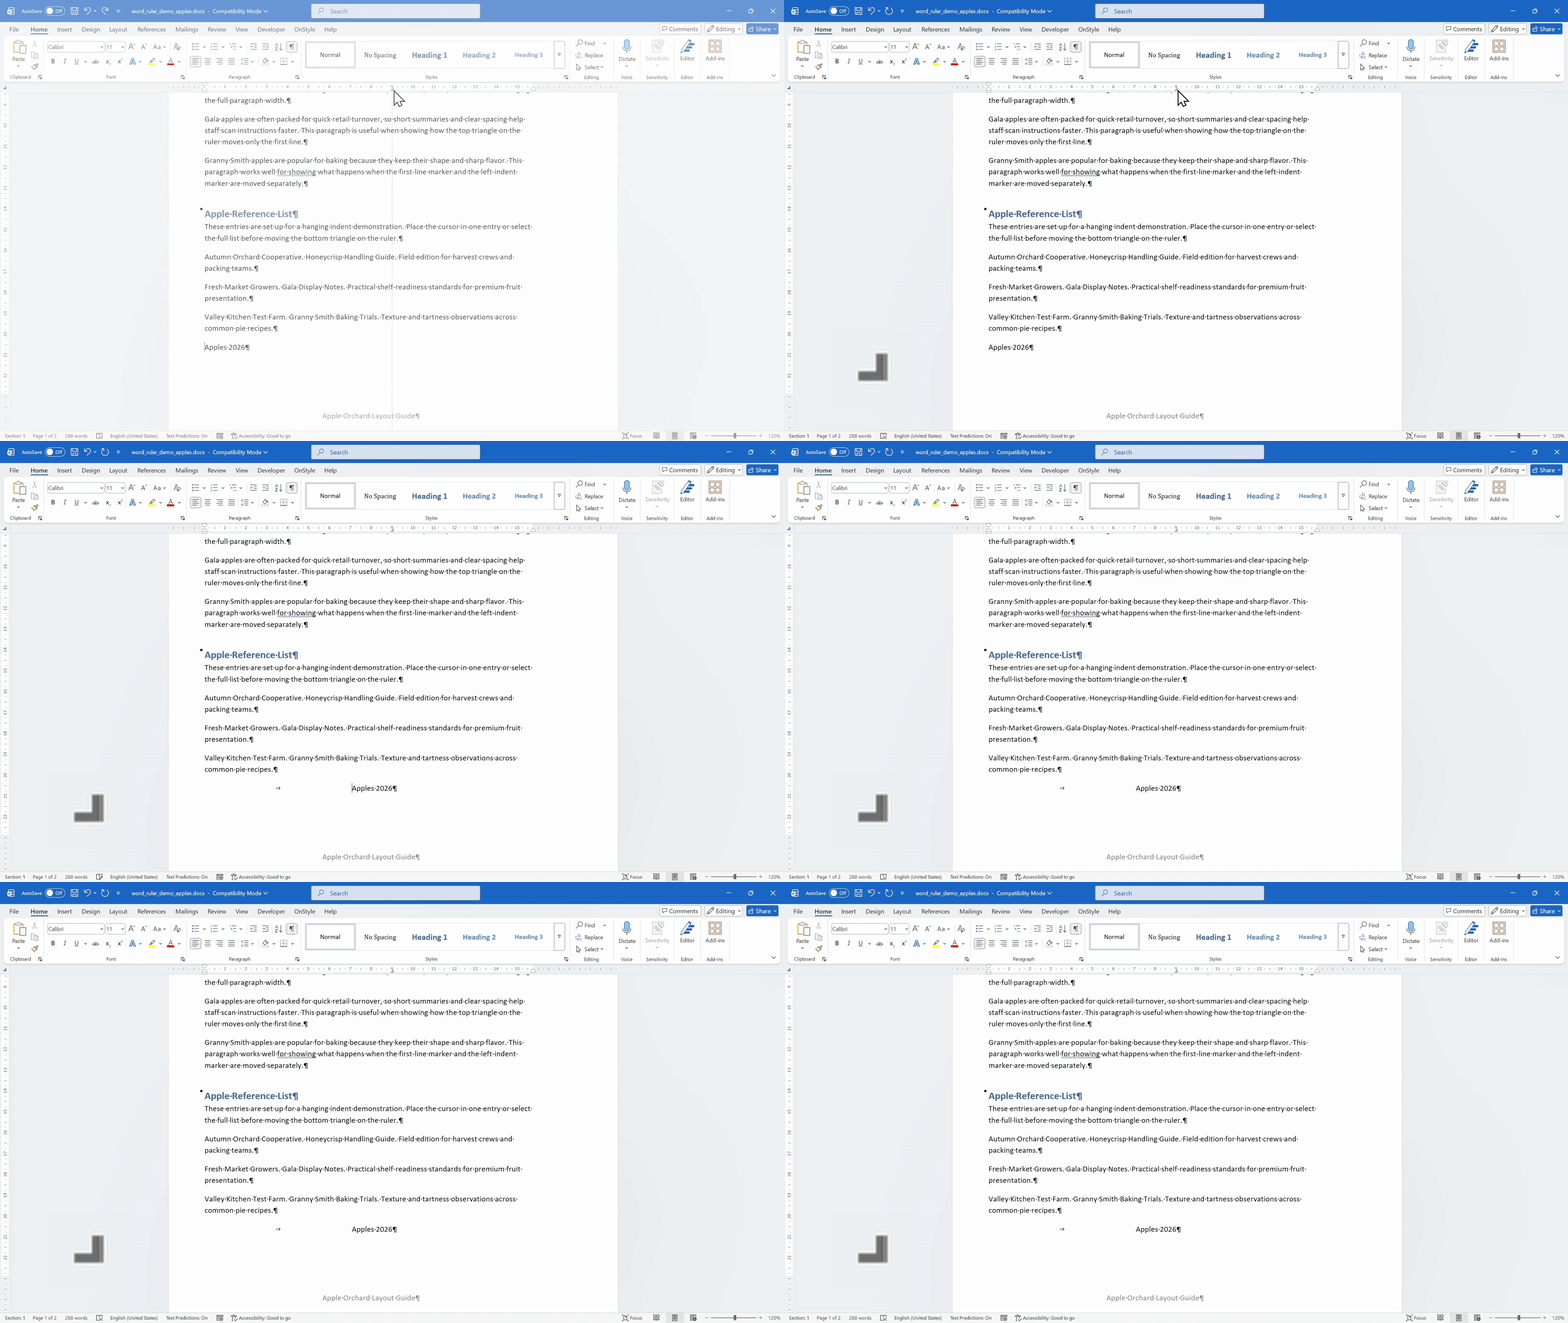
- Right Tab: Text ends at the tab stop. This is useful for prices, dates, or short values aligned on the right edge.
- Decimal Tab: Numbers align by the decimal point. This is useful for prices or numerical values.
- Bar Tab: A vertical line is inserted at the tab position. This acts as a visual divider rather than a text-alignment tool.
Common Ruler Mistakes in Microsoft Word
Section titled “Common Ruler Mistakes in Microsoft Word”Ruler problems usually happen when the wrong marker or tool is used. These mistakes are common for beginners and can make formatting harder to control.
- Dragging the wrong ruler marker.
- Moving the rectangle instead of the upper or lower triangle.
- Using tabs when a table would work better.
- Forgetting to select multiple paragraphs before adjusting indents.
- Using spaces instead of tabs.
- Confusing margins with paragraph indents.
Tabs are useful for simple alignment. For more complex layouts, a table is usually more reliable. Spaces should not be used to align text because the alignment can break when the font, margin, or page size changes.
Troubleshooting Ruler Problems in Word
Section titled “Troubleshooting Ruler Problems in Word”If the vertical ruler does not appear after selecting Ruler, open Word Options and enable the vertical ruler in Print Layout view.
If a paragraph shifts unexpectedly while adjusting indents, reset the markers and move them one at a time.
If placement looks slightly inaccurate while dragging, hold Alt for more precise positioning.
Summary
Section titled “Summary”Learning how to use the ruler in Word can be useful to show and adjust margins, first-line indents, hanging indents, right indents, and tab stops. The horizontal ruler is especially useful for paragraph formatting, while the vertical ruler helps with page positioning.
The upper triangle controls the first-line indent, the lower triangle controls the hanging indent, and the small rectangle moves the entire left indent. Tab stops align text without using spaces, and margins should be used only for page layout changes.
Once each marker and tab type is understood, the ruler becomes one of the fastest tools for creating cleaner, more consistent formatting in Microsoft Word.