
How to Use Heading Styles in Word
Why Heading Styles Matter in Microsoft Word
Section titled “Why Heading Styles Matter in Microsoft Word”If your Word document has section titles that are only bold, larger, or manually formatted, they may look like headings, but Word does not treat them as real document structure. Knowing how to use heading styles in Wordmatters because real heading styles tell Word what a main section is, what a subsection is, and how the document is organized.
A real heading uses a built-in style such as Heading 1, Heading 2, or Heading 3. If you click inside a title and the Styles gallery still shows Normal, that title is only manually formatted text. Word does not understand it as part of the document structure.
Heading styles control structure and formatting at the same time. This is why they are useful for navigation, automatic tables of contents, consistent formatting, heading numbering, document review, and long-document editing.
How to Check Whether Headings Are Real Word Headings
Section titled “How to Check Whether Headings Are Real Word Headings”Step 1: Open the Navigation Pane. Go to the View tab and select Navigation Pane.

Step 2: Check whether your headings appear. If the titles in the document are only manually formatted, they may not appear correctly in the Navigation Pane.
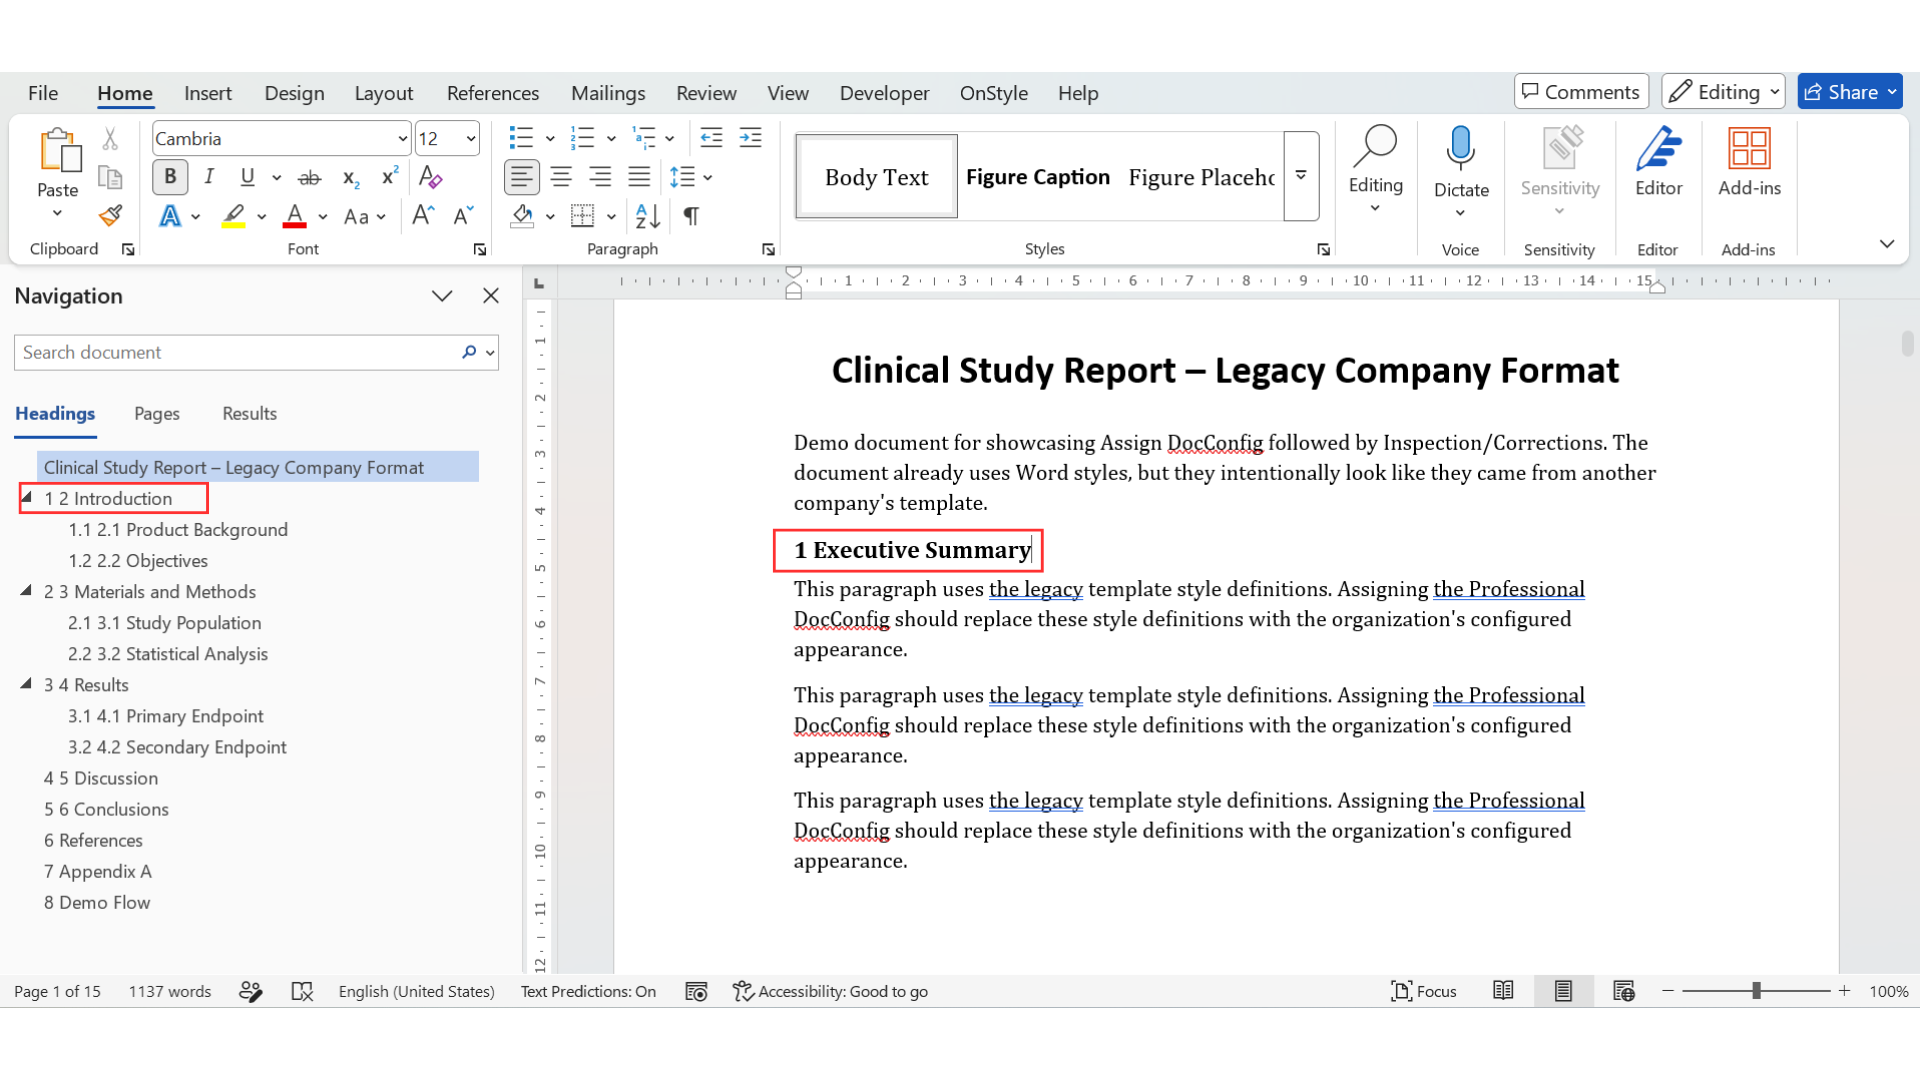
Step 3: Check the Styles gallery. Click inside a section title and look at the Styles gallery on the Home tab. If Word shows Normal, the text is not a real heading yet.

This quick check helps you find fake headings before they cause problems with navigation, table of contents creation, or document structure.
How to Apply Heading Styles in Word
Section titled “How to Apply Heading Styles in Word”The basic workflow for how to use heading styles in Word starts on the Home tab. Instead of making titles manually bold or large, apply a heading style from the Styles gallery.
Step 1: Select the first main section title. Highlight the text that should become a main section heading.
Step 2: Apply Heading 1. On the Home tab, in the Styles gallery, select Heading 1. The text is now a real Word heading, not just manually formatted text.
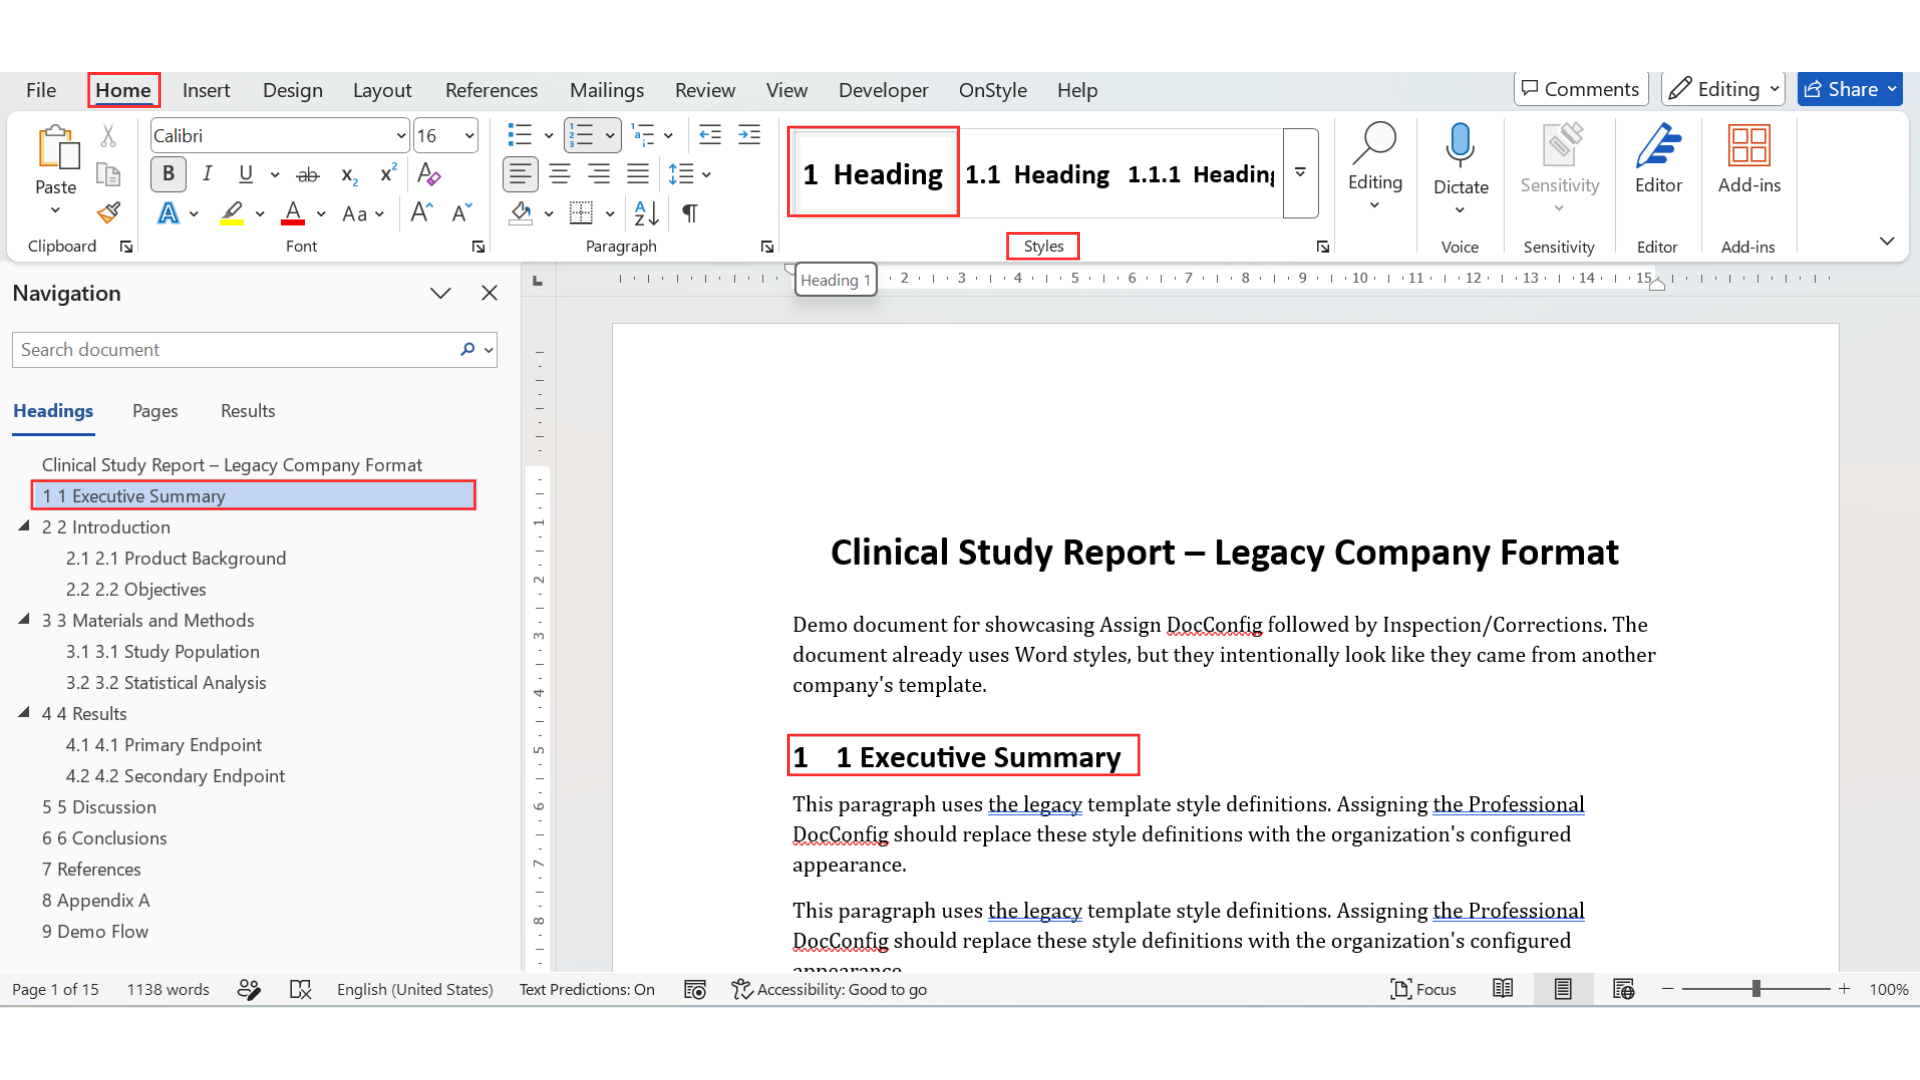
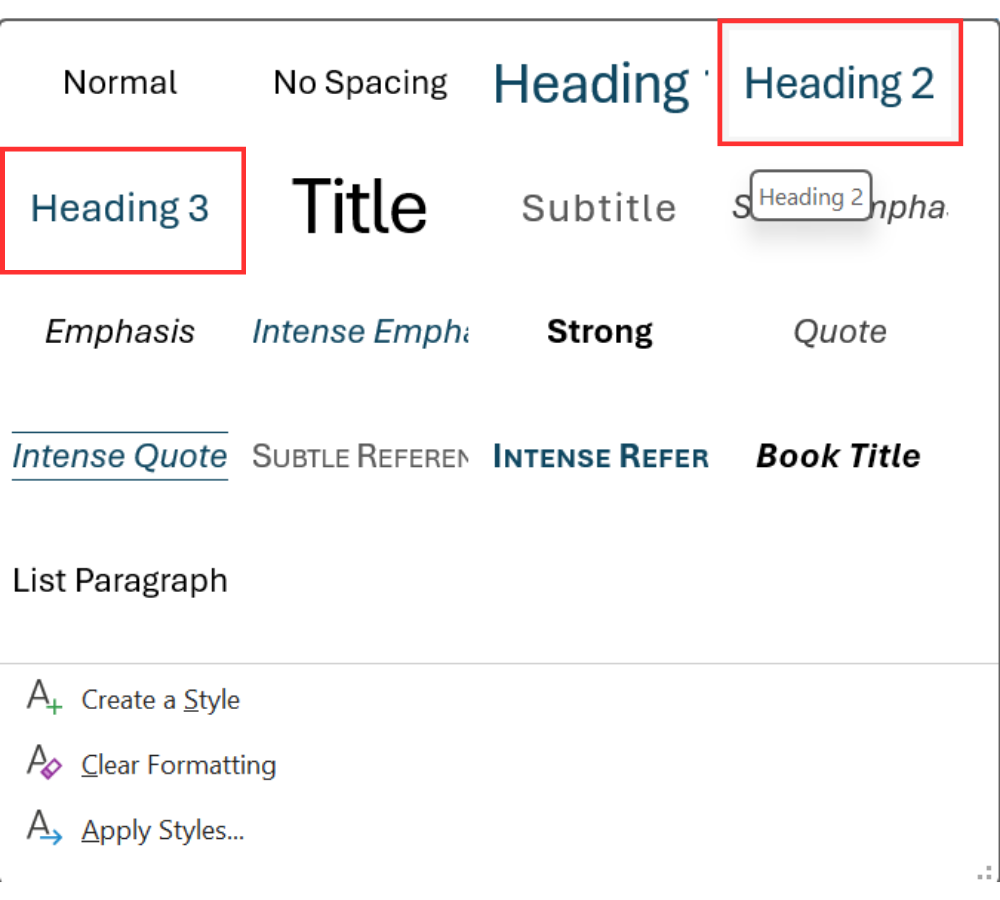
Step 3: Apply Heading 2 to subsections. Select a smaller section under the main topic and choose Heading 2.
Step 4: Apply Heading 3 to lower-level sections. Use Heading 3 for smaller sections inside a Heading 2 section.
Step 5: Repeat through the document. Use Heading 1 for the biggest sections, Heading 2 for sections inside those sections, and Heading 3 for smaller sections inside Heading 2.
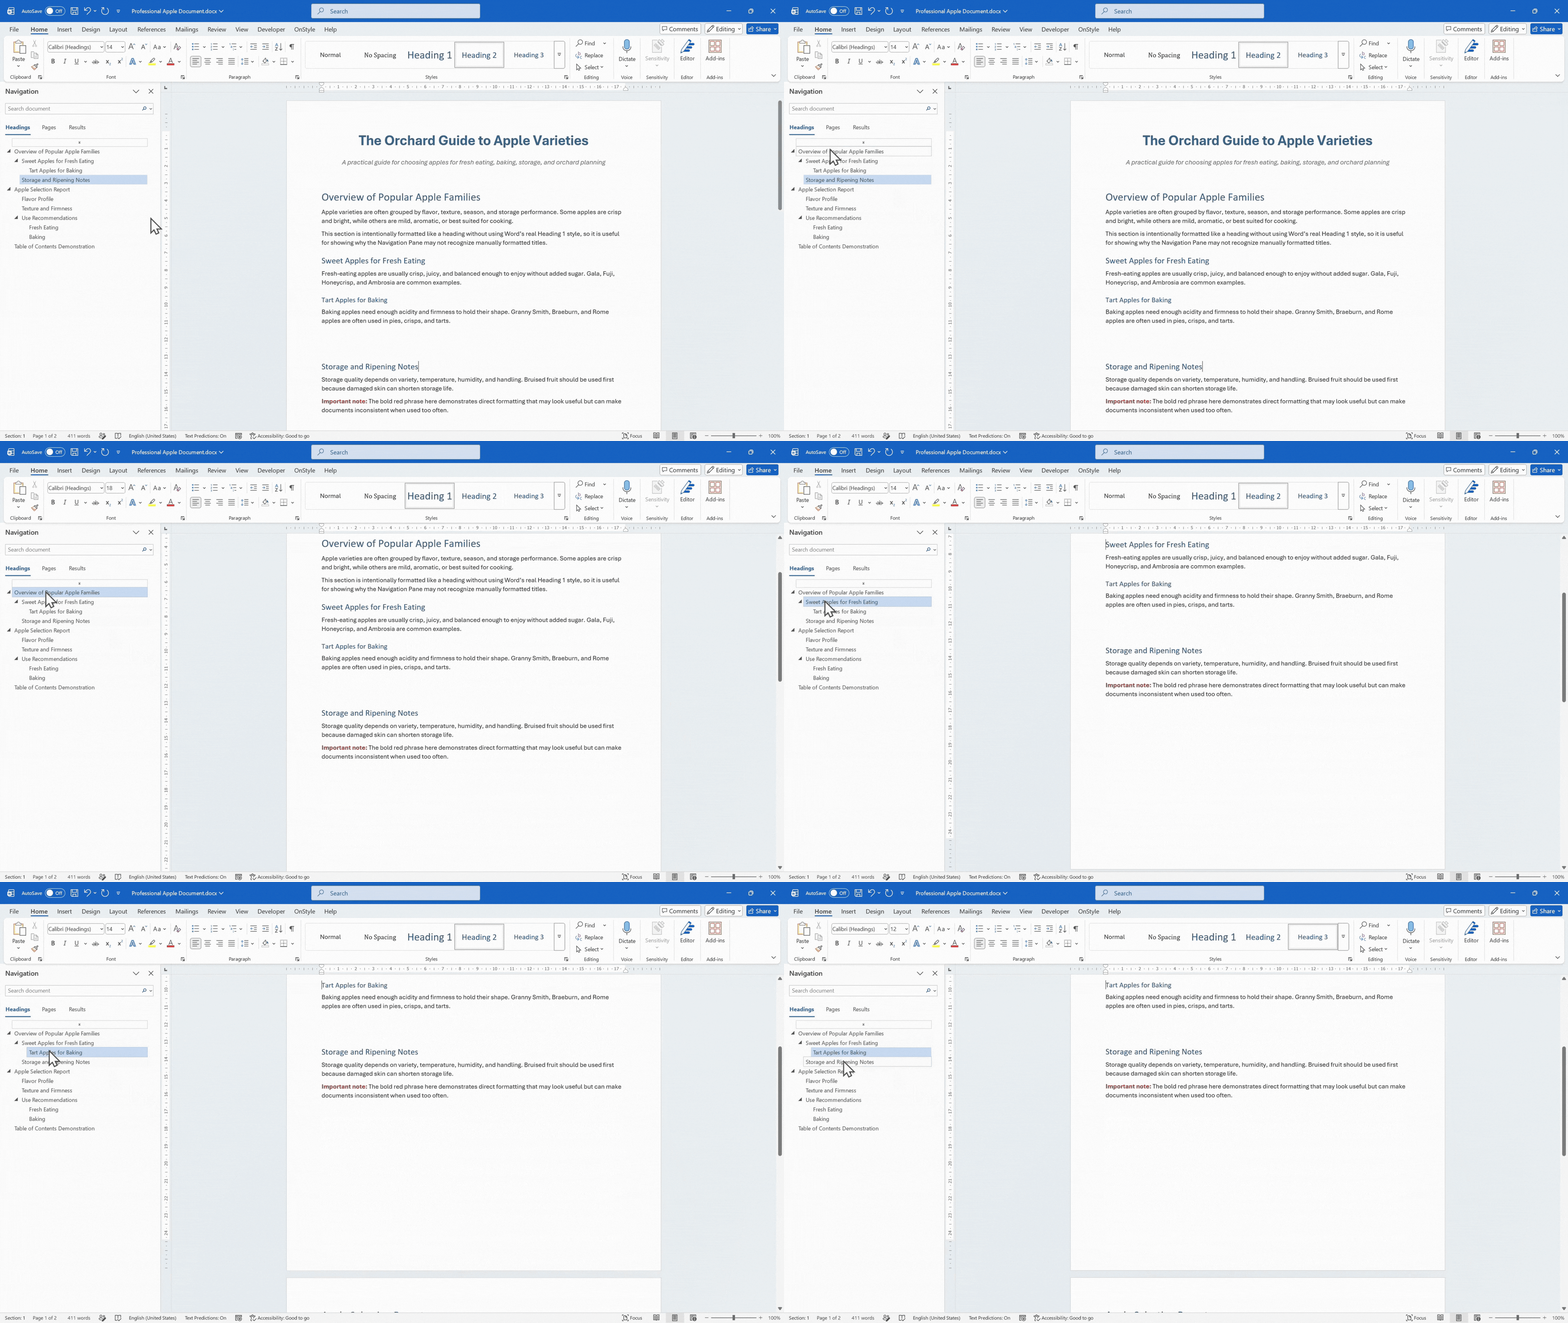
After heading styles are applied, the Navigation Pane becomes useful. You can click a heading and jump straight to that part of the document.
How to Add Automatic Numbering to Headings in Word
Section titled “How to Add Automatic Numbering to Headings in Word”If you want headings that are automatically numbered, such as 1, 1.1, and 1.1.1, use a multilevel list that is linked to heading styles. Do not type heading numbers manually.
Step 1: Apply the heading styles first. Use Heading 1, Heading 2, and Heading 3 before adding numbering.
Step 2: Click inside a Heading 1 paragraph. Place the cursor inside one of your Heading 1 headings.
Step 3: Open the Multilevel List menu. On the Home tab, open the Multilevel List menu.
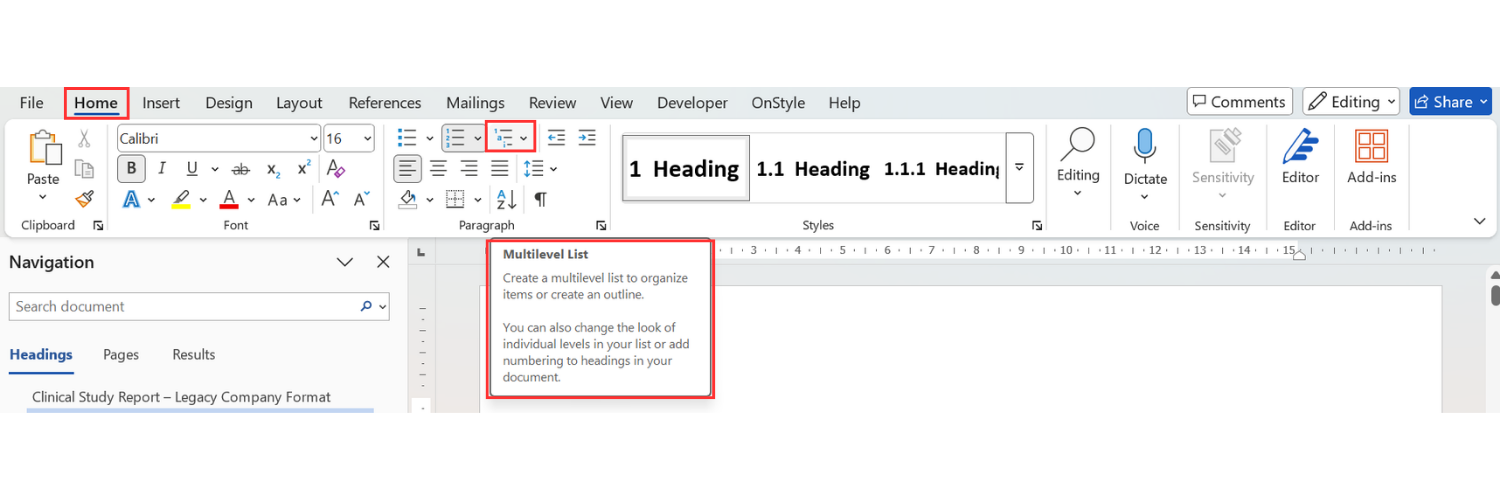
Step 4: Choose a heading numbering format. Select a format that is linked to the heading styles. In the preview, look for numbering connected to Heading 1, Heading 2, and lower heading levels.
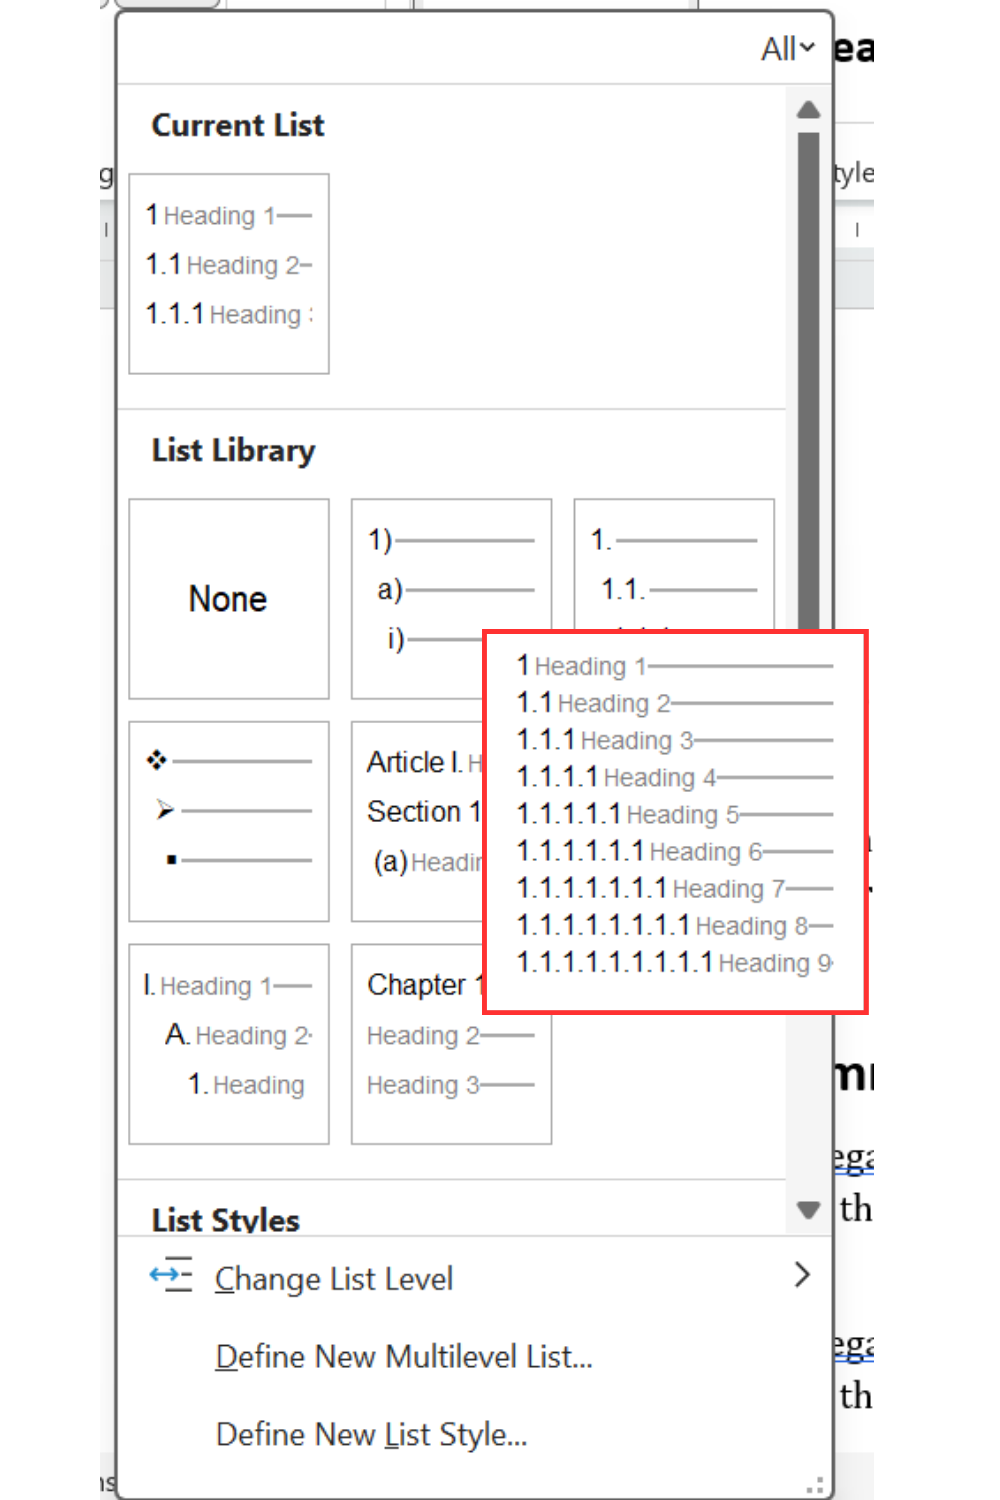
After you apply the numbering format, Word connects numbering to the document structure. If you insert a new section or reorganize the document, Word updates the heading numbering automatically.
How to Modify Heading Styles in Word
Section titled “How to Modify Heading Styles in Word”Default heading styles work, but they may not match the design you want. The best way to change a heading is not to manually format each one. Instead, update the style.
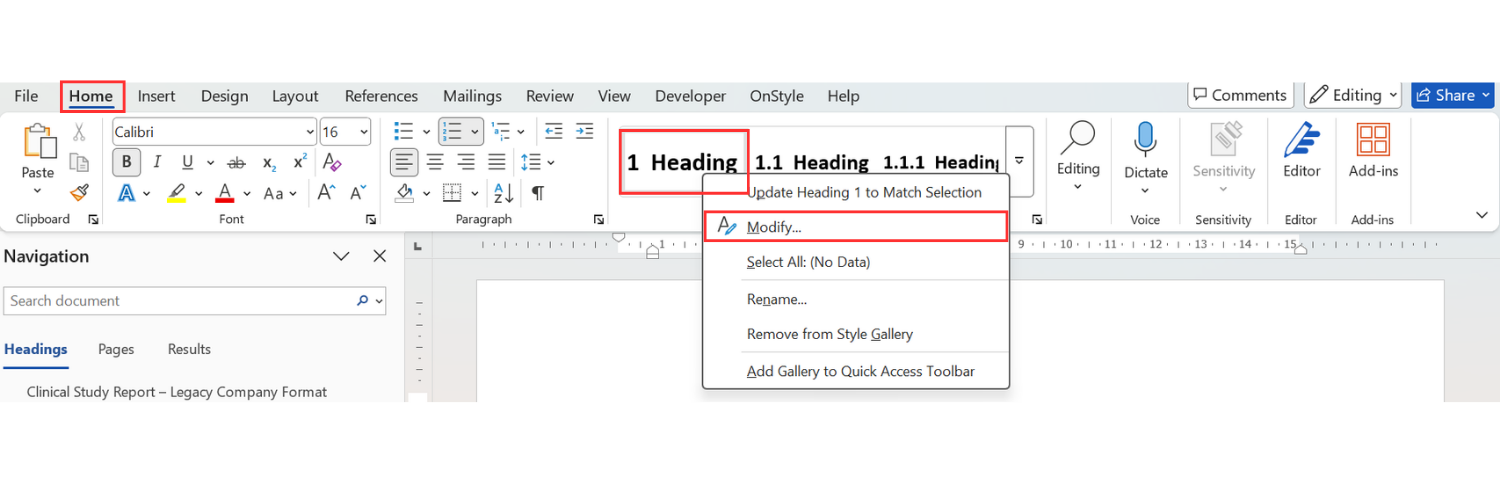
Step 1: Open the style menu. On the Home tab, right-click Heading 1 in the Styles gallery.
Step 2: Choose Modify. Select Modify to open the style settings.
Step 3: Change the formatting. Adjust the font, size, color, bold setting, spacing, or other formatting options. For more control, open the Format drop-down menu.
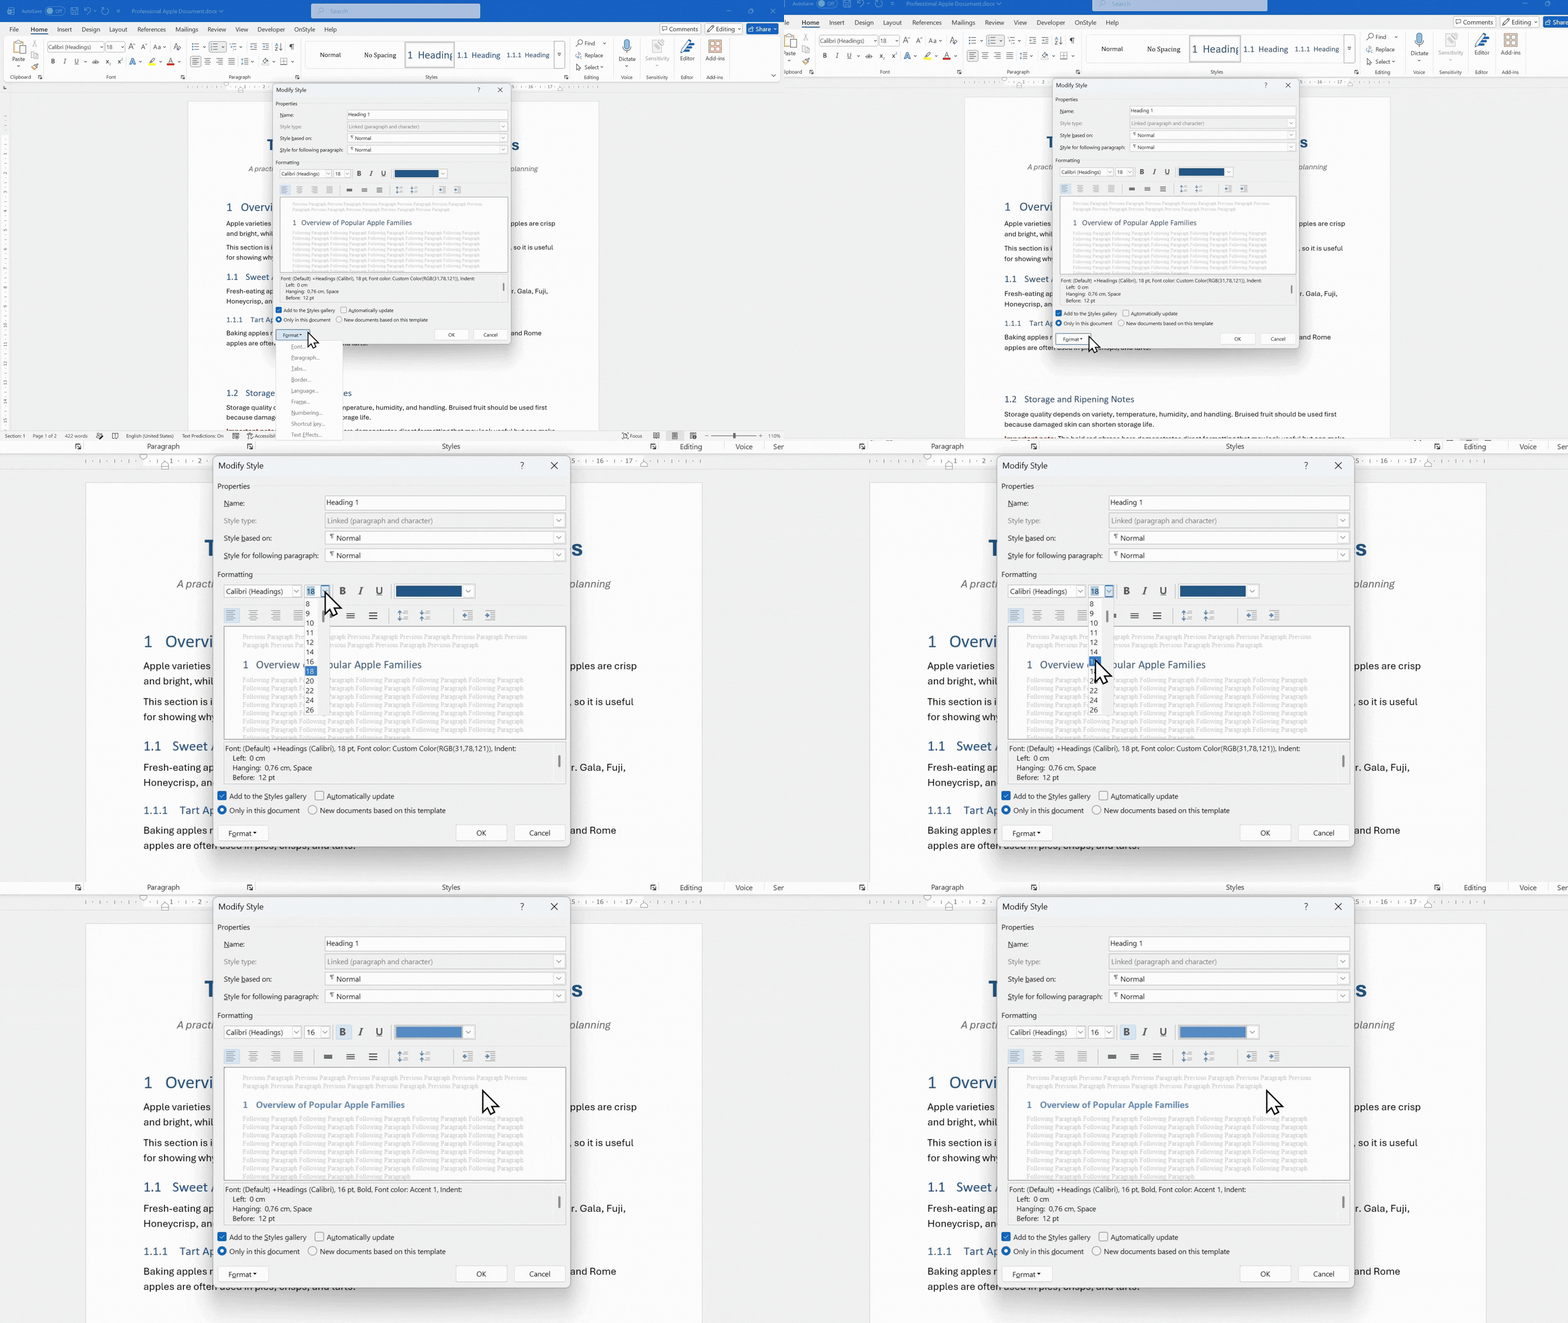
Step 4: Choose where the change applies. Select Only in this document if the change should apply only to the current file. Choose the option for New documents based on this template only if future documents should use the same heading style.
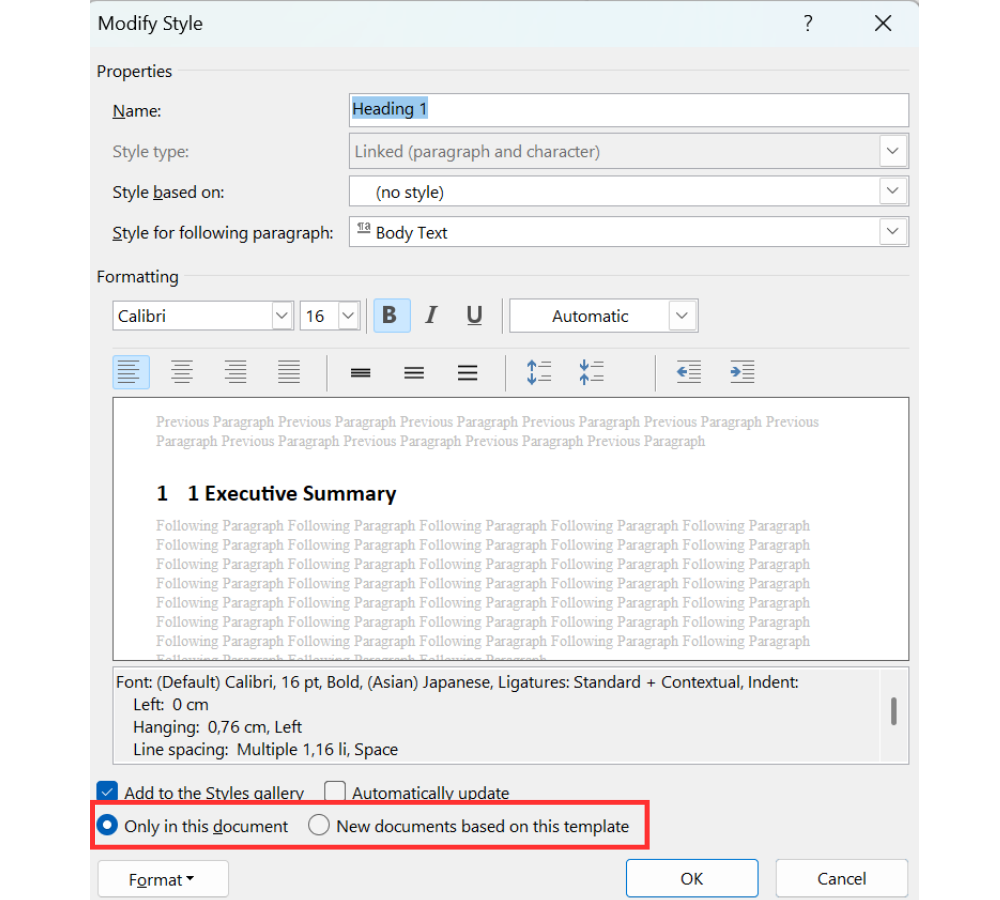
Step 5: Click OK. Every paragraph using Heading 1 updates at the same time.
This is the power of styles. You can update the appearance of all headings at one level without editing each heading one by one. Repeat the same process for Heading 2 or Heading 3 if needed.
How to Update a Heading Style to Match Selection
Section titled “How to Update a Heading Style to Match Selection”There is another quick way to customize a heading style when you already designed one heading visually.
Step 1: Select text that already uses the heading style. For example, select a paragraph formatted as Heading 2.
Step 2: Make the visual changes. Use the Font group on the Home tab to change the font, size, color, bold setting, or other visible formatting.
Step 3: Update the style from the selection. In the Styles gallery, right-click the highlighted style and choose Update Heading 2 to Match Selection.
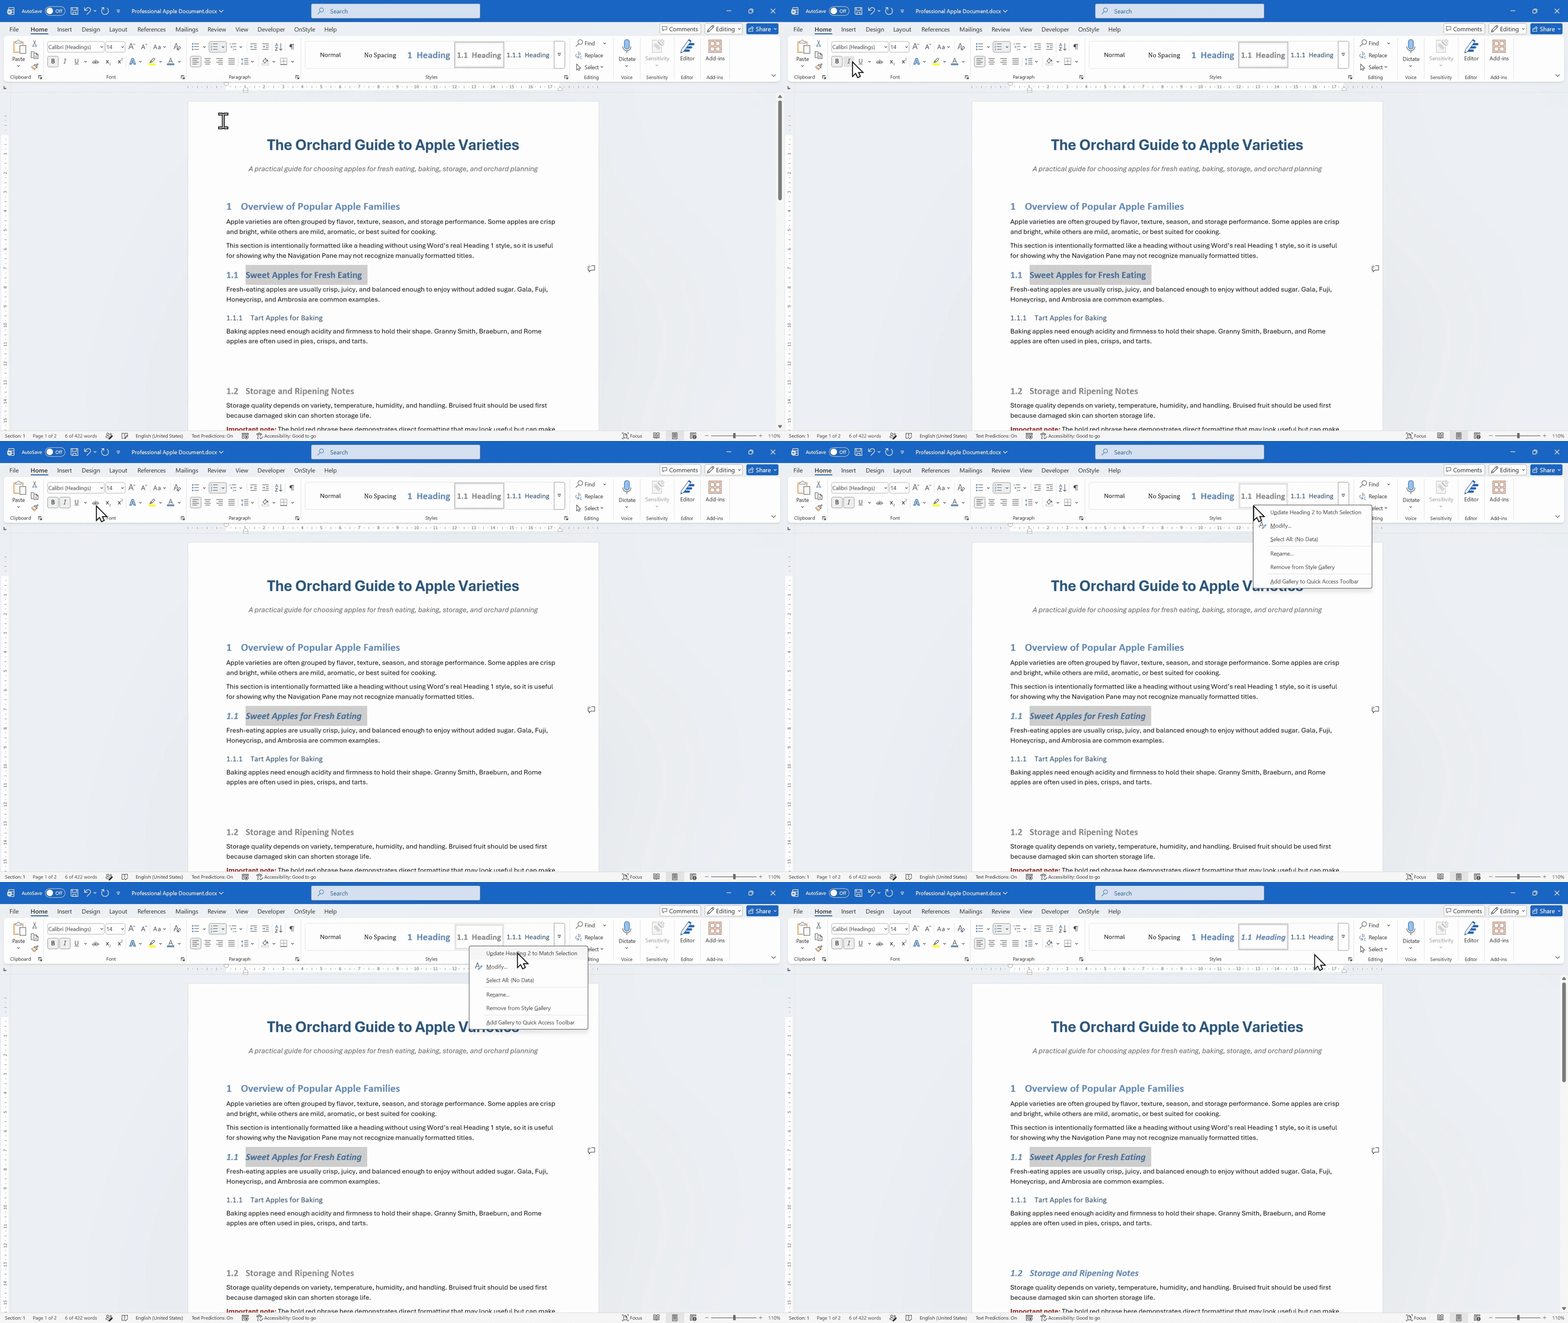
Word saves that design back into the style, and every paragraph with the same style updates to match. This is a fast way to design one heading visually and then apply that design consistently across the document.
How Heading Styles Appear in the Navigation Pane
Section titled “How Heading Styles Appear in the Navigation Pane”Once real heading styles are applied, Word automatically turns Heading 1, Heading 2, and Heading 3 into a clickable outline in the Navigation Pane.
Click any main heading to jump to that section. Click a subsection to move directly to that part of the document. You can also collapse and expand heading levels in the Navigation Pane to focus on the main structure.
In some versions of Word, you can drag headings in the Navigation Pane to reorganize sections. When you do this, always review the document afterward to make sure the correct content moved with the heading.
If your headings are also used for an automatic table of contents, update the table after reorganizing the document. See the related tutorial on how to create an automatic table of contents in Microsoft Word if you want Word to build the table from these heading styles.
How OnStyle Supports a Standardized Heading Workflow
Section titled “How OnStyle Supports a Standardized Heading Workflow”The native Word workflow is useful, but standardized professional documents often need stricter heading control. OnStyle is a Microsoft Word add-in that helps apply document standards and check formatting issues before the document is finalized.
Start by assigning the correct DocConfig. This step is optional for some OnStyle tools, but it is required for document standard functions such as configured heading styles, fonts, and layout settings. Once the DocConfig is assigned, use the configured heading styles instead of manually formatting headings.
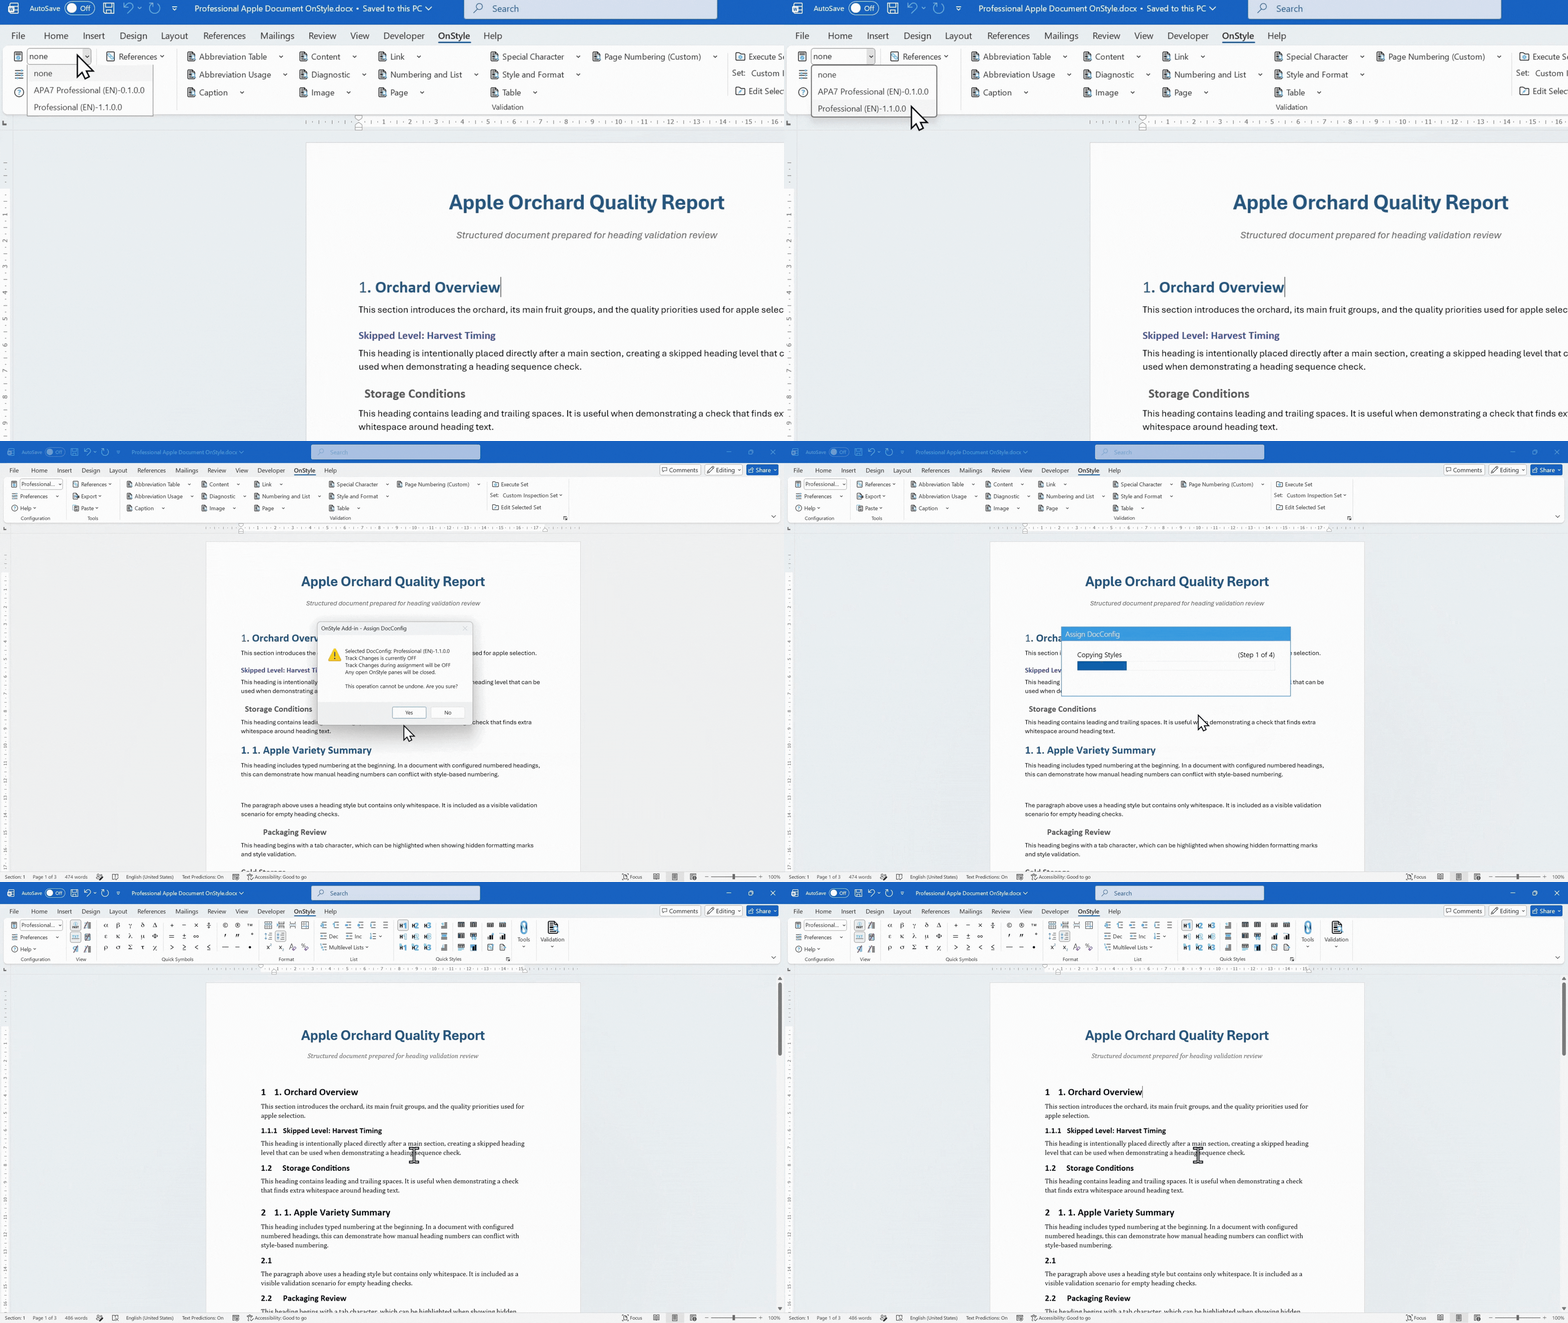
Step 1: Show style information if needed. In OnStyle, you can turn on Styles in the View group. This shows paragraph styles next to the document, so it is easier to see which text is already a real heading and which text only looks like one.
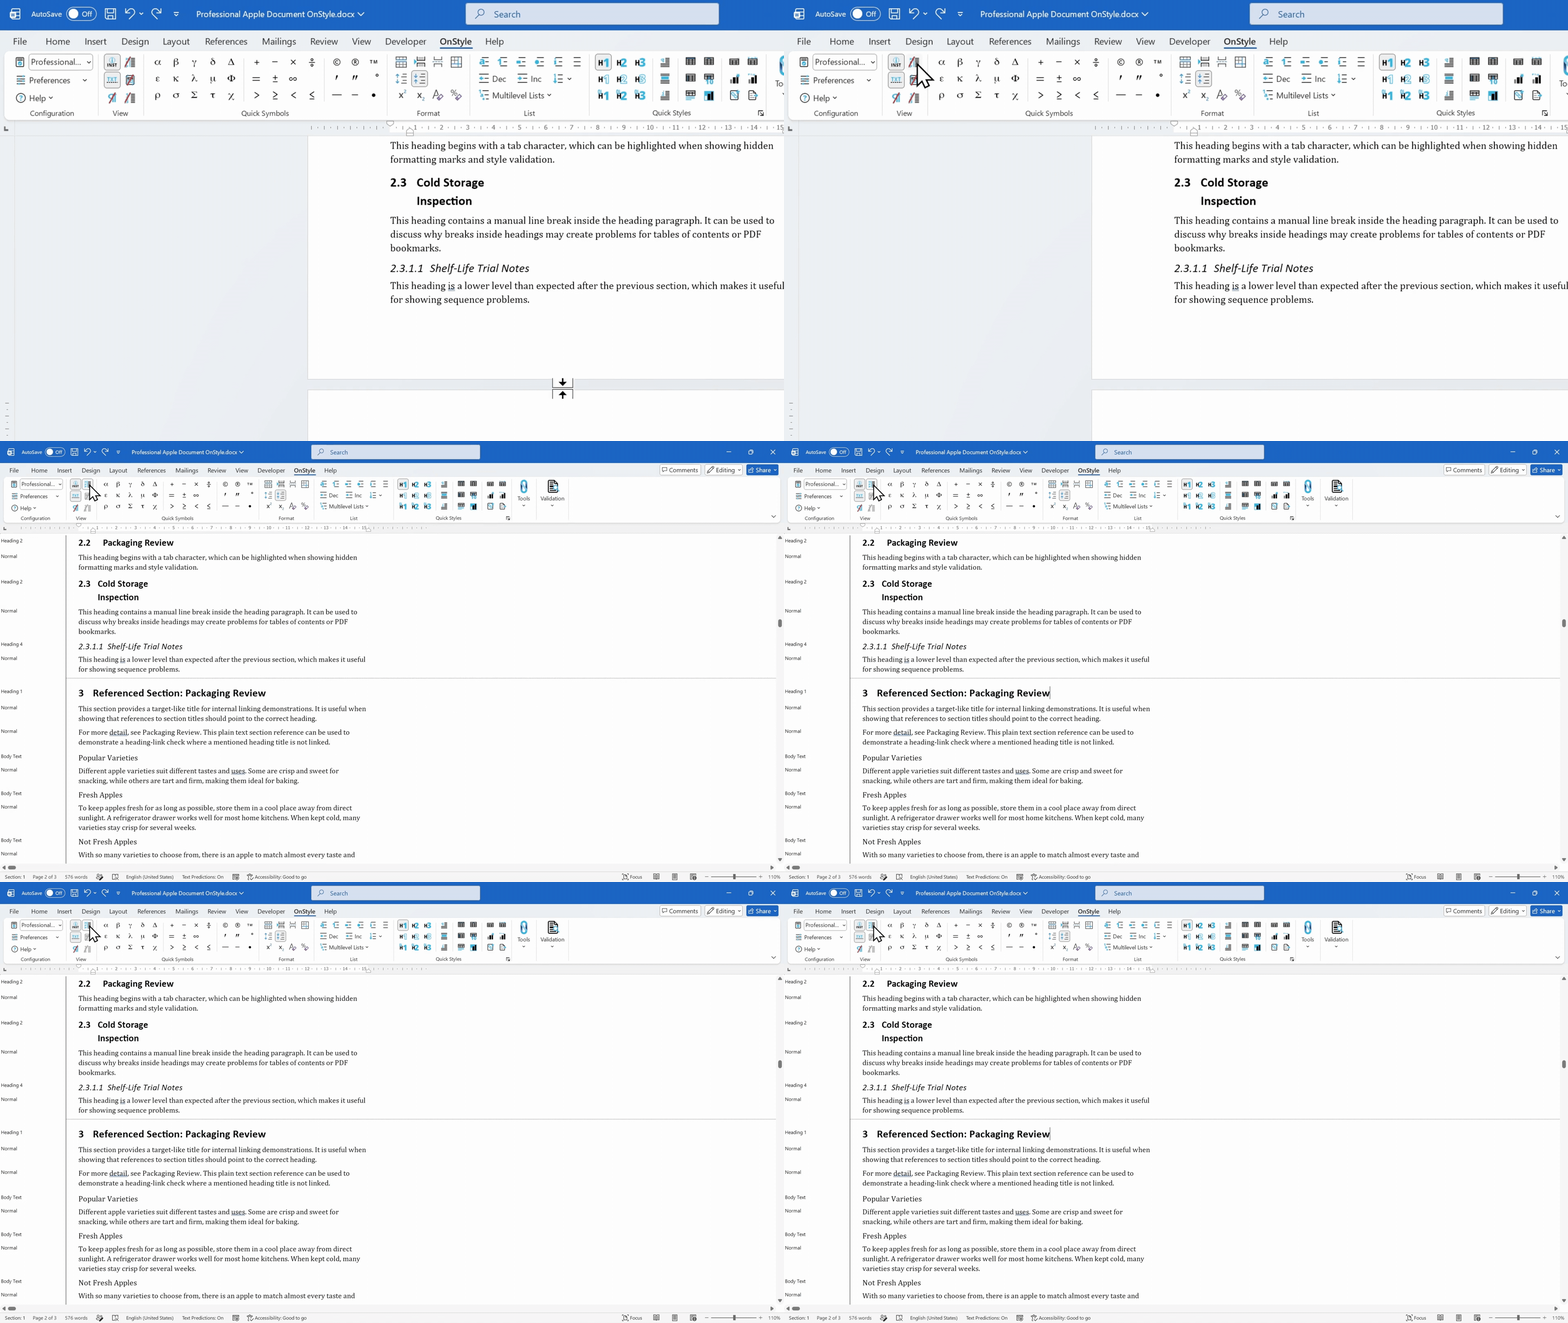
Step 2: Apply or insert configured heading styles. Use the Quick Styles group or the Headings tools to apply heading-related styles. The Headings area can apply pre-configured numbered headings and non-numbered headings.
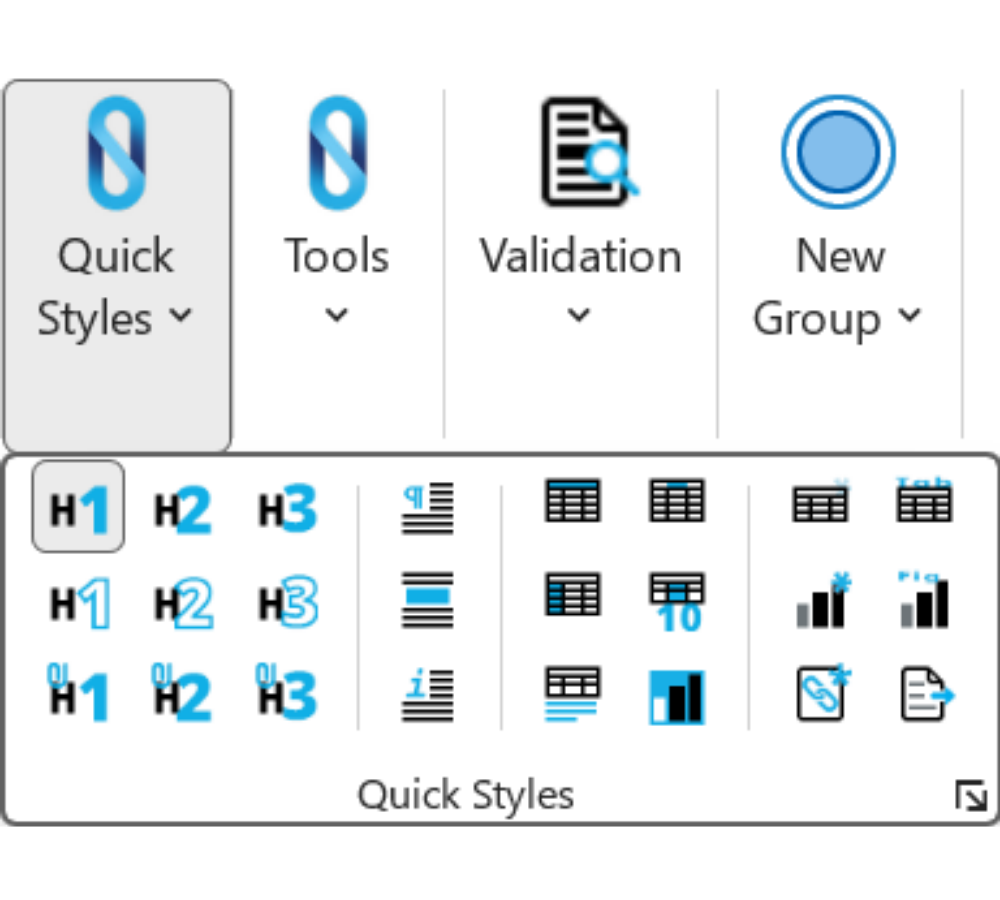
Step 3: Use the quick style indicators. When you click inside a paragraph, the matching Quick Styles button can show which configured style is currently active.
Step 4: Apply heading levels. Select the main section title and apply the configured Heading 1 style. Then select a subsection and apply Heading 2. For a lower-level subsection, apply Heading 3.
This is useful because the heading style is not only visually consistent. It is also part of the document structure expected by the assigned DocConfig.
OnStyle Heading Shortcuts
Section titled “OnStyle Heading Shortcuts”OnStyle also provides default heading shortcuts for faster heading application.
- Use Alt + 1 for Heading 1.
- Use Alt + 2 for Heading 2.
- Continue the same pattern up to Heading 5.
- For non-numbered headings, use Alt + Shift + 1 for NoNum Heading 1 and continue the same pattern up to level 5.
Hover the cursor over the Quick Styles buttons in the Ribbon to see the available shortcuts.
How to Switch Numbered and Non-Numbered Headings with OnStyle
Section titled “How to Switch Numbered and Non-Numbered Headings with OnStyle”Some documents contain mixed heading types, with numbered and non-numbered headings used inconsistently. OnStyle can convert heading styles uniformly instead of requiring manual changes.
Step 1: Open the heading tools. In OnStyle, go to Tools, then Headings.
Step 2: Select Switch Headings. Use Switch Headings to change heading styles uniformly to numbered or non-numbered versions.
Step 3: Choose the scope. If nothing is selected, OnStyle changes all heading styles in the document. If part of the document is selected, it changes only the headings in that selection.
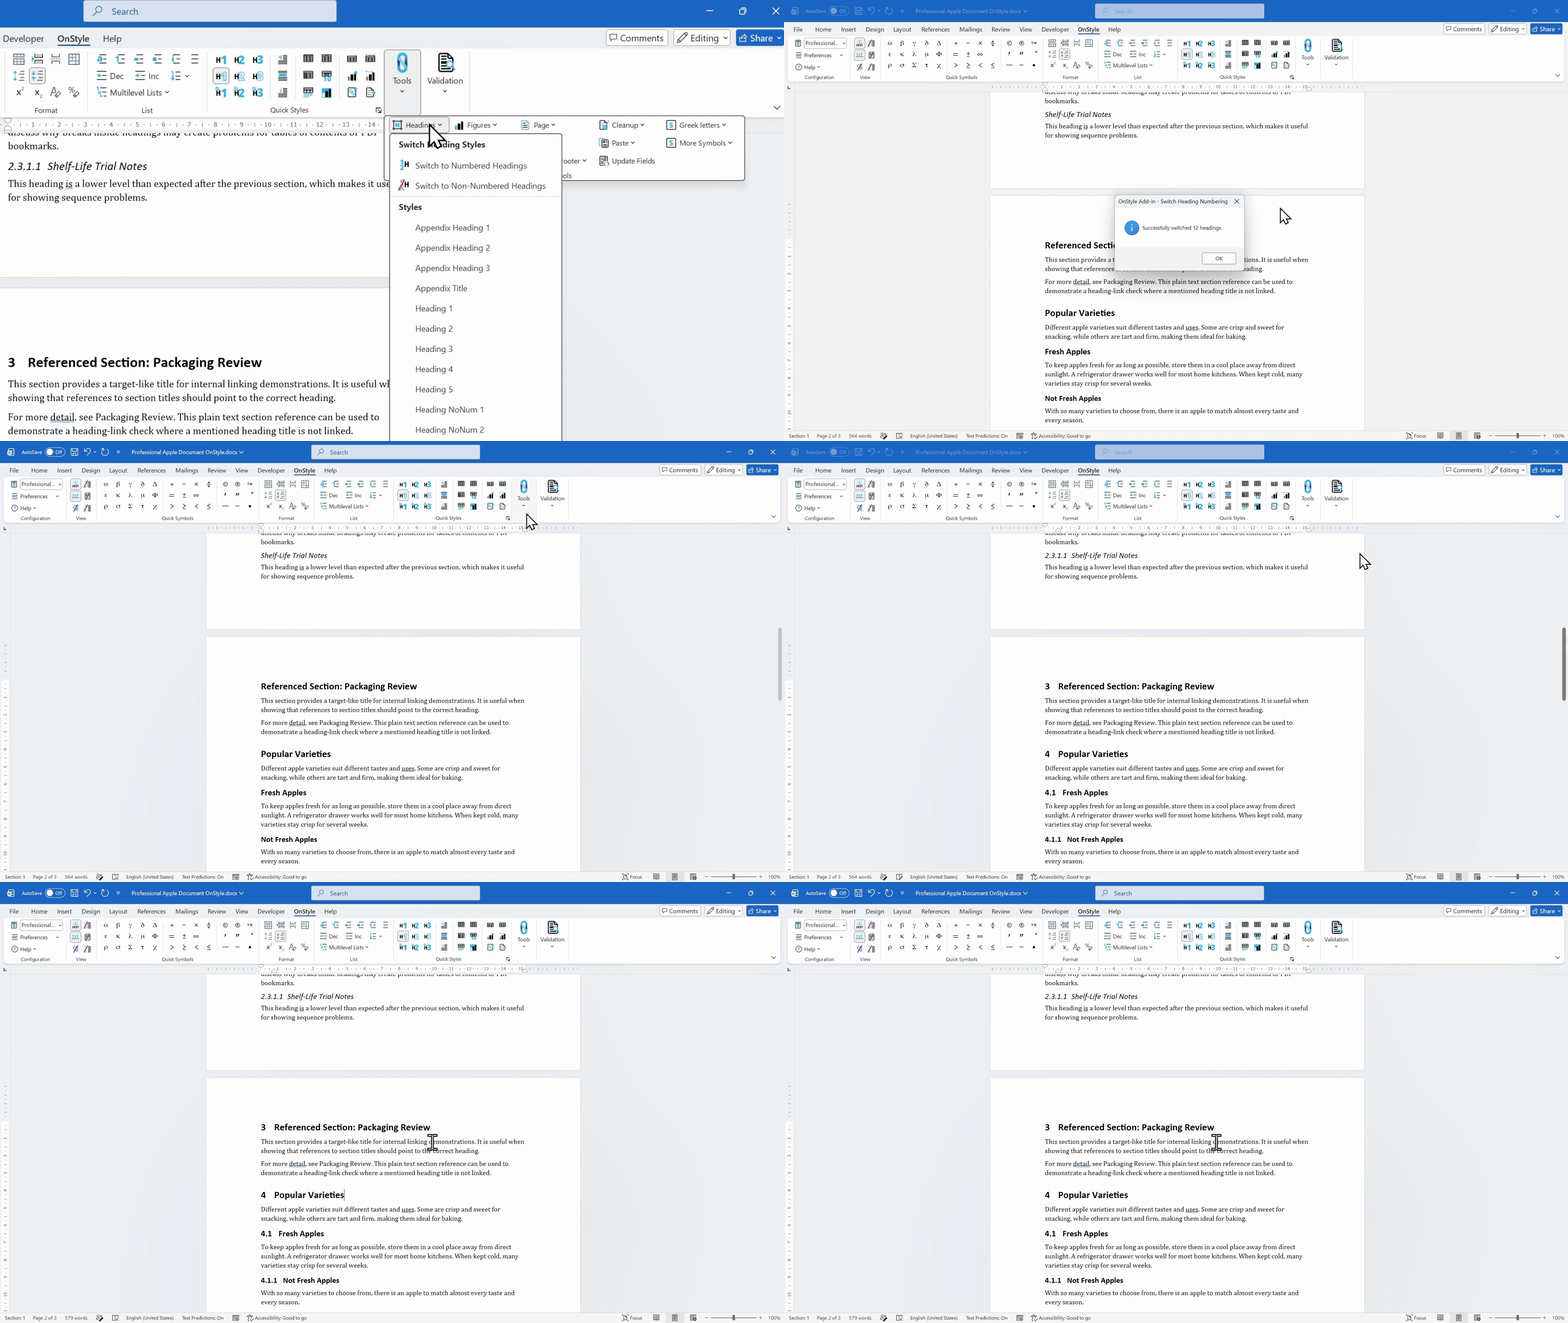
This is helpful when you inherit a document where heading numbering is inconsistent or when a document needs to follow a specific standard before review.
How to Check and Fix Heading Issues in Word with OnStyle
Section titled “How to Check and Fix Heading Issues in Word with OnStyle”After headings are set up, use OnStyle’s validation function to check the document. Validation can find and correct text style and formatting errors. Inspection modules are organized into Inspection Groups and Inspection Sets.
The groups are the buttons in the main area and are meant to handle different issue categories indicated by their names. The inspection sets are presets that contain these groups. OnStyle includes a default set called Global, and a custom set can also be edited.
Step 1: Choose an inspection set or group. In the Validation section, choose the relevant Inspection Set or Inspection Group.
Step 2: Execute the inspection. Run the selected inspection to check the document for heading-related issues.
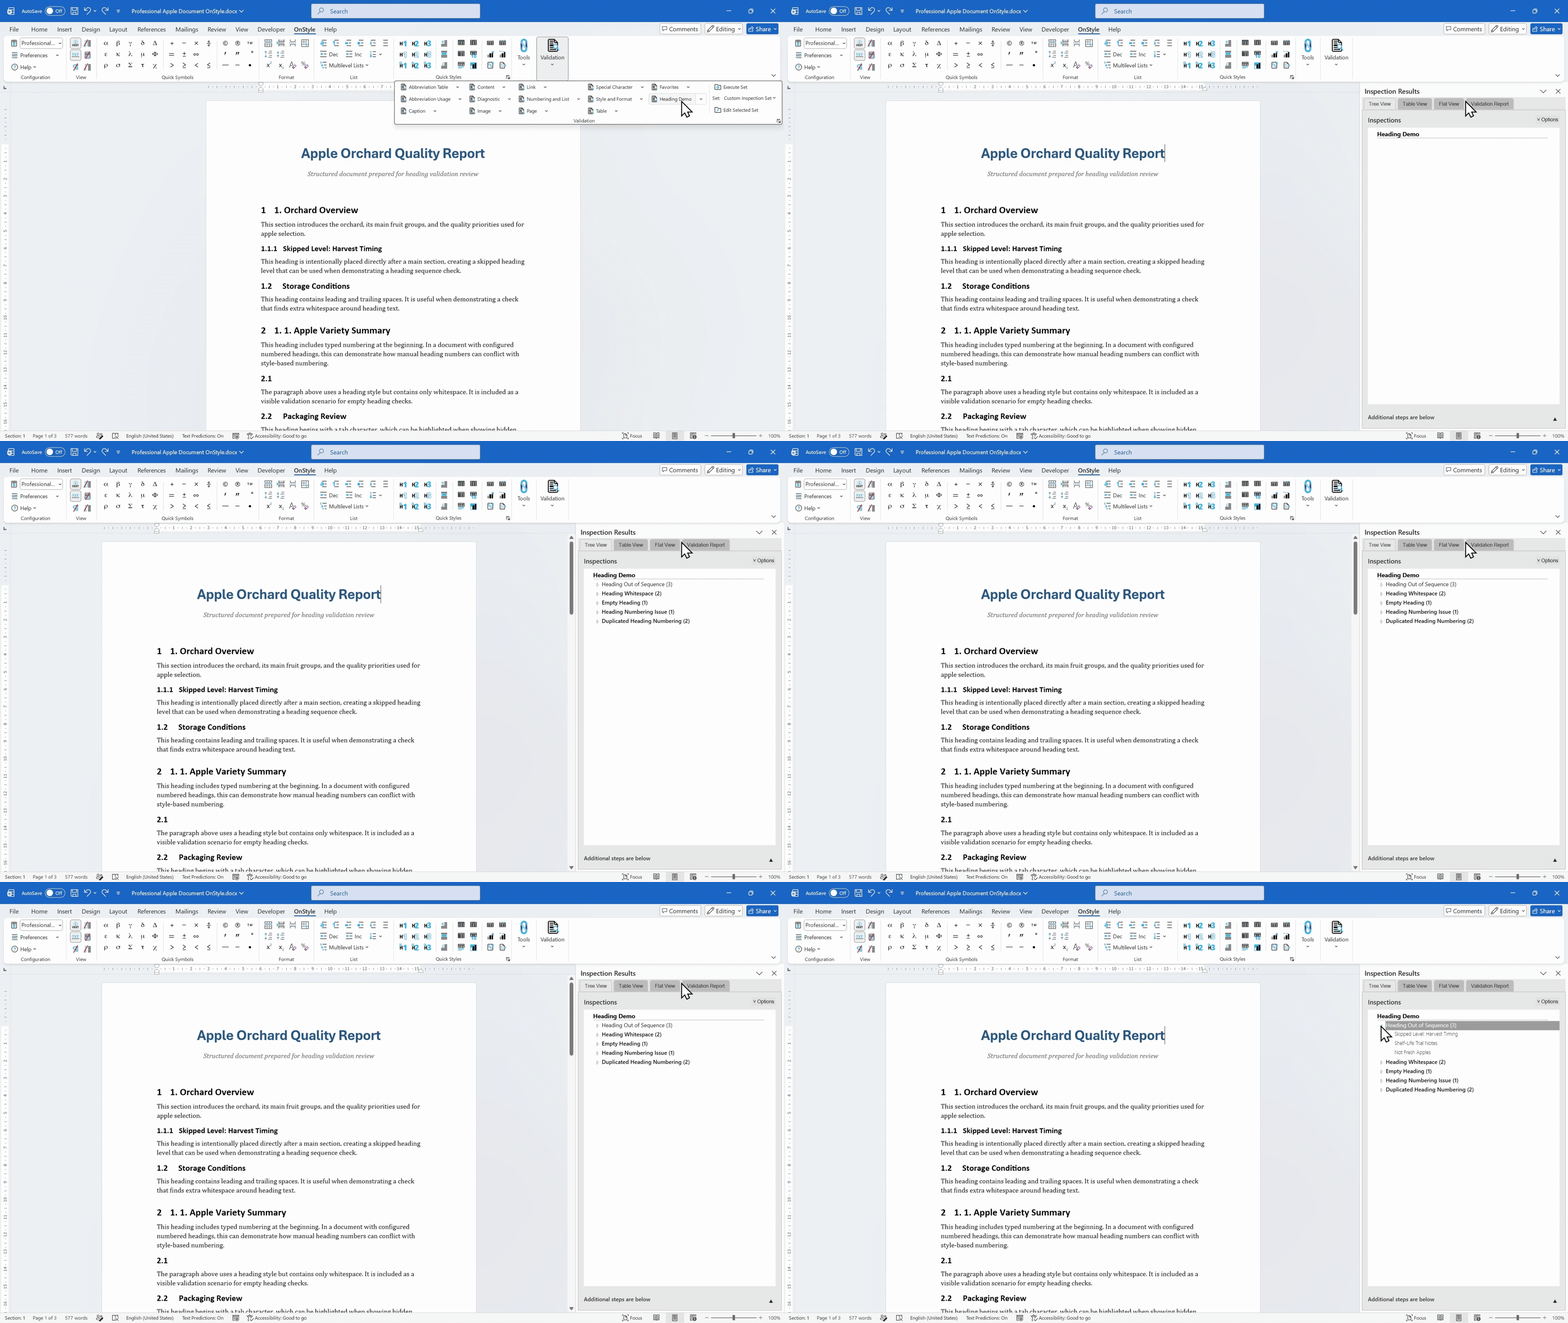
Step 3: Review heading-specific checks. For a heading-focused document, several checks are especially useful.
- Heading Out of Sequence checks for heading levels that do not follow the expected structure. This helps find problems such as a document jumping from Heading 1 directly to Heading 3 without a Heading 2 in between. Skipped heading levels can make the document harder to navigate, create an unclear structure in the Navigation Pane, and cause problems in an automatic table of contents.
- Heading White Space finds extra spaces or tab characters before or after heading text. This helps fix headings that look slightly misaligned, appear inconsistent in the document body, or create uneven entries in the table of contents. For example, a heading may look correct at first, but an extra space before the title can affect alignment, sorting, copying, or exported PDF output.Empty Heading finds paragraphs that use a heading style but do not contain real heading text. This often happens when a heading is deleted but the empty paragraph remains in the document. Empty headings can create blank entries in the Navigation Pane, unwanted lines in the table of contents, or confusing document structure for reviewers and readers.
- Heading Numbering Issue checks numbered headings where the automatic numbering has been manually changed, removed, or reformatted. This helps find headings that no longer follow the correct numbering sequence, such as a section that should be numbered “2.1” but was manually changed or formatted differently. These issues can lead to incorrect section numbering, inconsistent document structure, and unreliable references in long Word documents.
- Duplicated Heading Numbering checks headings where a manually typed number appears next to Word’s automatic heading number. This helps find headings that look like “1. 1. Introduction” or “2.3 2.3 Scope” because someone typed the number manually before applying a numbered heading style. Removing duplicated numbering keeps headings clean, prevents confusing table of contents entries, and avoids numbering problems when sections are added, deleted, or reorganized.Heading Out of Sequence checks for heading levels that do not follow the expected sequence.
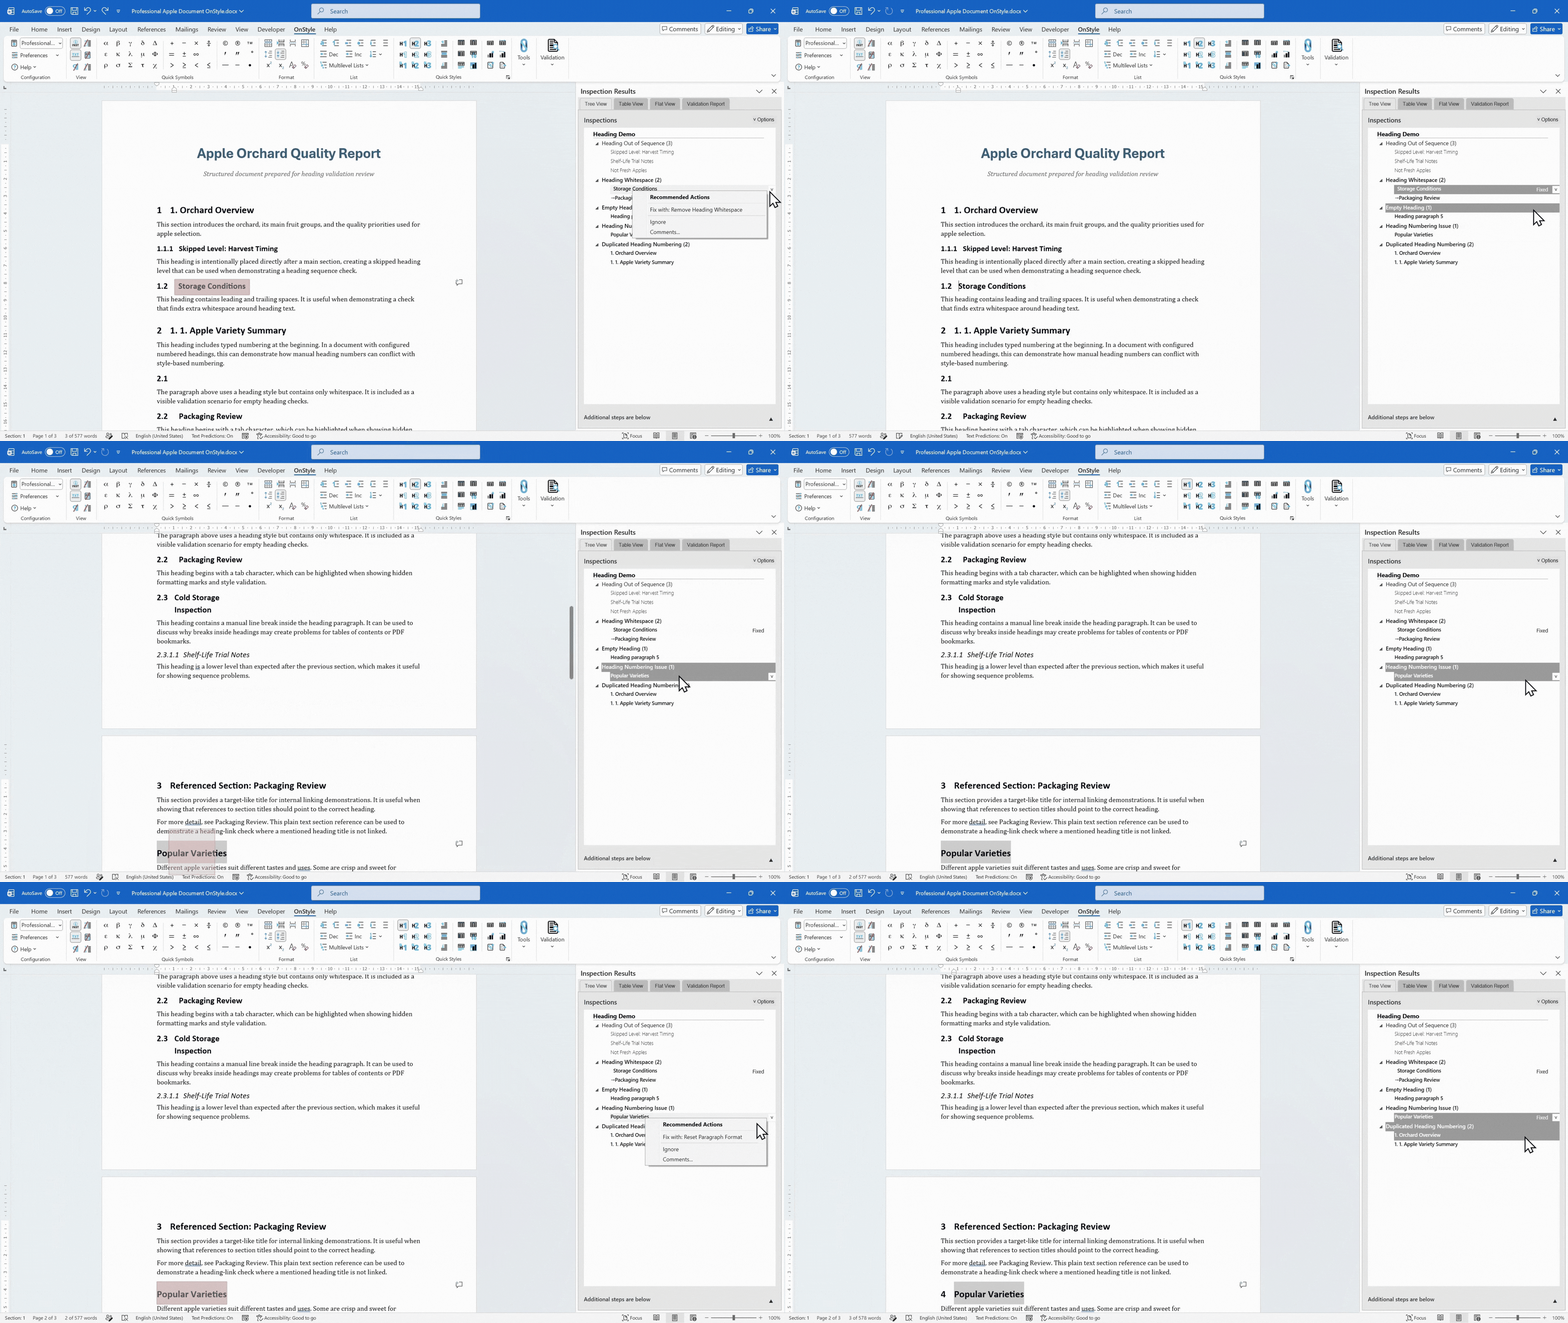
Step 4: Fix issues from the results pane. Click an issue to navigate to the problem. If a correction is available, apply it from the Inspection Results pane. For example, Heading White Space can use Remove Heading White Space, and Heading Numbering Issue can use Reset Paragraph Format.
Common Heading Mistakes to Avoid
Section titled “Common Heading Mistakes to Avoid”- Do not create fake headings by only making text bold, larger, or colored.
- Do not type heading numbers manually.
- Do not skip heading levels without a structural reason.
- Do not manually reformat every heading one by one.
- Do not ignore the Navigation Pane if headings are missing from it.
- Do not forget that heading styles affect tables of contents, navigation, numbering, and document review.
Summary: How to Use Heading Styles in Word
Section titled “Summary: How to Use Heading Styles in Word”The main thing to remember is that headings are not just decoration. How to use heading styles in Word is really about creating document structure. Once headings are structured properly, the rest of the document becomes easier to navigate, update, and review.
The basic workflow is simple: apply Heading 1, Heading 2, and Heading 3 from the Styles gallery, use a linked Multilevel List if you need automatic numbering, modify the style instead of manually formatting each heading, and use the Navigation Pane to check the structure.
For standardized documents, OnStyle adds another layer by applying configured heading styles, switching numbered and non-numbered headings, and validating heading issues before the document is finalized.