
How to Change Proofing Language in Word
Learning how to change Proofing Language in Wordis useful when MS Word keeps underlining correct text, missing real spelling errors, or switching dictionaries unexpectedly. The proofing language controls which dictionary Word uses for spelling and grammar checking. If the proofing language is wrong, correct words may be marked as errors and actual mistakes may be missed.
This guide explains what proofing language means in Microsoft Word, how to change proofing language for selected text, how to change proofing language for an entire document, how to stop Word from automatically changing the language, how to set a default proofing language, and how OnStyle can find and fix proofing language issues faster in long documents.
Why Word Keeps Underlining Text in Word
Section titled “Why Word Keeps Underlining Text in Word”If a paragraph is written correctly but Word marks many words with red squiggly underlines, the problem may not be spelling. The proofing language may be set to the wrong language.
For example, English text may be checked with a different dictionary. In that case, Word treats correct English words as spelling mistakes. The opposite can also happen: if the wrong proofing language is applied, real errors may not be detected.
Knowing how to change proofing language in MS Word helps fix these false spelling errors and keeps proofreading consistent across the document.
What is Proofing Language in Word
Section titled “What is Proofing Language in Word”Proofing language is the language Word uses to spell-check and grammar-check text. It affects the dictionary, grammar suggestions, and spelling marks used in the document.
The proofing language can vary between paragraphs, selected text, pasted content, or sections of a document. This is why one paragraph may be checked correctly while another paragraph shows many false errors underlined with red.
To check the proofing language at the cursor location, look at the status bar at the bottom of the Word window. The language displayed there applies to the current cursor position or selected text.
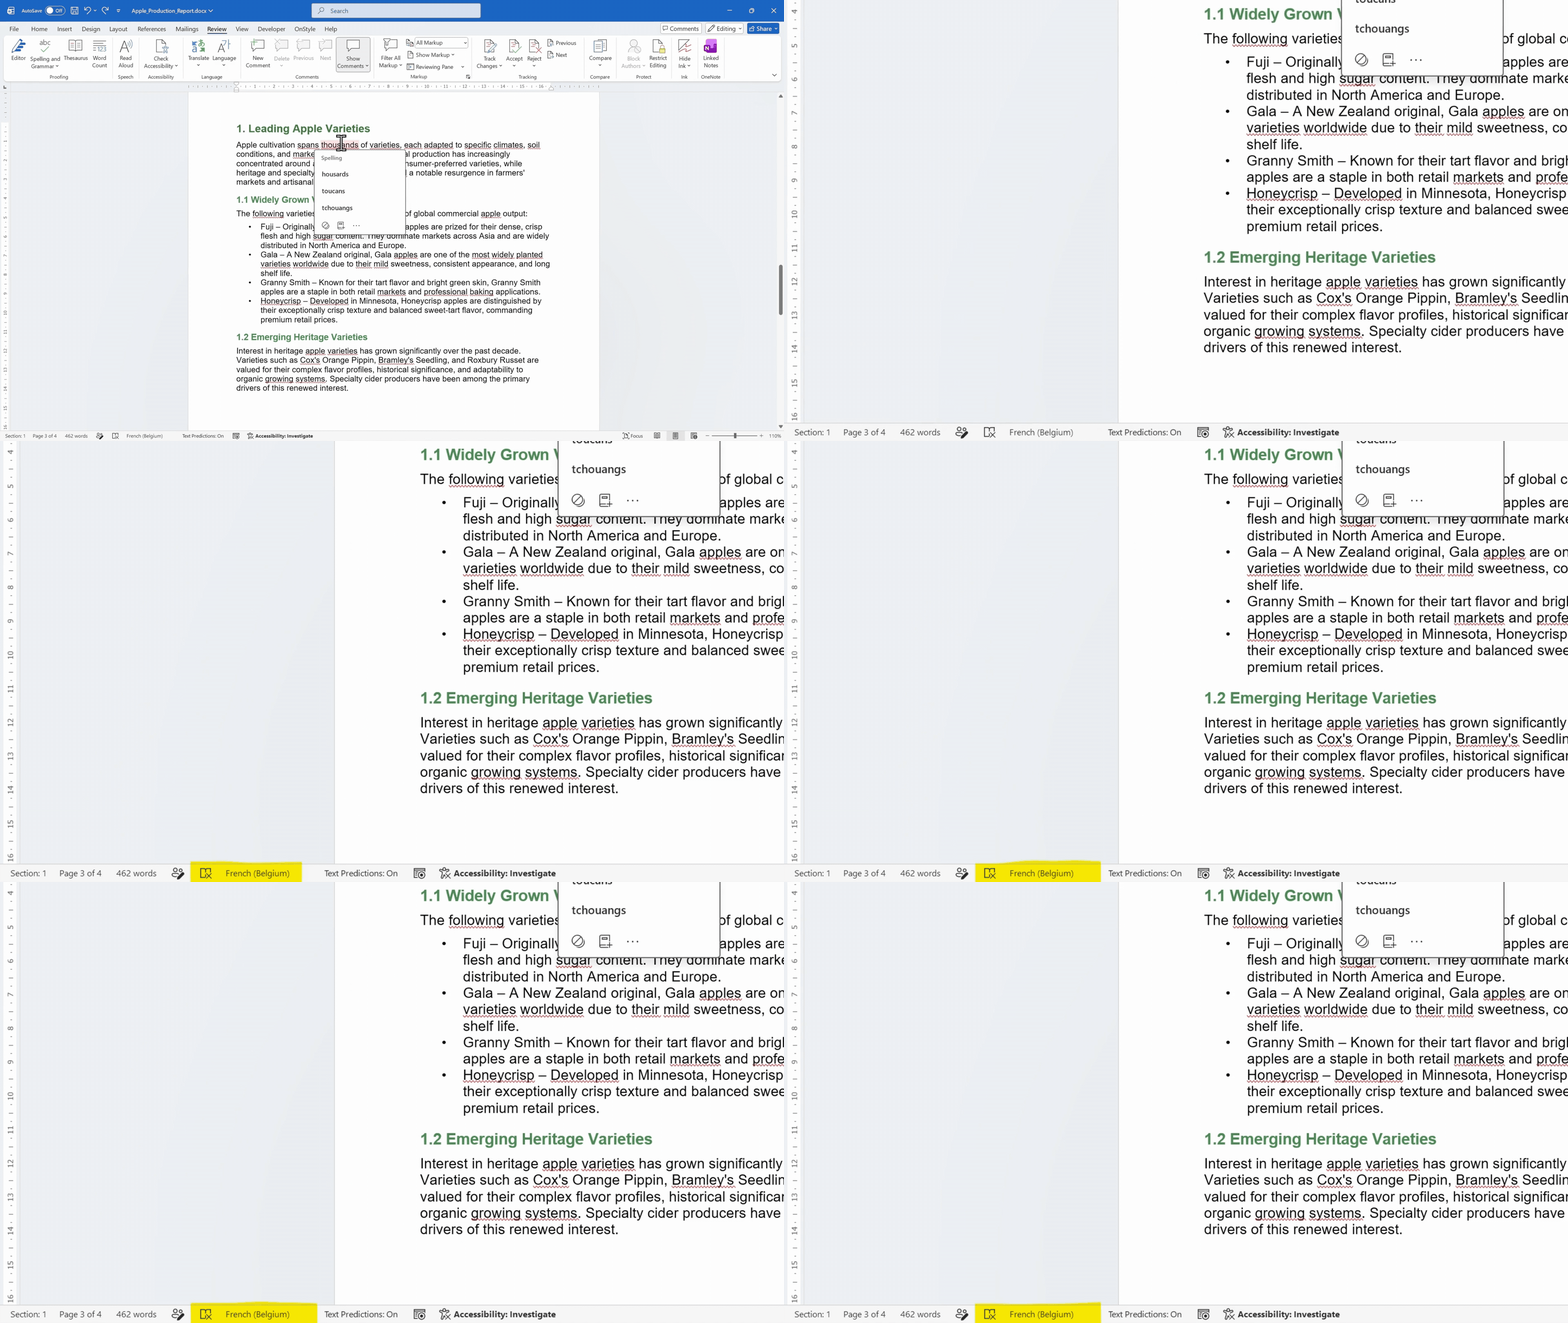
How to Change Proofing Language in Word for Selected Text
Section titled “How to Change Proofing Language in Word for Selected Text”Use this method when only one paragraph, section, quote, table entry, or pasted text block has the wrong proofing language setting.
Step 1: Select the Text
- Select the paragraph or text that should use a different proofing language.
- Make sure only the affected text is selected if the rest of the document is already correct.
Step 2: Open Set Proofing Language
- Go to the Review tab of the Ribbon.
- Select Language.
- Select Set Proofing Language.
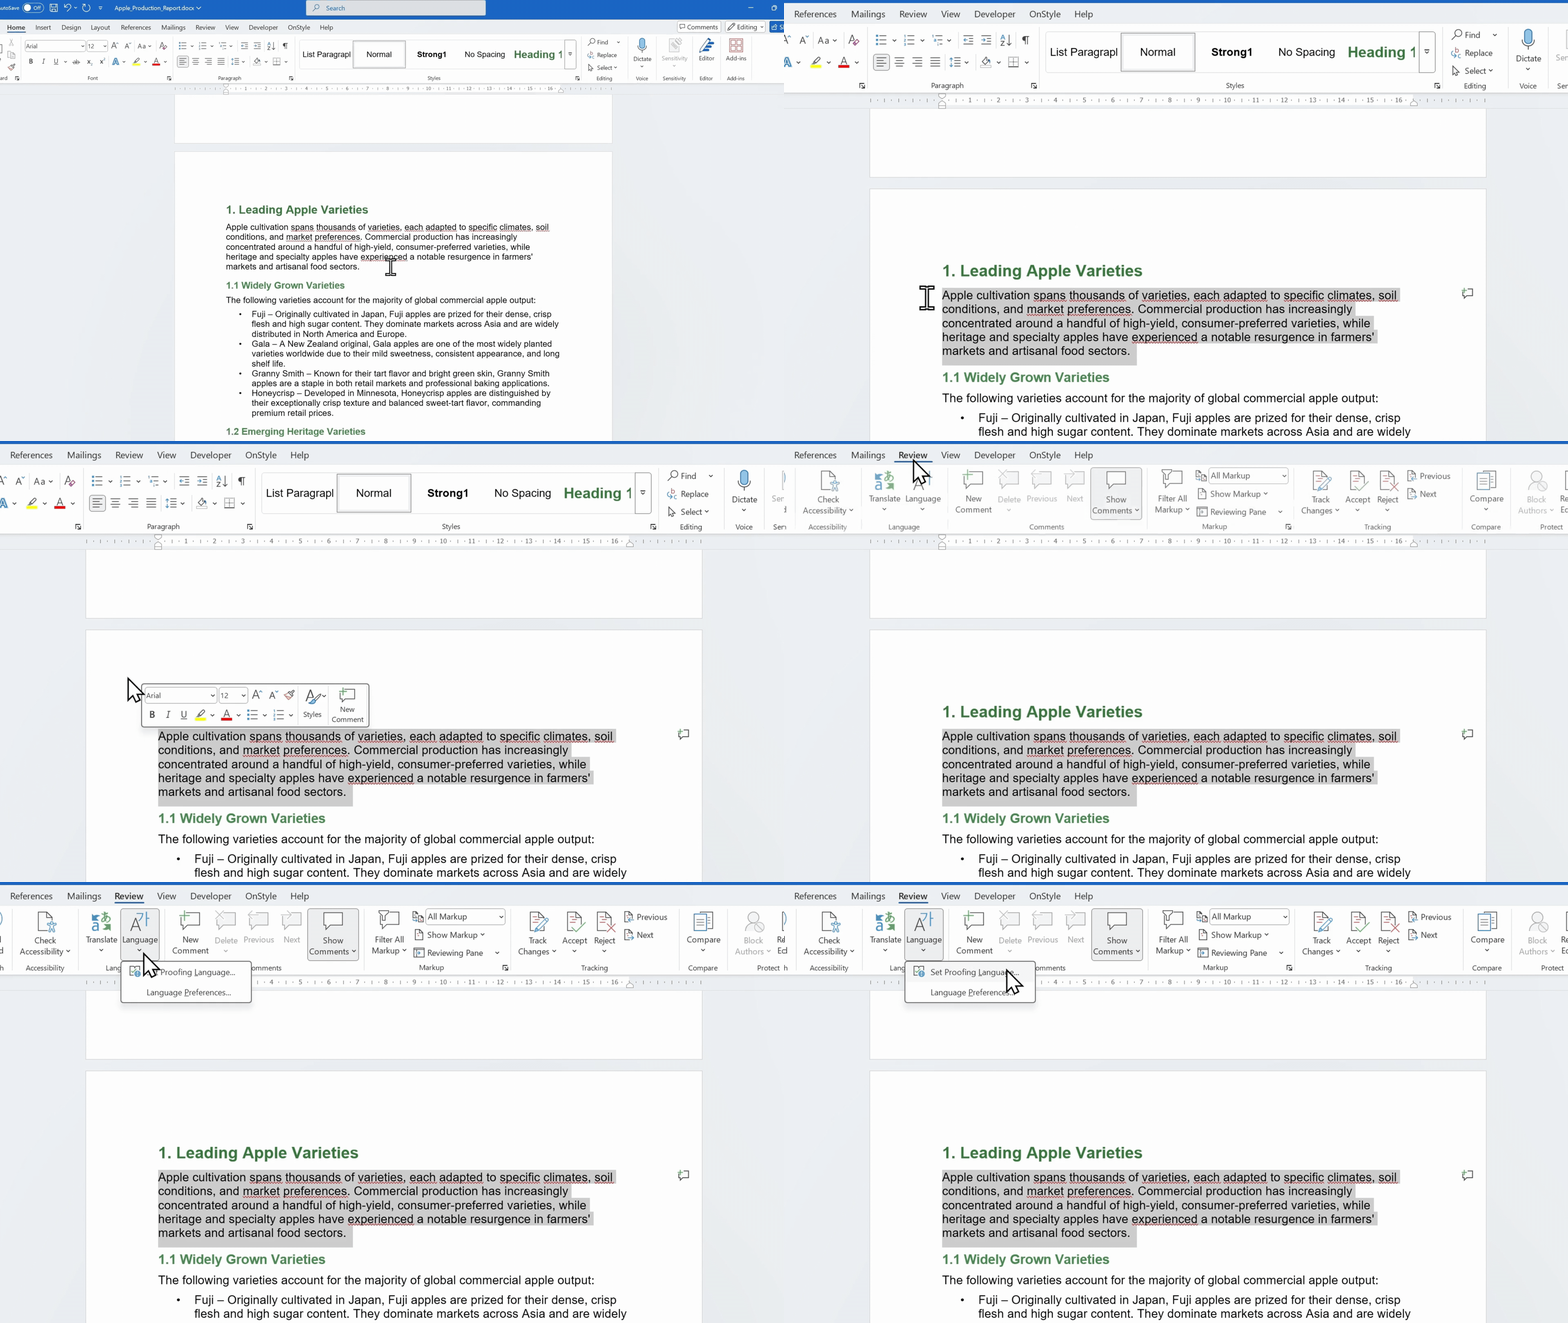
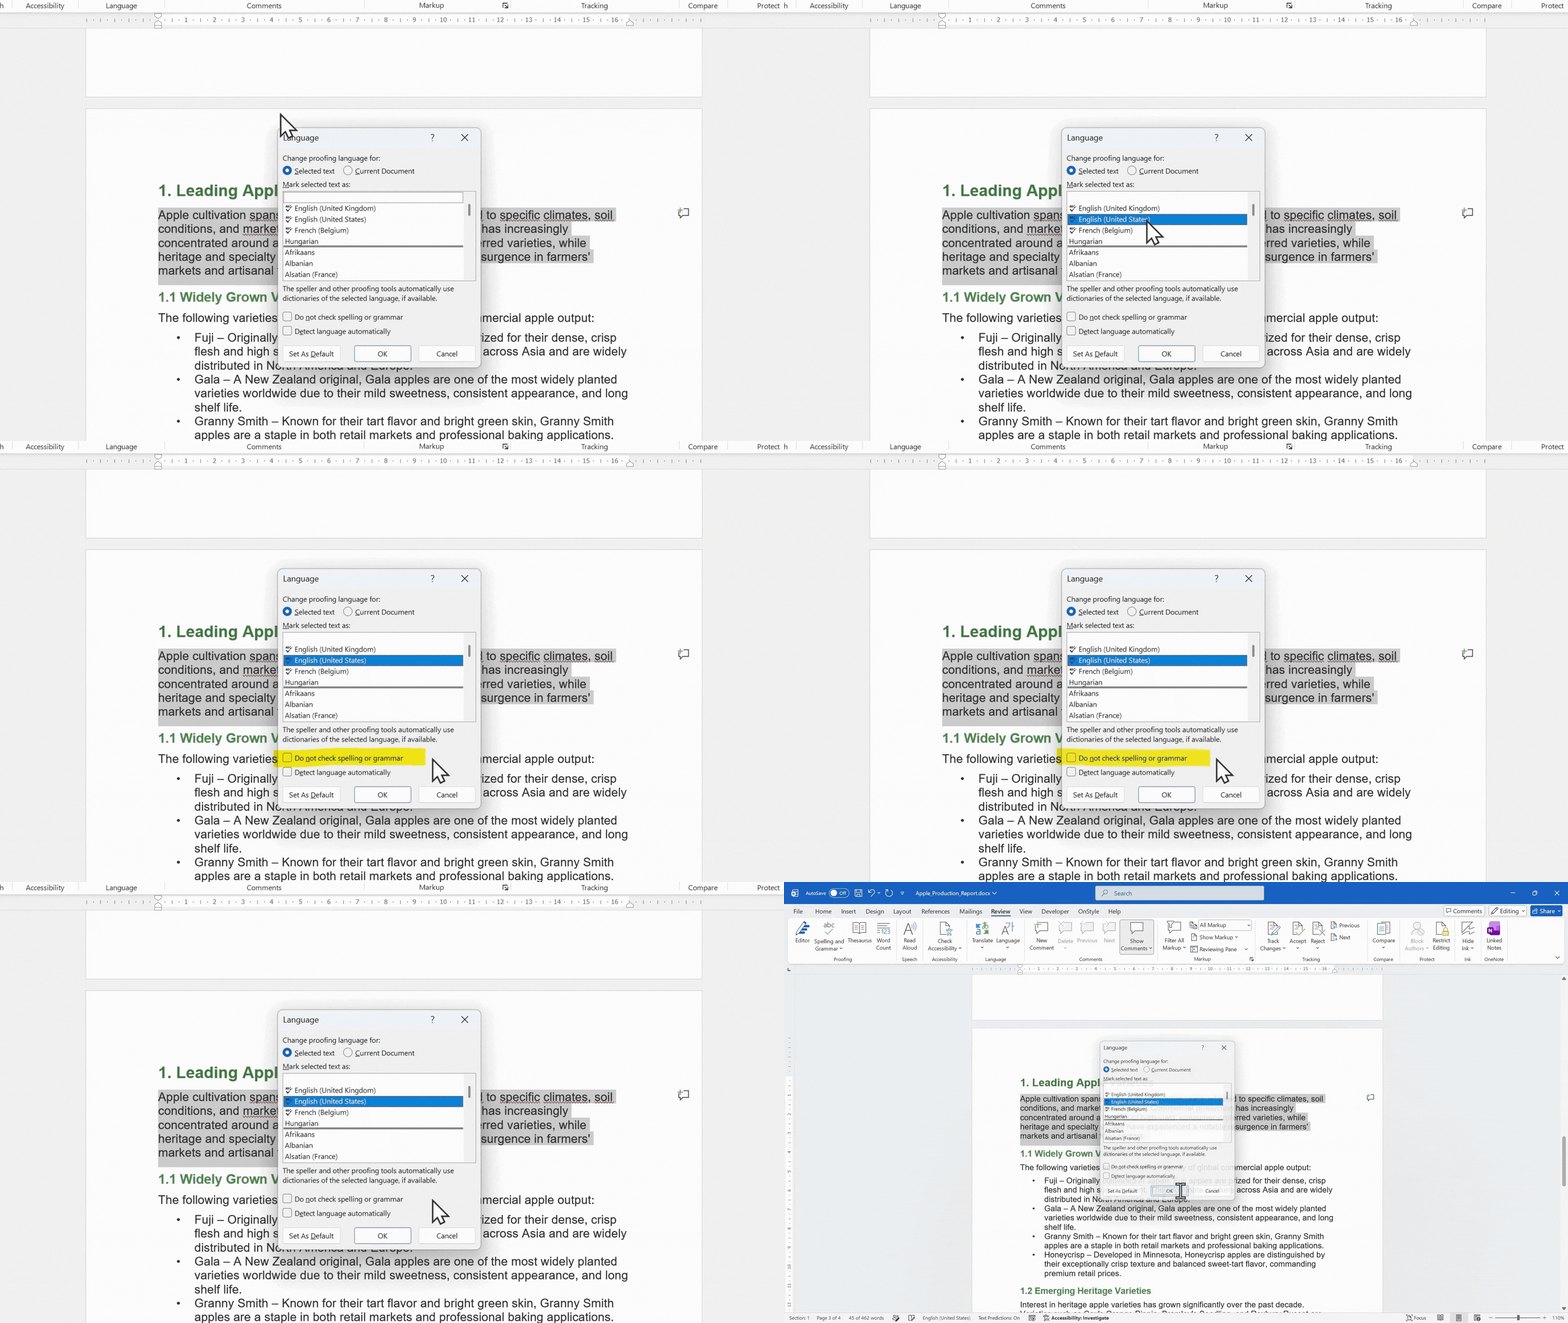
Step 3: Choose the Correct Language
- In the Set Proofing Language dialog box, select the correct language, such as English (United States).
- Make sure Do not check spelling or grammar is unchecked.
- Select OK.
After the correct language is applied, the red lines indicating false spelling errors should disappear if the words are spelled correctly.
How to Change Proofing Language in Word for the Entire Document
Section titled “How to Change Proofing Language in Word for the Entire Document”Use this method when the whole document should be checked with the same language. This is the fastest manual way to fix proofing language issues across all text.
Step 1: Select the Entire Document
- Press Ctrl + A to select the entire document.
Step 2: Apply the Proofing Language
- Go to the Review tab of the Ribbon.
- Select Language.
- Select Set Proofing Language.
- Choose the correct language.
- Make sure Do not check spelling or grammar is unchecked.
- Select OK.
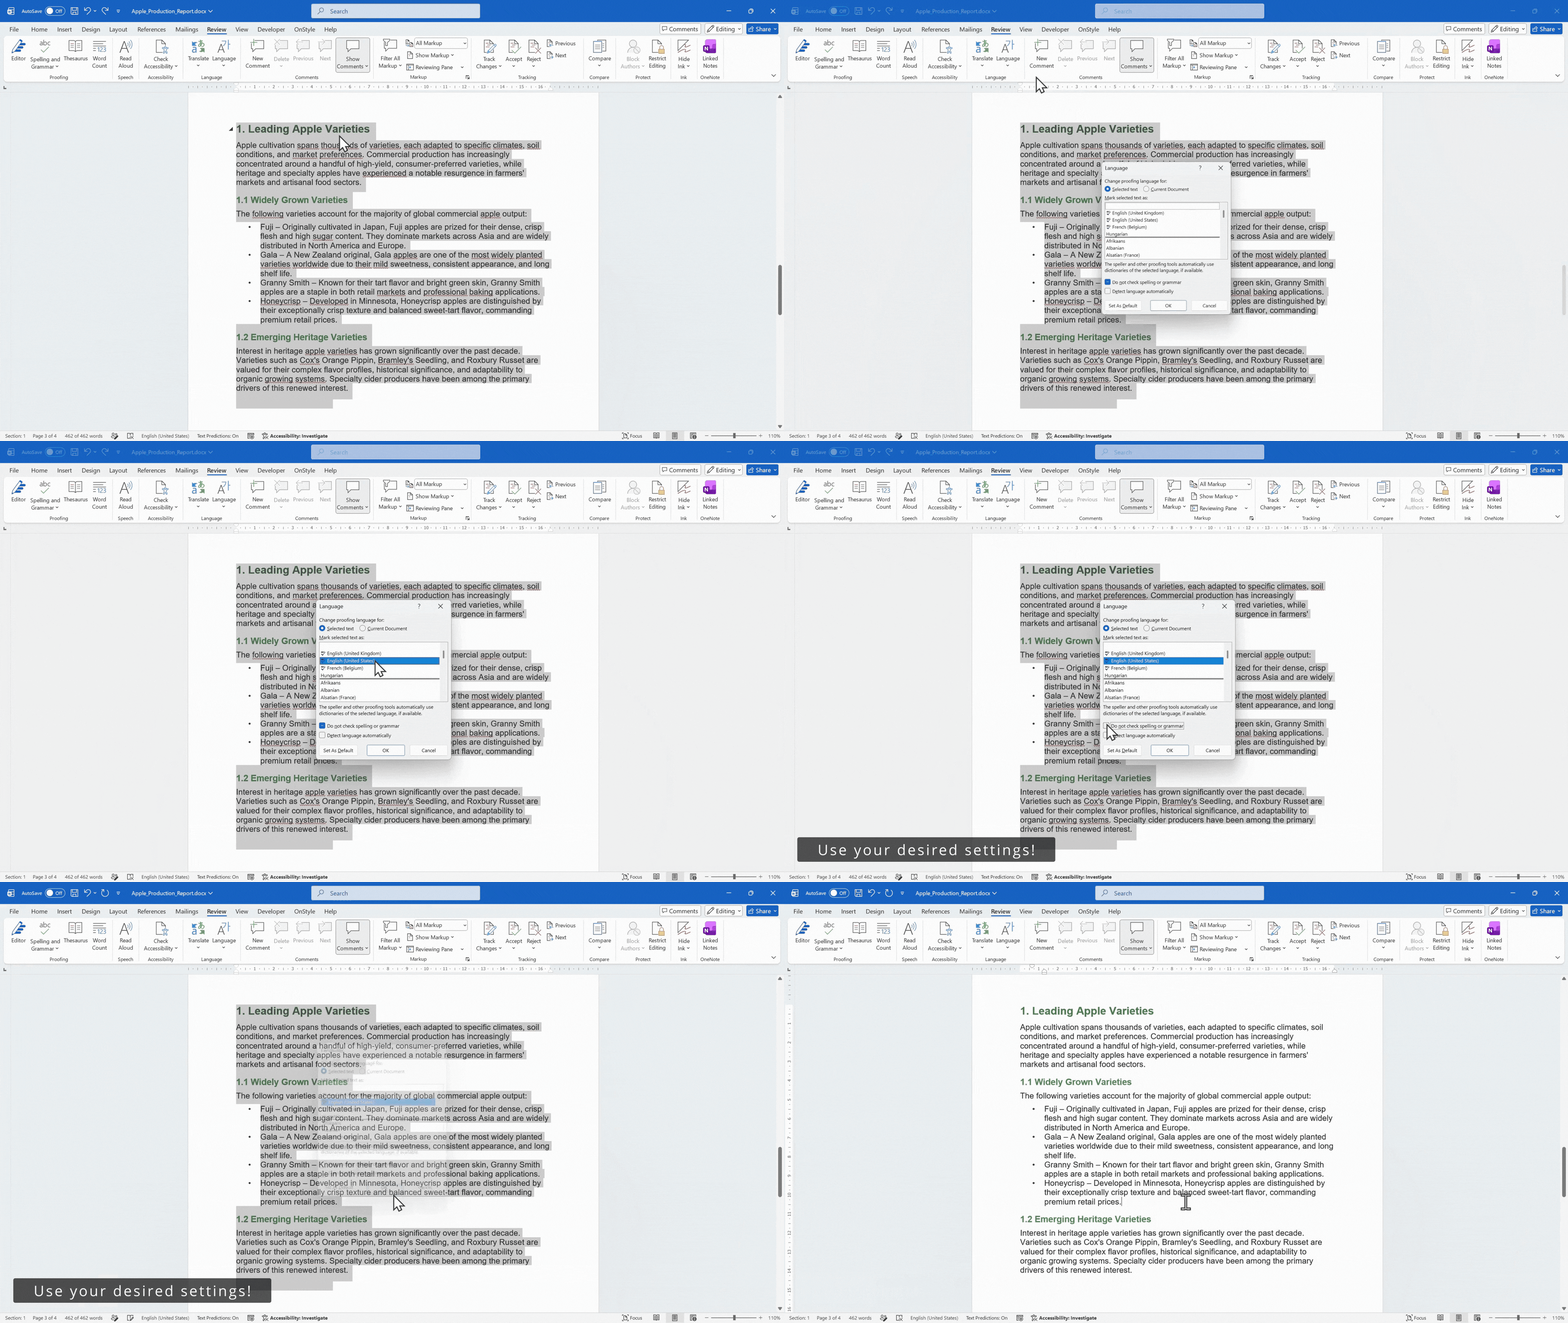
Every paragraph in the selected document now uses the same proofing dictionary. This is an extremely simple solution to a common and frustrating problem.
How to Stop Word from Changing Language Automatically
Section titled “How to Stop Word from Changing Language Automatically”The Detect language automatically setting is one of the most common causes of unexpected proofing language changes. When it is enabled, Word guesses the language while typing or after pasted content is added. In mixed-language or copied documents, Word can guess incorrectly.
How to Turn Off Automatic Language Detection in Word
Section titled “How to Turn Off Automatic Language Detection in Word”- Open the Set Proofing Language dialog box.
- Clear Detect language automatically.
- Select OK.
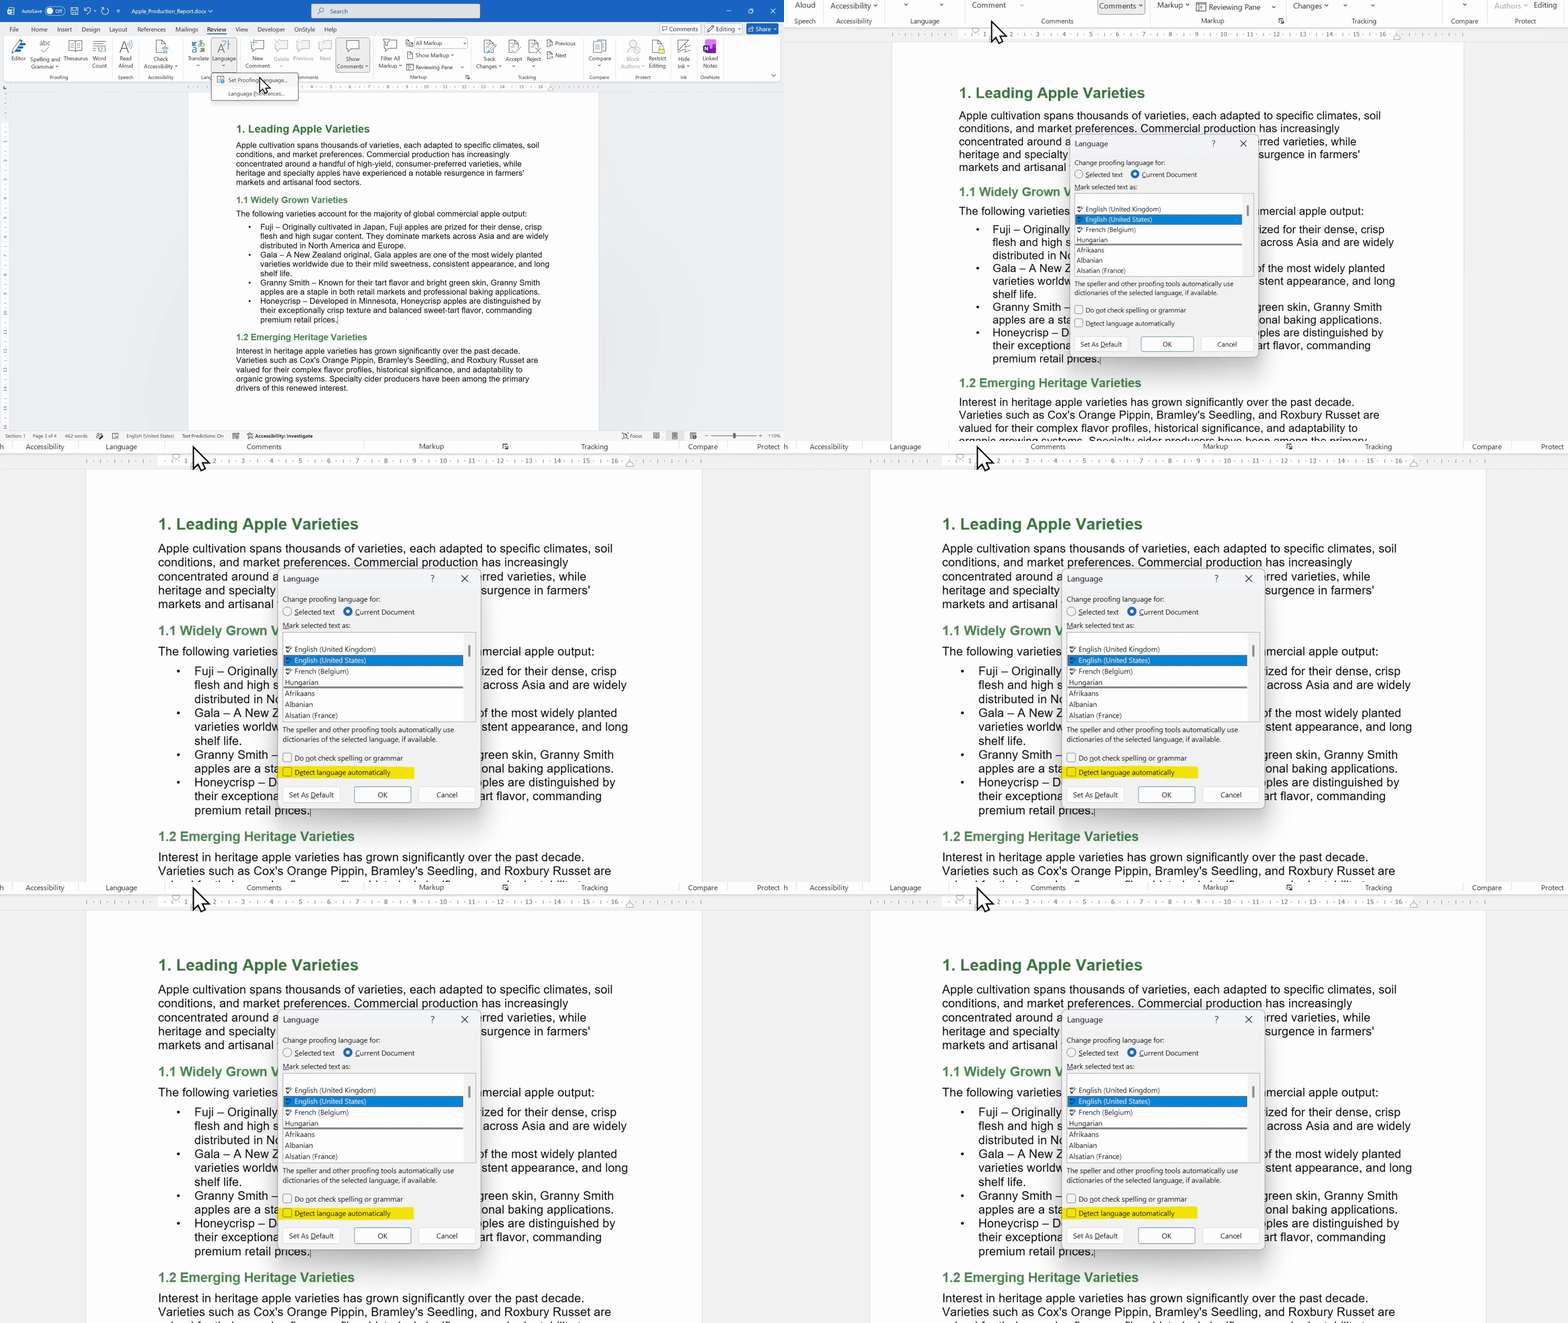
Keeping Detect language automatically turned off helps Word stay in the language selected for the document or selected text.
Set a Default Proofing Language for All New Documents
Section titled “Set a Default Proofing Language for All New Documents”If the same proofing language should be used in future files, set it as the default. This helps prevent the same problem from returning in new Word documents.
Step 1: Open the Proofing Language Settings
- Open the Set Proofing Language dialog box.
- Select the language that should be used as the default.
Step 2: Set the Language as Default
- Select Set As Default at the bottom of the dialog box.
- Confirm the change when Word asks for confirmation.
- Select Yes if you want new documents to start with that proofing language.
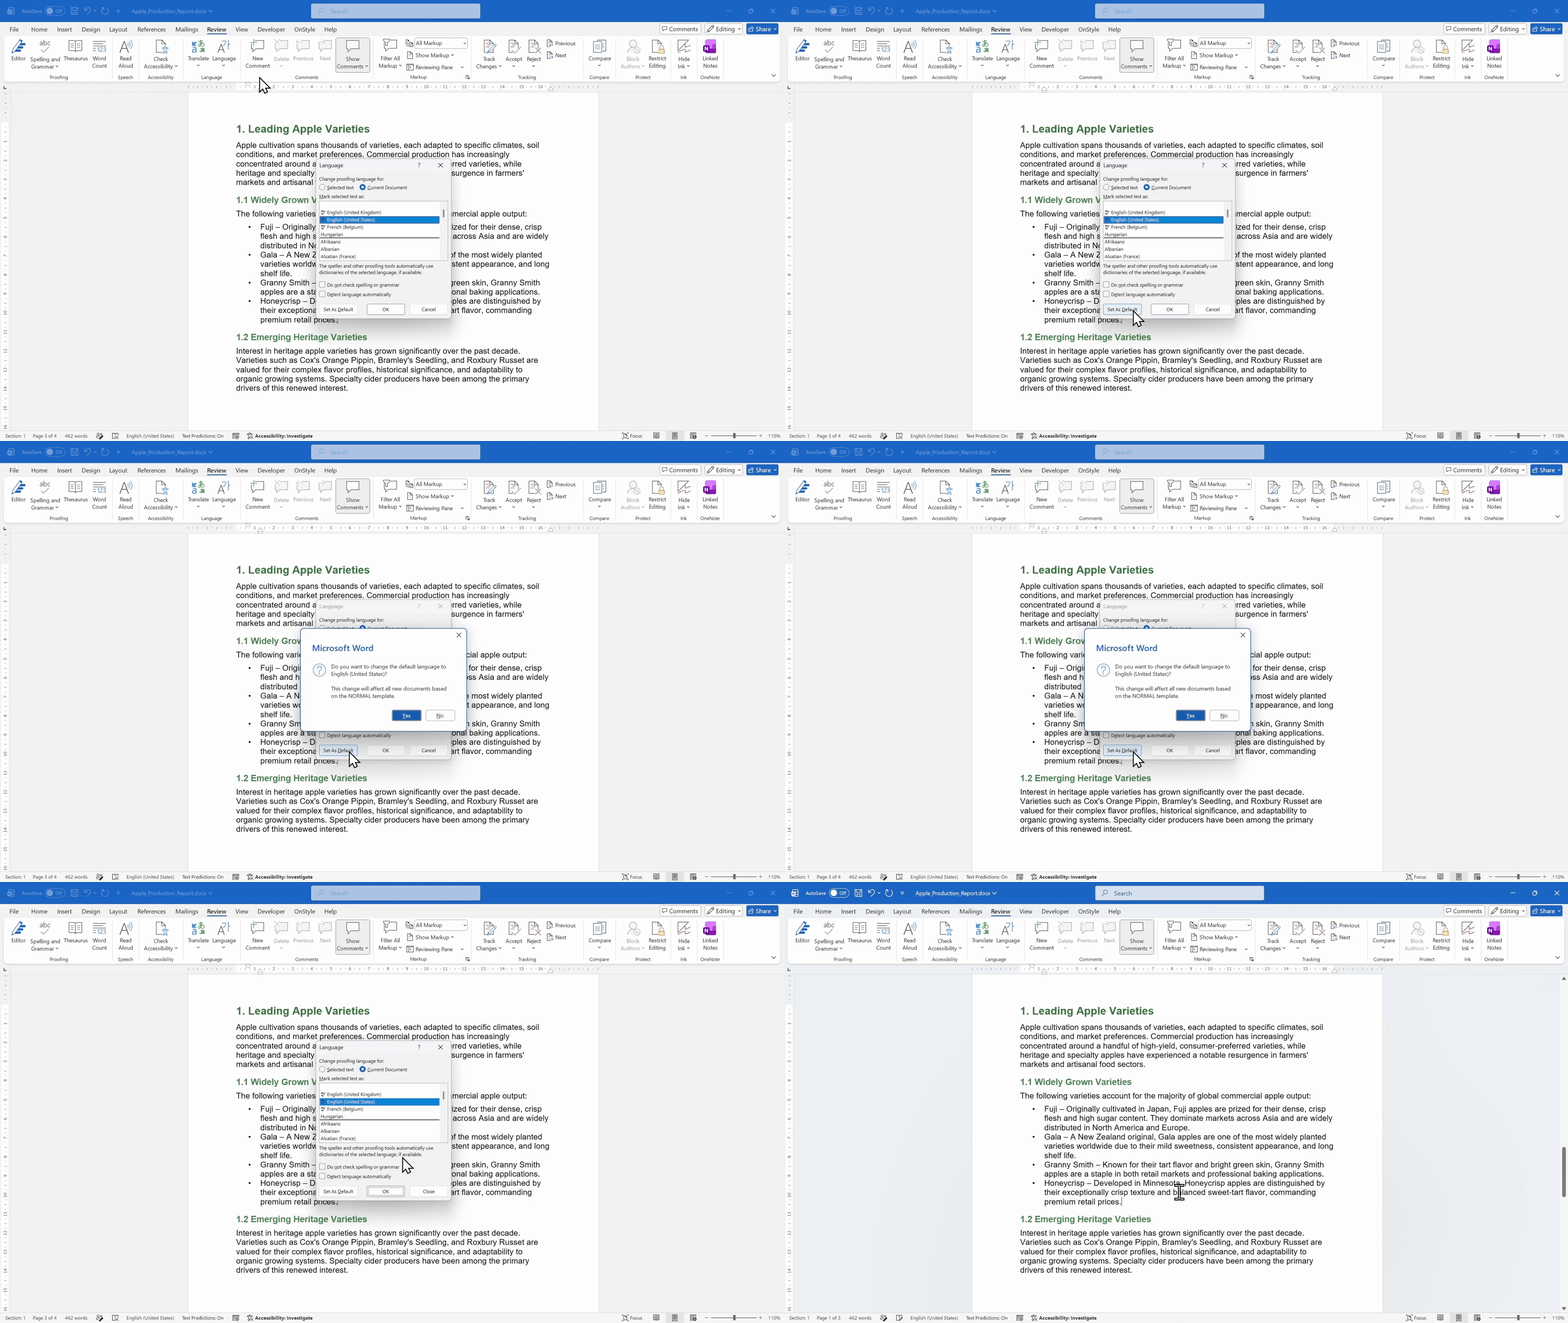
After this setting is saved, new documents start with the selected proofing language by default.
Fastest Manual Route to Proofing Language Settings
Section titled “Fastest Manual Route to Proofing Language Settings”There is no single default hotkey that opens the full proofing language workflow directly, but there are two fast manual routes.
- Use Ctrl + A to select all text, then go to Review, Language, Set Proofing Language.
- Click the language shown in the status bar at the bottom of the Word window to open the proofing language settings.
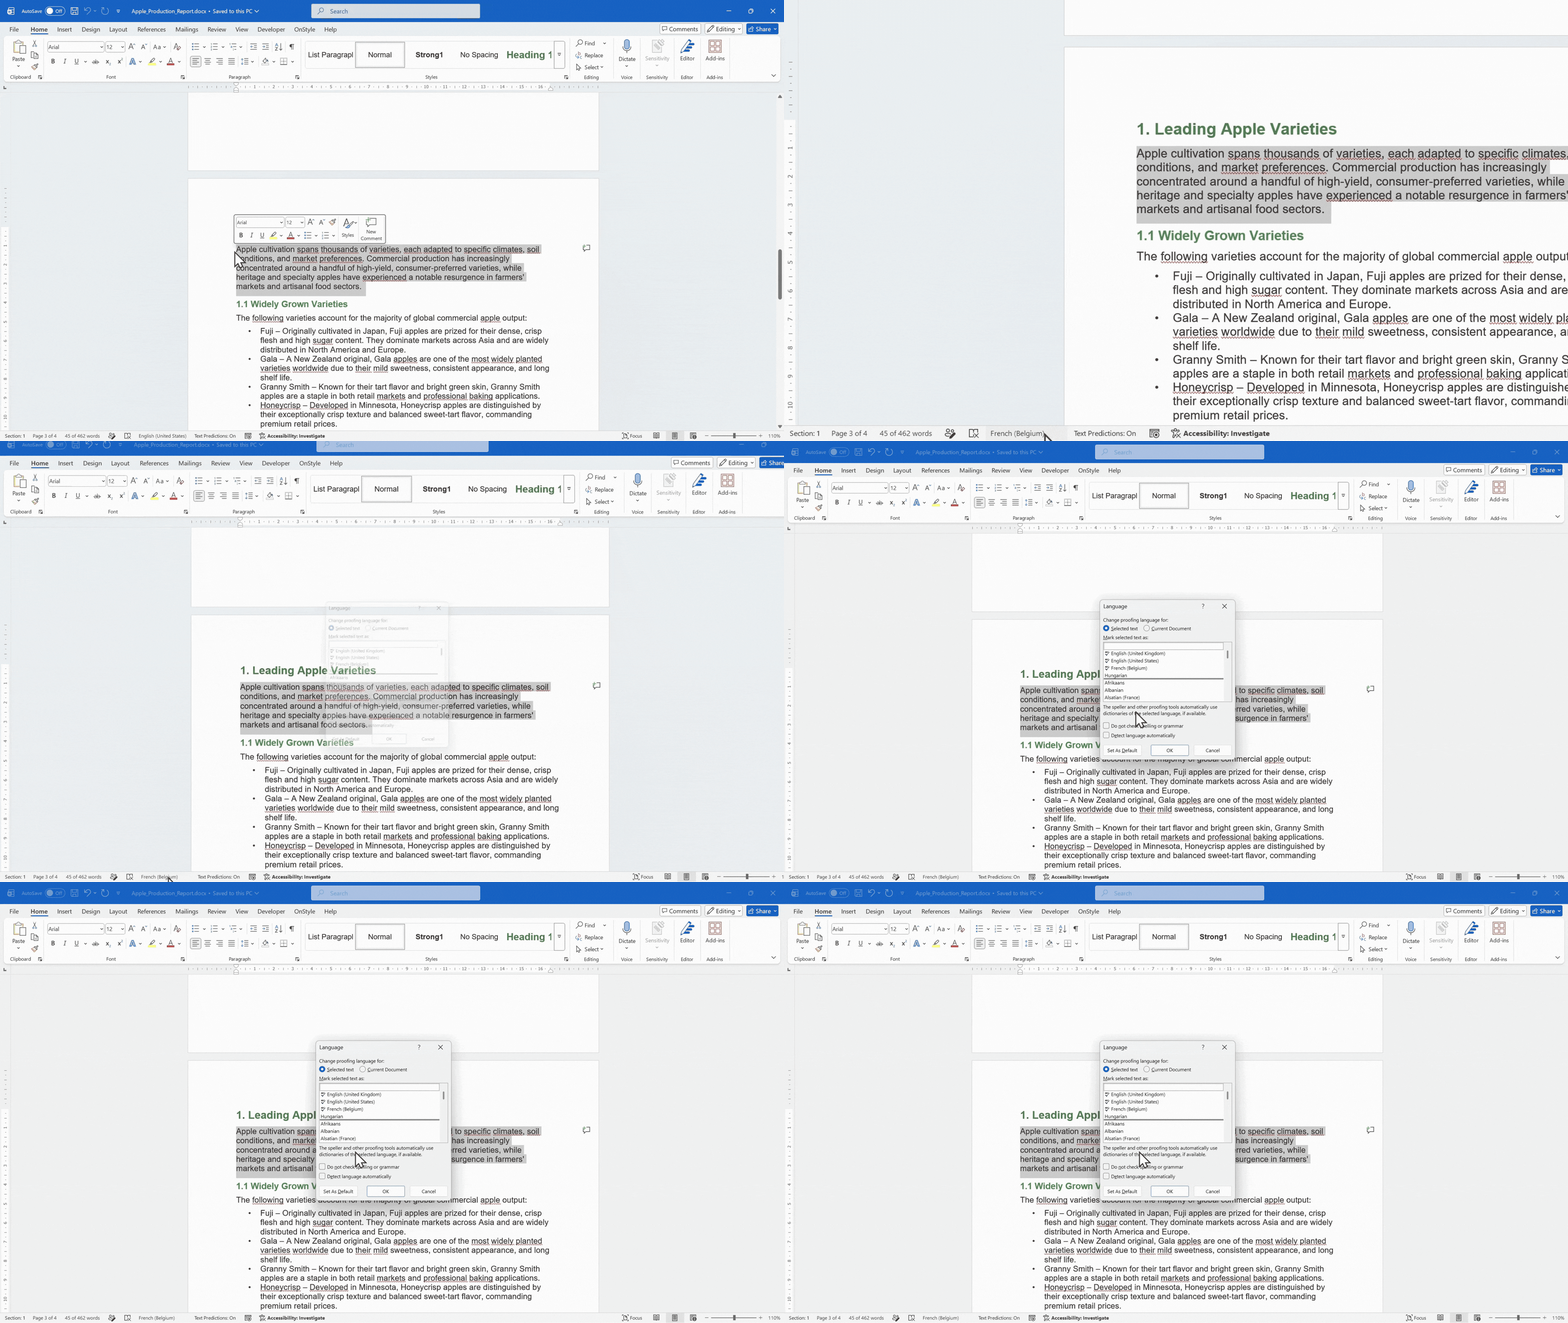
These shortcuts are useful for quick manual fixes, especially when the document is short or only one section is affected.
How to Find and Fix Proofing Issues Instantly with OnStyle
Section titled “How to Find and Fix Proofing Issues Instantly with OnStyle”Manual methods work well for one paragraph or a short document. However, they become slow in long documents where different proofing languages may be buried in many paragraphs. It is easy to miss sections when checking manually.
OnStyleis a Word add-in that helps with formatting, document cleanup, validation, and consistency tasks that are tedious in native Word. It currently includes more than150 checks and fixes. For proofing language issues, only one check is needed.
Step 1: Open the OnStyle Word Add-in
- Open the OnStyle tab from the Word Ribbon.
- Without a DocConfig, OnStyle uses US English as the default proofing language. You can set other default proofing languages in a DocConfig.
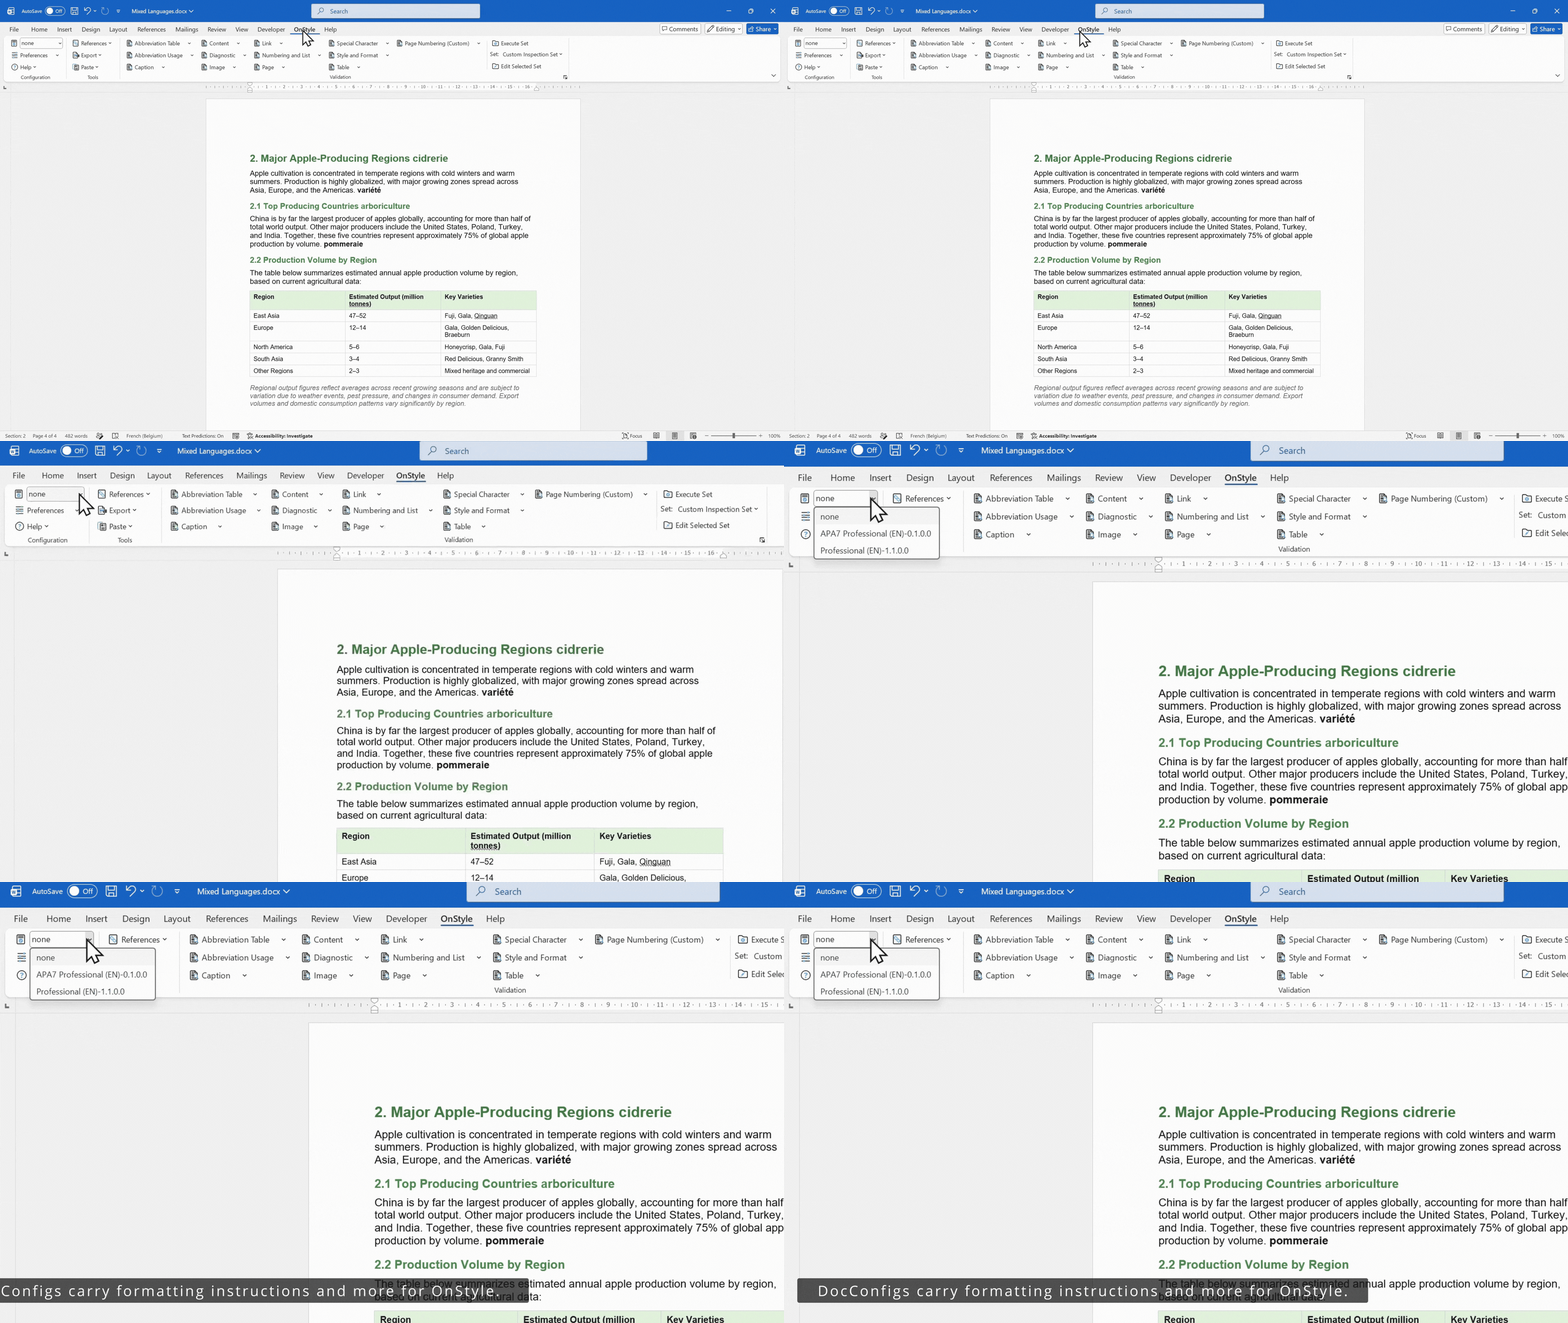
Step 2: Find the Language Issue Check
- Open the Content drop-down menu.
- Go to Inspection Group Modules.
- Select Language Issue Check.
The Language Issue Check results appear on the right, listing all text where the proofing language differs from the default setting in US English or the language defined in the DocConfig.
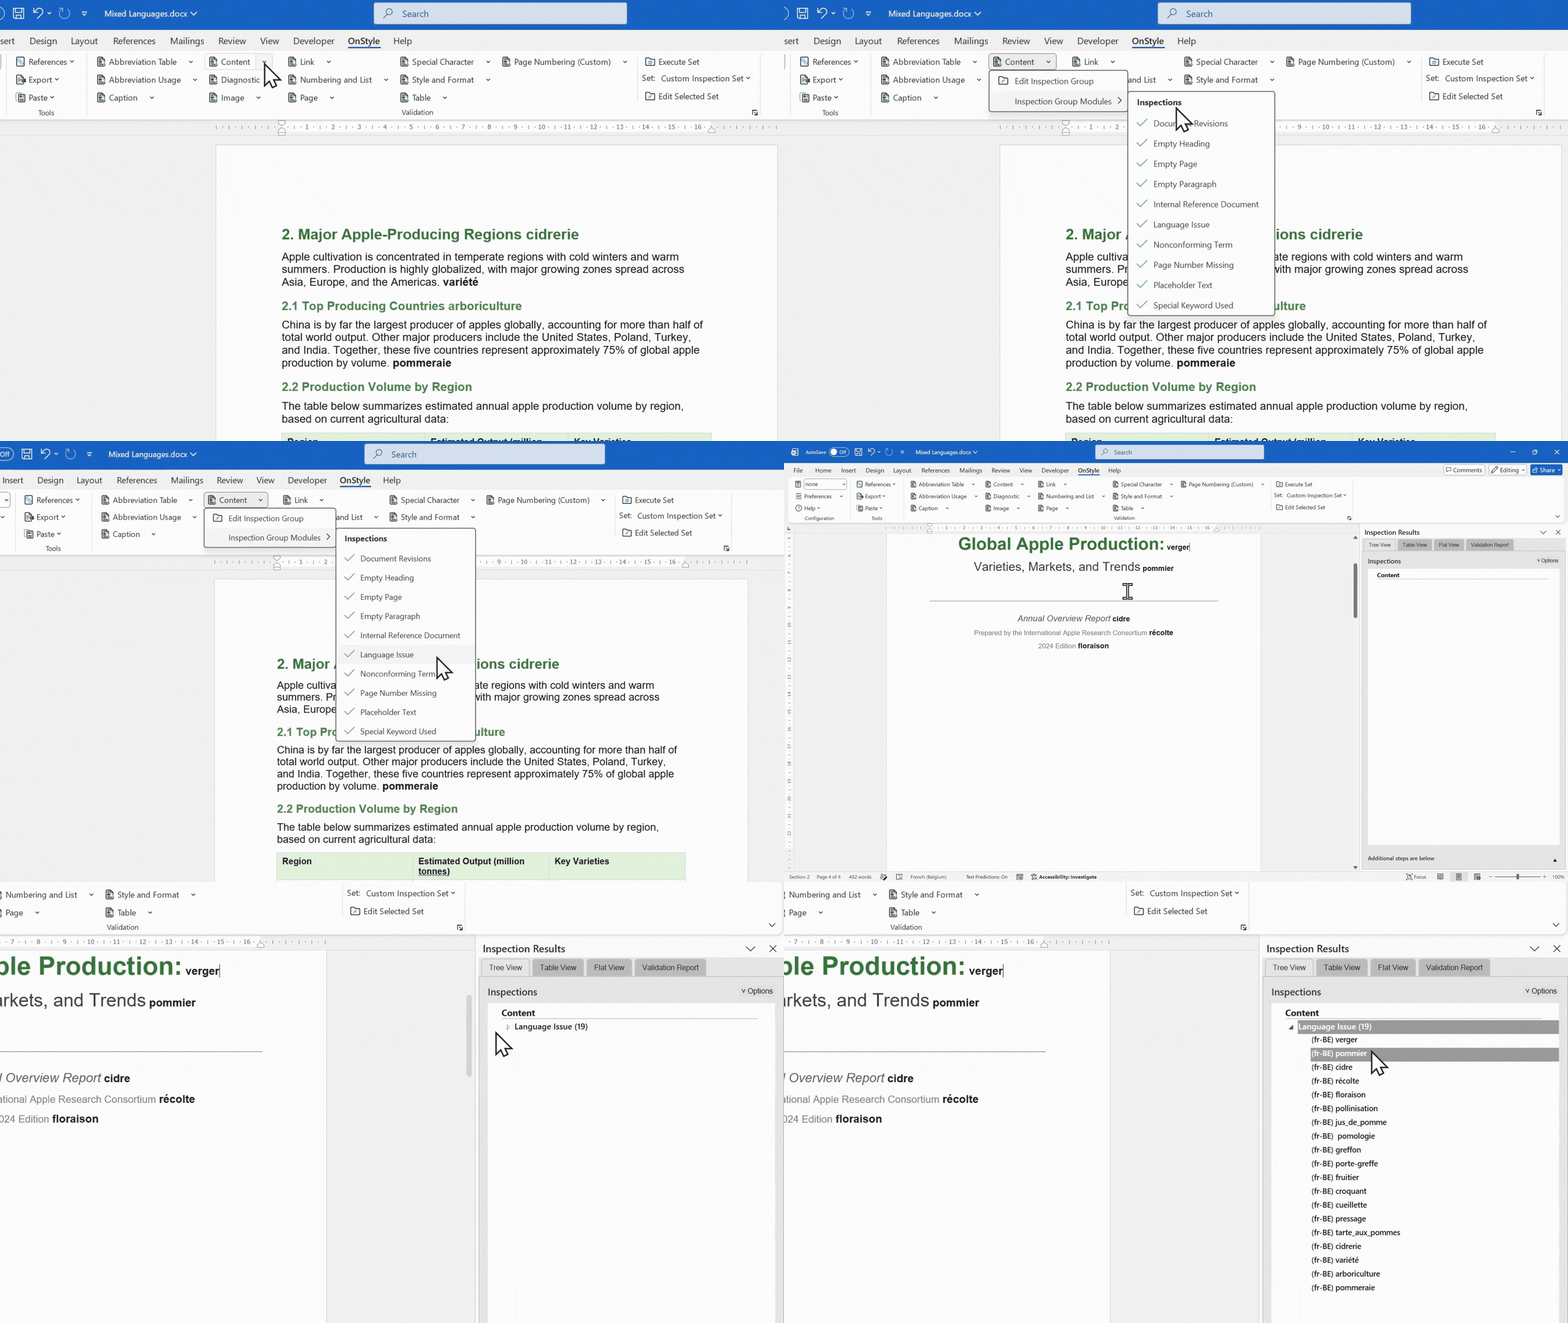
Step 3: Review Proofing Language Issues
- Use the Inspection Results pane to click through individual issue instances.
- Review the paragraphs where the proofing language does not match the expected language.
This helps identify proofing language problems that may not be visible at a glance, especially in long or mixed-format documents.
Step 4: Apply the Automatic Correction: Fix Incorrect Language
- After reviewing the list of found issues, decide if you want to change the proofing language for all of them or leave some unchanged.
- To change the proofing language for all listed issues, in the Inspection Results pane select the small arrow next to the Language Issue group. To change only selected issues, use the small arrow next to each individual issue.
- Run the automatic correction: Fix Incorrect Language.
- Allow OnStyle to apply the configured proofing language to the text where it found a mismatch with the expected language.
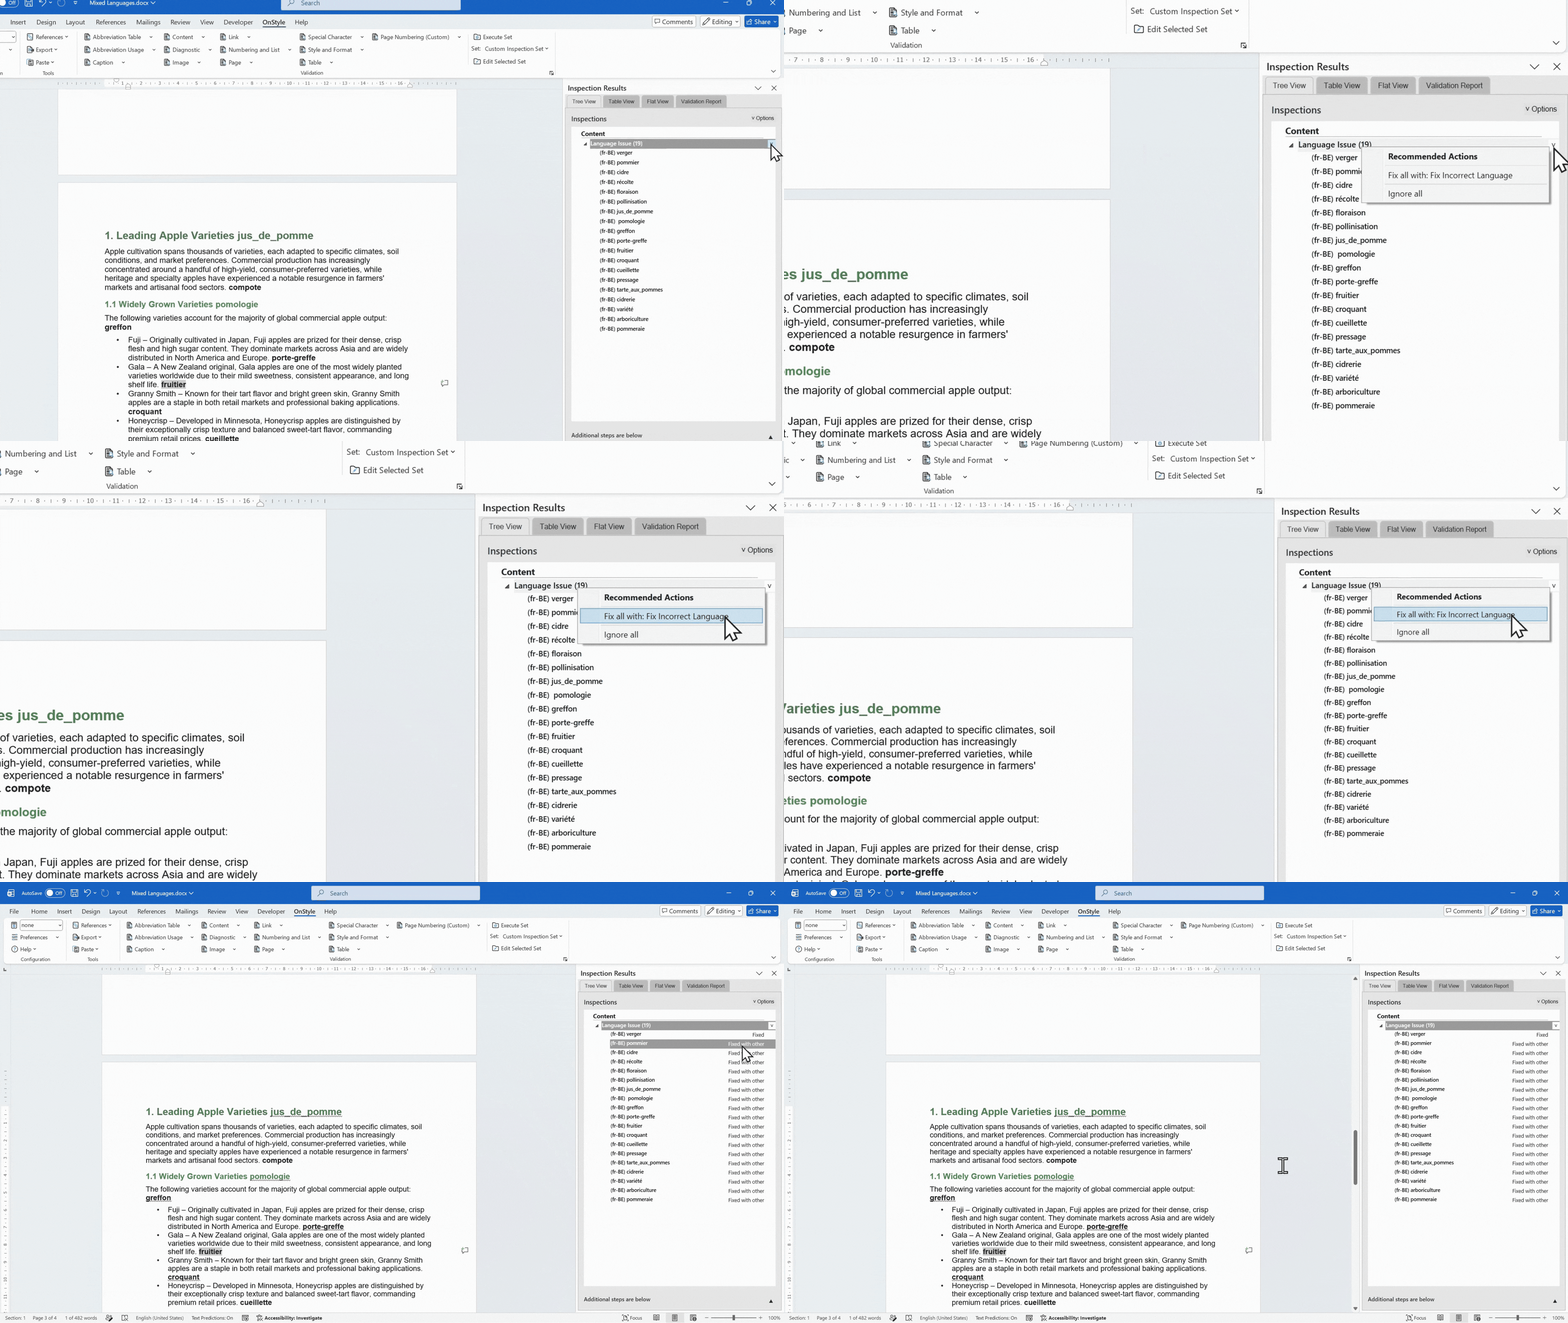
(In the image example, the automatic correction sets the proofing language to US English. The target language can be configured to another language depending on document requirements.)
Using OnStyle for checking and fixing proofing language is faster than selecting text manually because it checks the full document automatically and can fix paragraphs that are easy to miss by eye.
Common Proofing Language Problems in Word
Section titled “Common Proofing Language Problems in Word”Common proofing language issues include:
- Correct text is underlined in red because the wrong dictionary is applied.
- Real spelling mistakes are not flagged because the text is set to the wrong language.
- Only one paragraph or pasted section uses a different proofing language.
- Detect language automatically changes the proofing language unexpectedly.
- Do not check spelling or grammar is enabled for selected text.
- A long document contains mixed proofing languages that are difficult to find manually.
Summary
Section titled “Summary”Proofing language controls which dictionary Microsoft Word uses for spelling and grammar checking. If the proofing language is wrong, Word may underline correct text or miss real errors.
Use the native Word method for small fixes and selected text. Use Ctrl + A when the whole document needs one language. For long documents with hidden or mixed-language sections, OnStyle provides a faster way to detect and correct proofing language issues at scale.