
How to Start Page Numbers on a Specific Page in Word
If page numbers appear on your cover page or table of contents, Word is doing what it does by default: it is numbering the whole document as one continuous section. Learning how to start page numbers on a specific page in Word fixes that problem by separating the introductory pages from the main content.
This tutorial explains how to remove unwanted page numbers, divide the document into sections, unlink the footer, insert a page number where the real content begins, and make that page display as page 1.
Why Page Numbering Is Complicated in Word
Section titled “Why Page Numbering Is Complicated in Word”Word treats a document as one section until you tell it otherwise. That means if your cover page is the first physical page and your table of contents is the second physical page, Word normally counts both of them before the body content begins.
For many reports, proposals, manuals, regulatory submissions, and professional documents, that is not what you want. The cover page and table of contents often stay unnumbered, while the first real content page starts at page 1.
To make that happen, you need three things:
- A section break before the first page that should be numbered.
- An unlinked footer in the new section.
- A page number format that starts the new section at 1.
How to Remove Page Numbers in Word
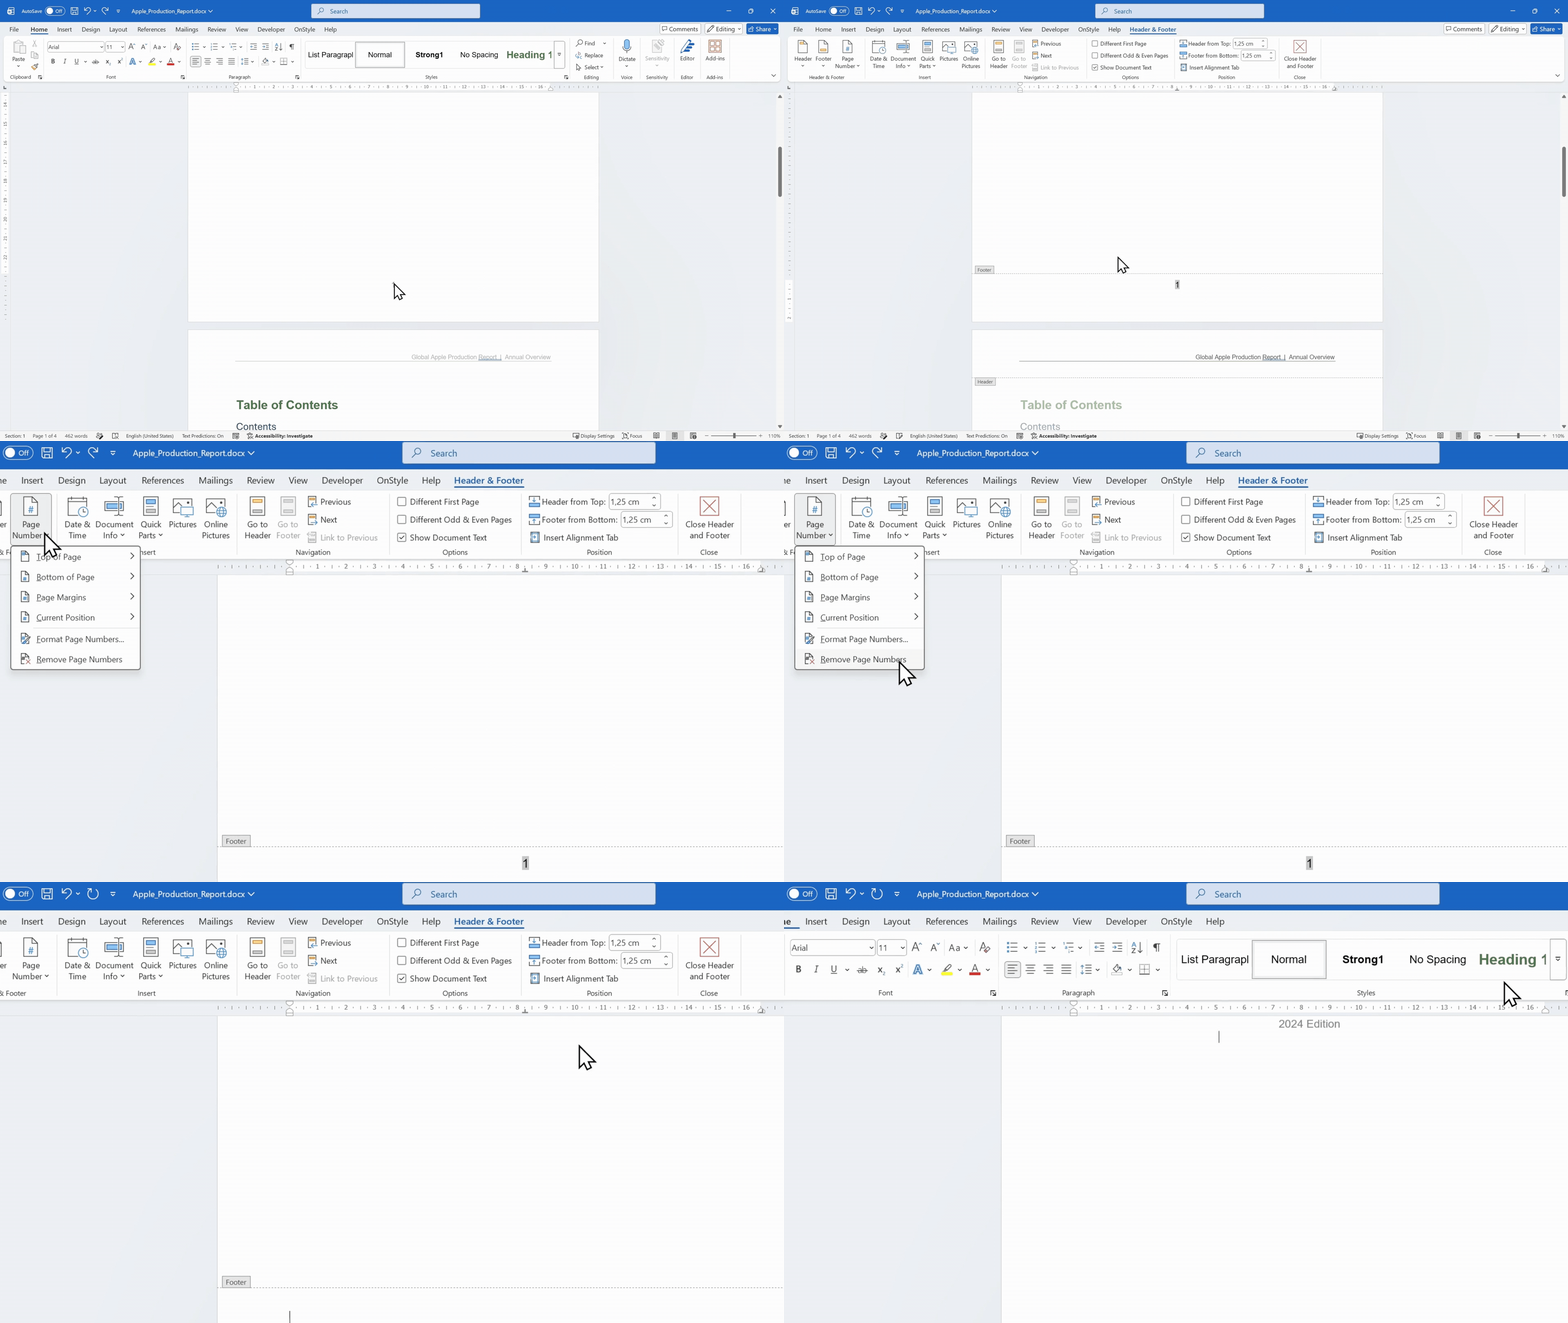
Section titled “How to Remove Page Numbers in Word”Before creating a clean numbering setup, remove any page numbers that are already in the wrong place. This prevents old header or footer content from interfering with the new section-based numbering.
Open the header or footer area by double clicking in the footer, select the existing page number if one is already present, and delete it. After the old numbering is removed, you can build the correct page-numbering structure from the beginning.
How to Start Page Numbers on a Specific Page in Word
Section titled “How to Start Page Numbers on a Specific Page in Word”The most reliable way to start page numbers on a specific page in Word is to insert a section break before the content that should be numbered. Then the new section can have its own footer and its own page-numbering settings.
Step 1: Place the cursor at the end of the last unnumbered page. In most documents, this is the end of the table of contents page. If your document has only a cover page before the main content, place the cursor at the end of the cover page.
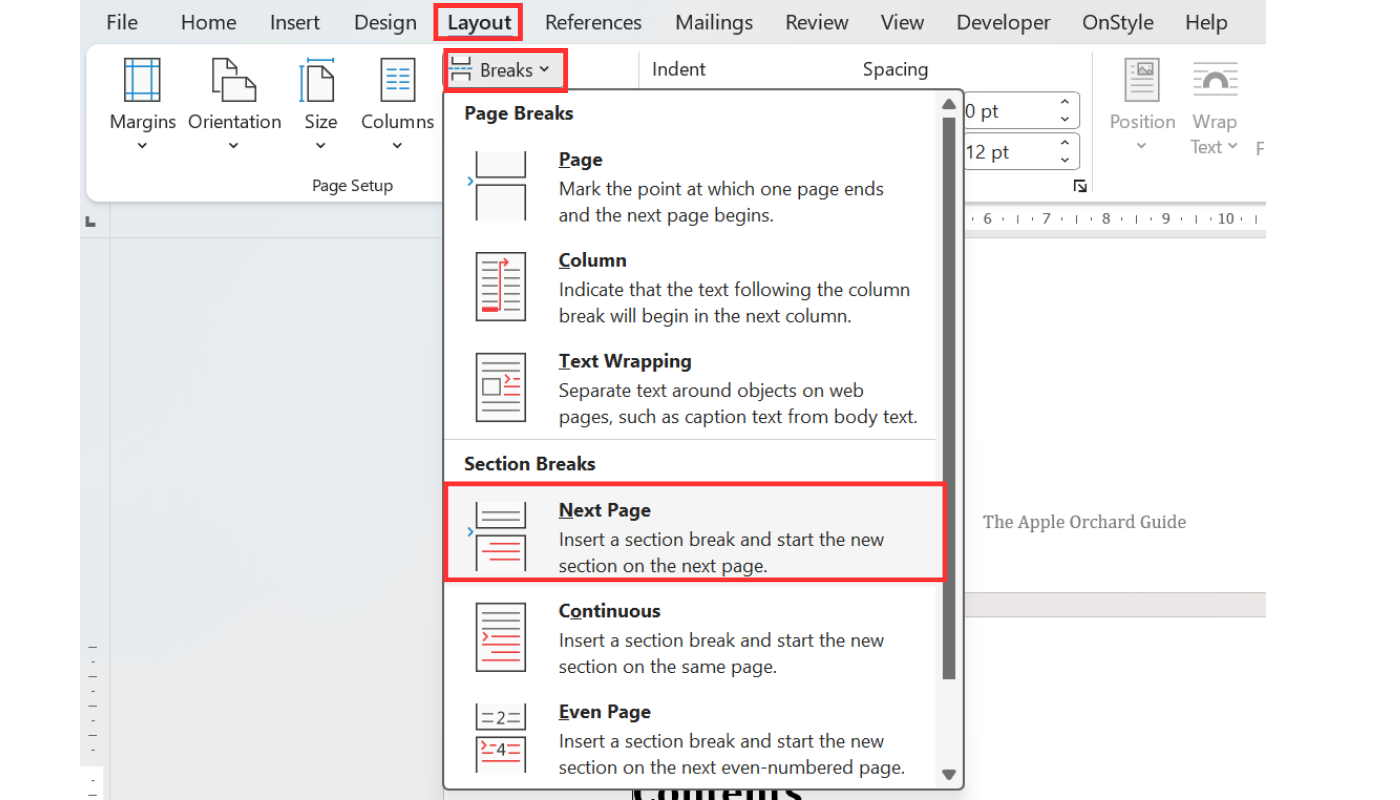
Step 2: Go to the Layout tab and select Breaks. Under Section Breaks, choose Next Page. This starts the next part of the document in a new section on a new page.
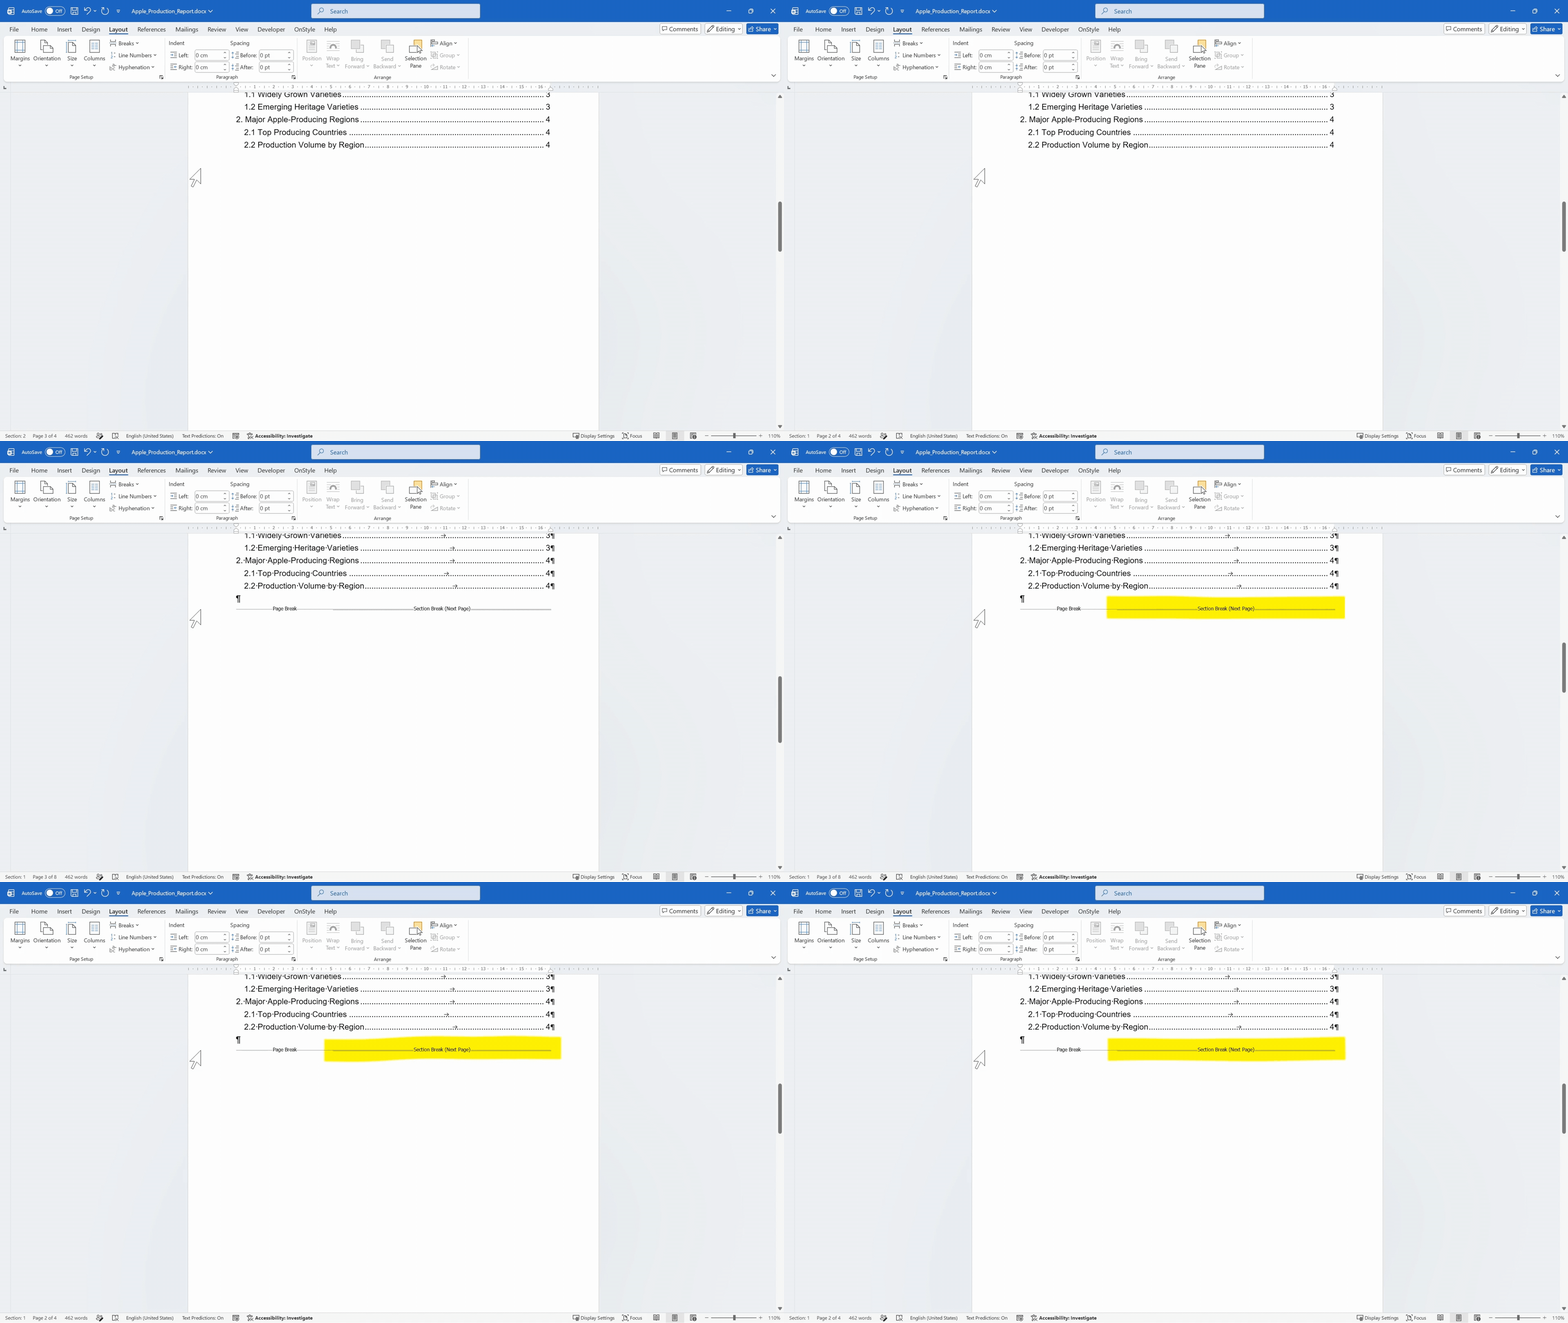
Step 3: Show formatting marks if you want to confirm the break. Press Ctrl + Shift + 8, or use Show/Hide ¶ on the Home tab. You should see a section break labeled as a section break in the document.
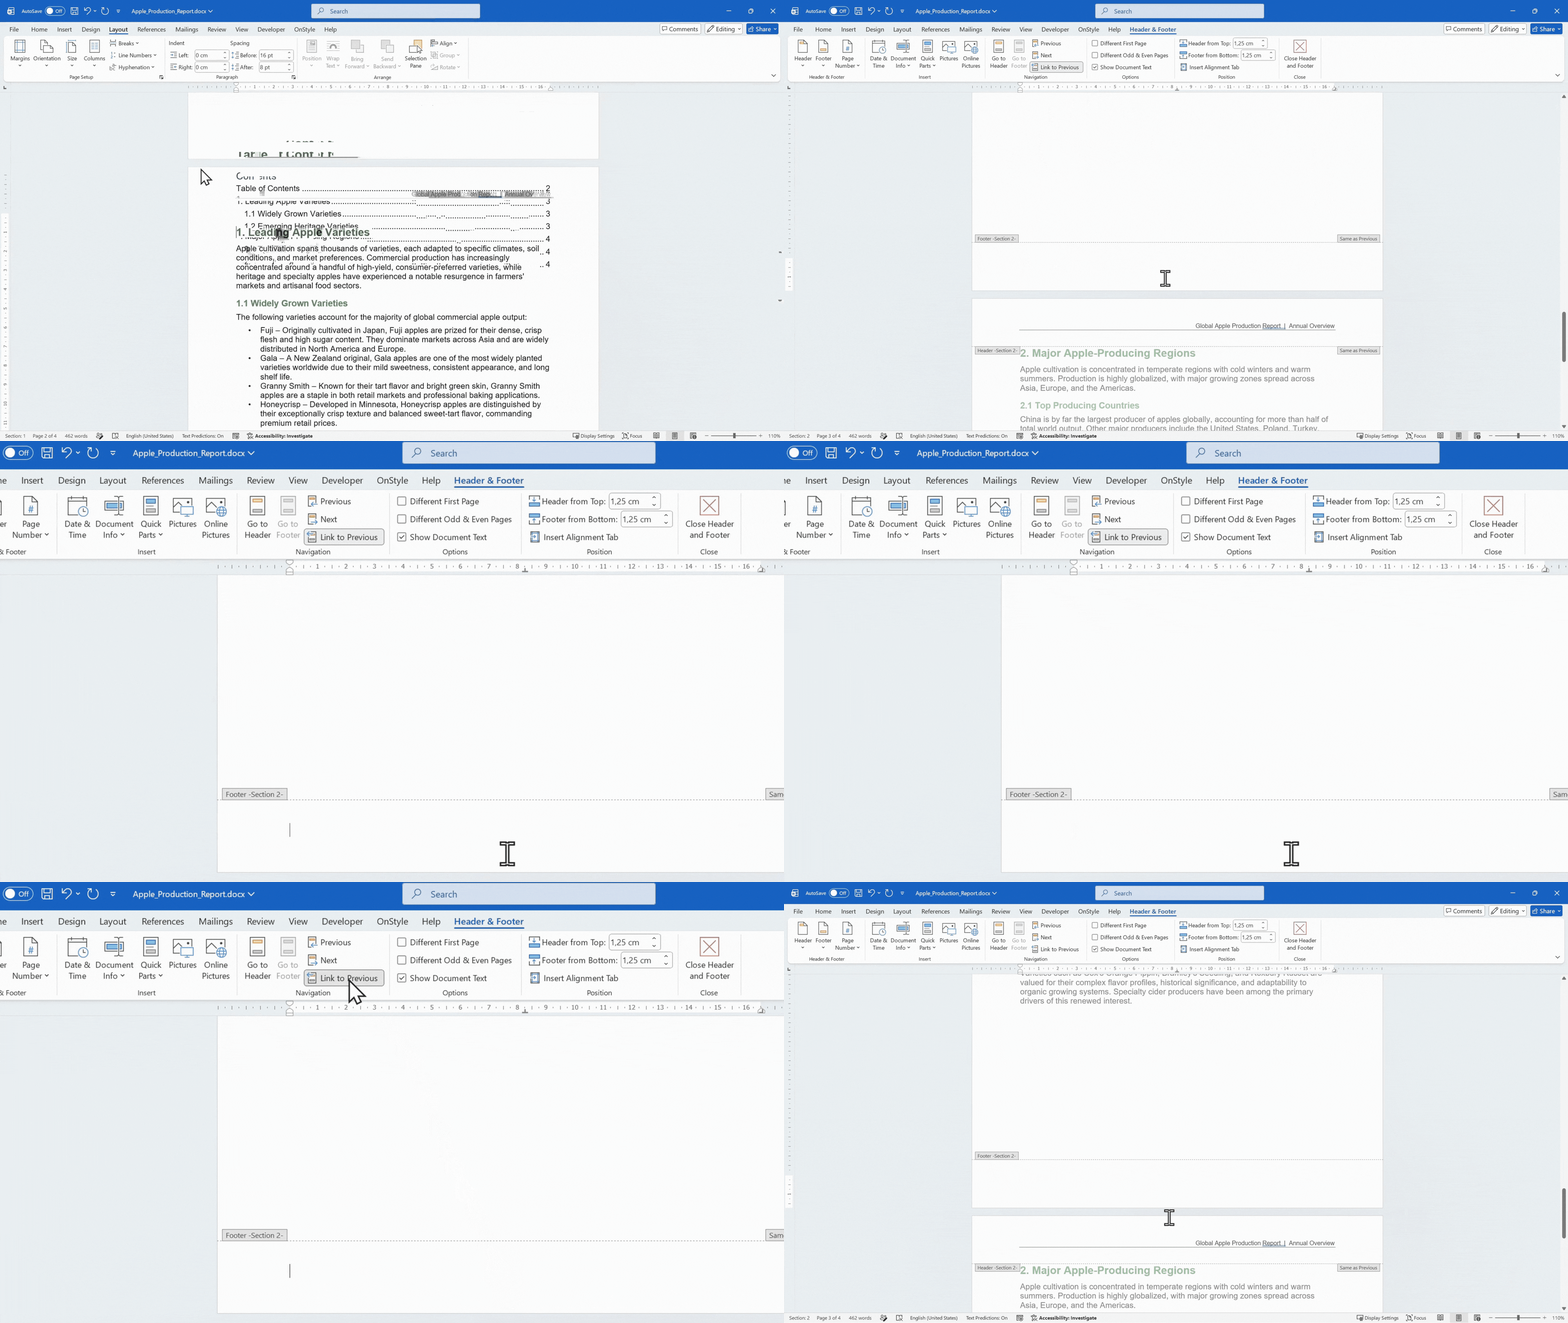
Step 4: Double-click inside the footer area of the first content page. This is the page where page numbering should begin.
Step 5: On the Header & Footer tab, check Link to Previous. If Link to Previous is highlighted, the footer in the new section is still connected to the previous section. Select Link to Previous to turn it off.
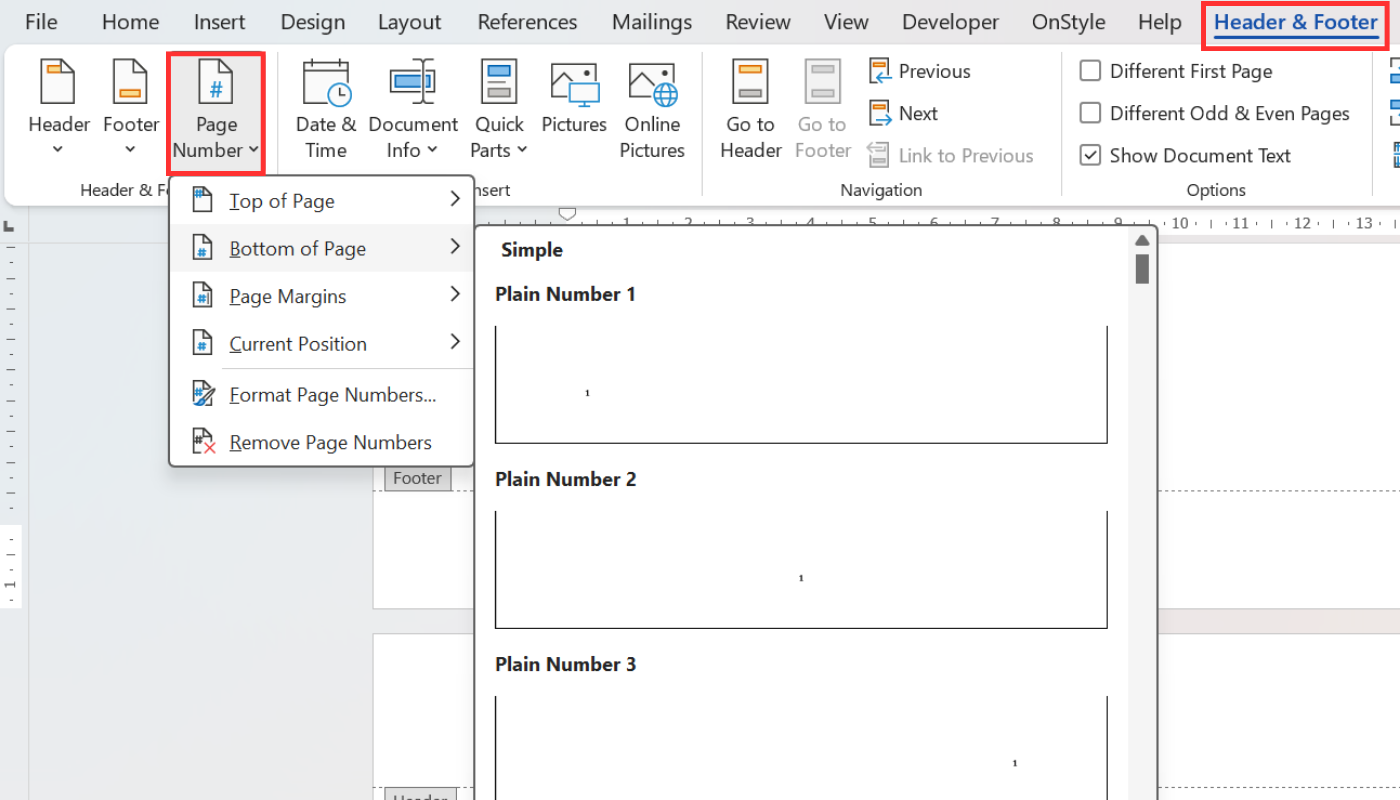
Step 6: Insert the page number. On the Header & Footer tab, select Page Number, choose the position, and select the layout you want. Bottom of Page is the most common choice for standard documents.
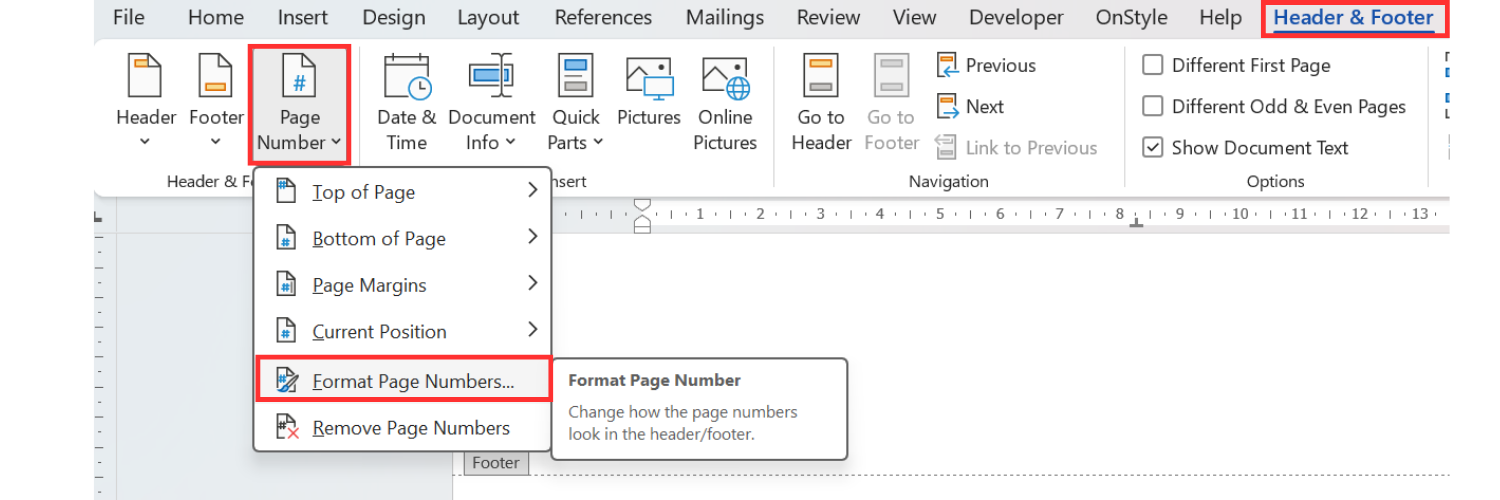
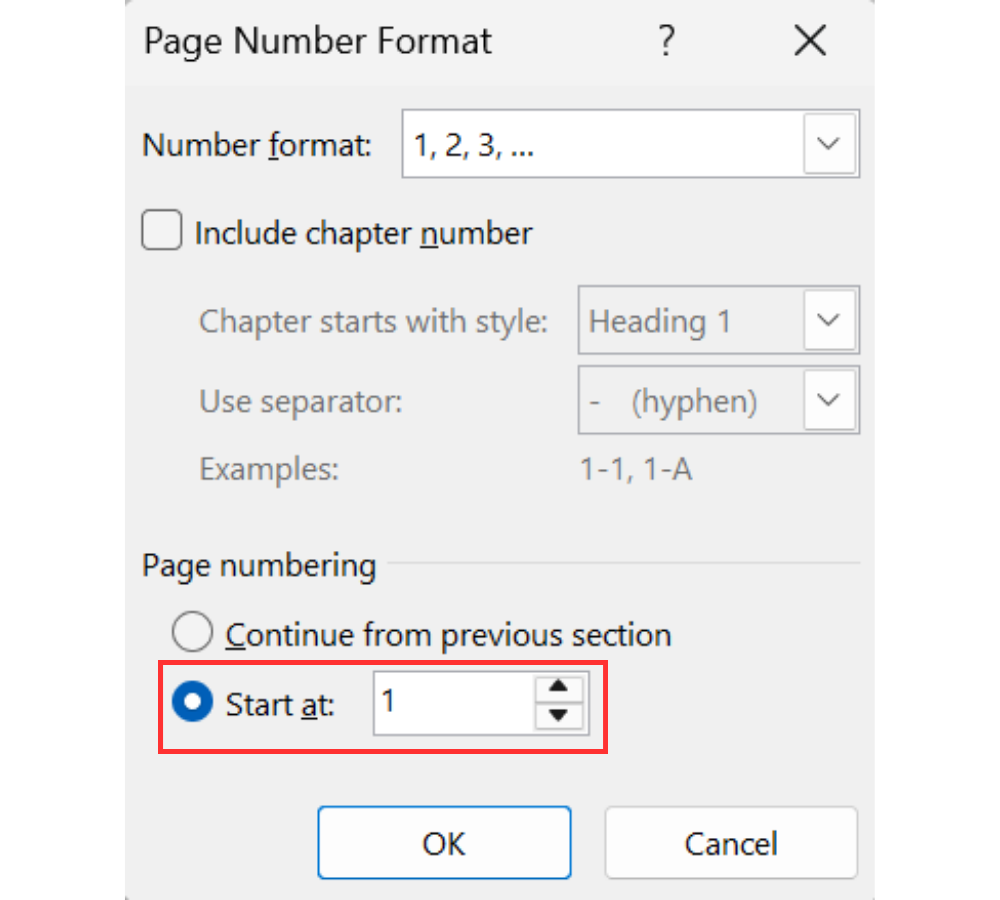
Step 7: Fix the starting number. On the Header & Footer tab, select Page Number, then choose Format Page Numbers. In the Start at field, enter 1, then select OK.
Step 8: Close the header and footer. Press Escape, or double-click back in the body of the document. The first content page should now show page 1, while the cover page and table of contents should have no page number.
What the Section Break Does in Word
Section titled “What the Section Break Does in Word”A Next Page section break divides the document into separate sections. Section one contains everything before the break, such as the cover page and table of contents. Section two contains everything after the break, which is where the main content begins.
Because the sections are separate, the footer in section two can behave differently from the footer in section one. That is why page numbers can be hidden from the introductory pages while still appearing in the main document body.
Why the First Content Page May Show 3 Instead of 1
Section titled “Why the First Content Page May Show 3 Instead of 1”After you insert a page number, Word may still count from the beginning of the document. For example, if the cover page is page 1 and the table of contents is page 2, the first content page may show 3.
That number is technically correct for the physical page position, but it is not correct for documents where body content should start at page 1. Use Format Page Numbers and set Start at to 1 to restart numbering in the new section.
How to Start Numbering Later in Word
Section titled “How to Start Numbering Later in Word”The same concept works if the main content starts on page 3, page 4, or later. Insert the Next Page section break at the end of the last introductory page. Then open the footer in the new section, turn off Link to Previous, insert the page number, and set Start at to 1.
The exact physical page does not matter. What matters is where the new section begins. The first page in the new section can be set to display page 1.
How to Check if Page Numbering is Correct in Word
Section titled “How to Check if Page Numbering is Correct in Word”After setting the page number, scroll back through the document and check three areas:
- The cover page should not show a page number.
- The table of contents or other introductory pages should not show a page number, unless your document style requires one.
- The first content page should show page 1.
Then continue scrolling through the body content to make sure the page numbers increase normally from that point onward.
Quicker Page Number Management with OnStyle
Section titled “Quicker Page Number Management with OnStyle”The native Word method works well for simpler documents. However, longer documents with many section breaks can make page numbering harder to manage. Reports, regulatory submissions, technical documentation, and company-controlled documents often need more reliable pagination checks.
OnStyle is a Microsoft Word add-in built for professional document quality and compliance. It includes tools that help manage page numbering across structured documents instead of relying only on manual section-by-section checks.
How OnStyle Checks Missing Page Numbers
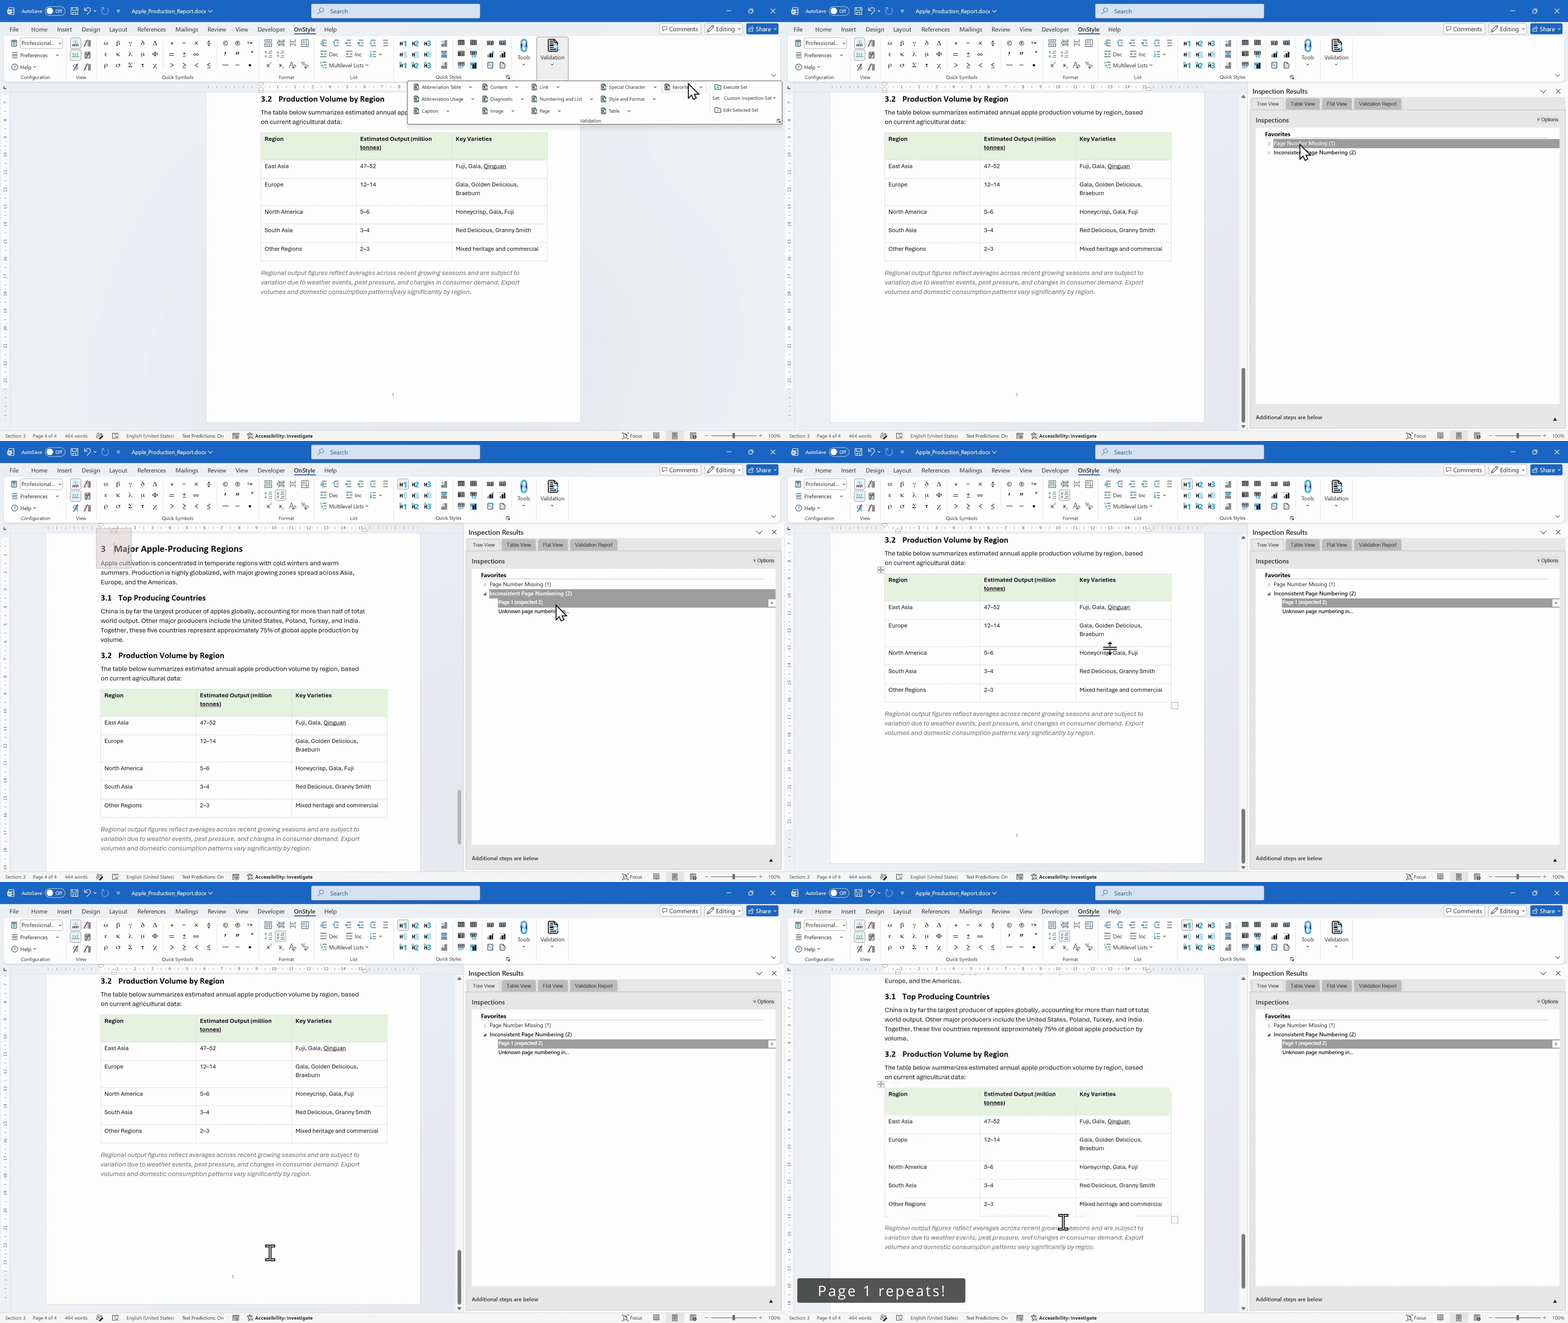
Section titled “How OnStyle Checks Missing Page Numbers”OnStyle includes a Page Number Missing inspection module. When you run an inspection, OnStyle scans every section of the document and flags any section where a page number is missing from the header or footer.
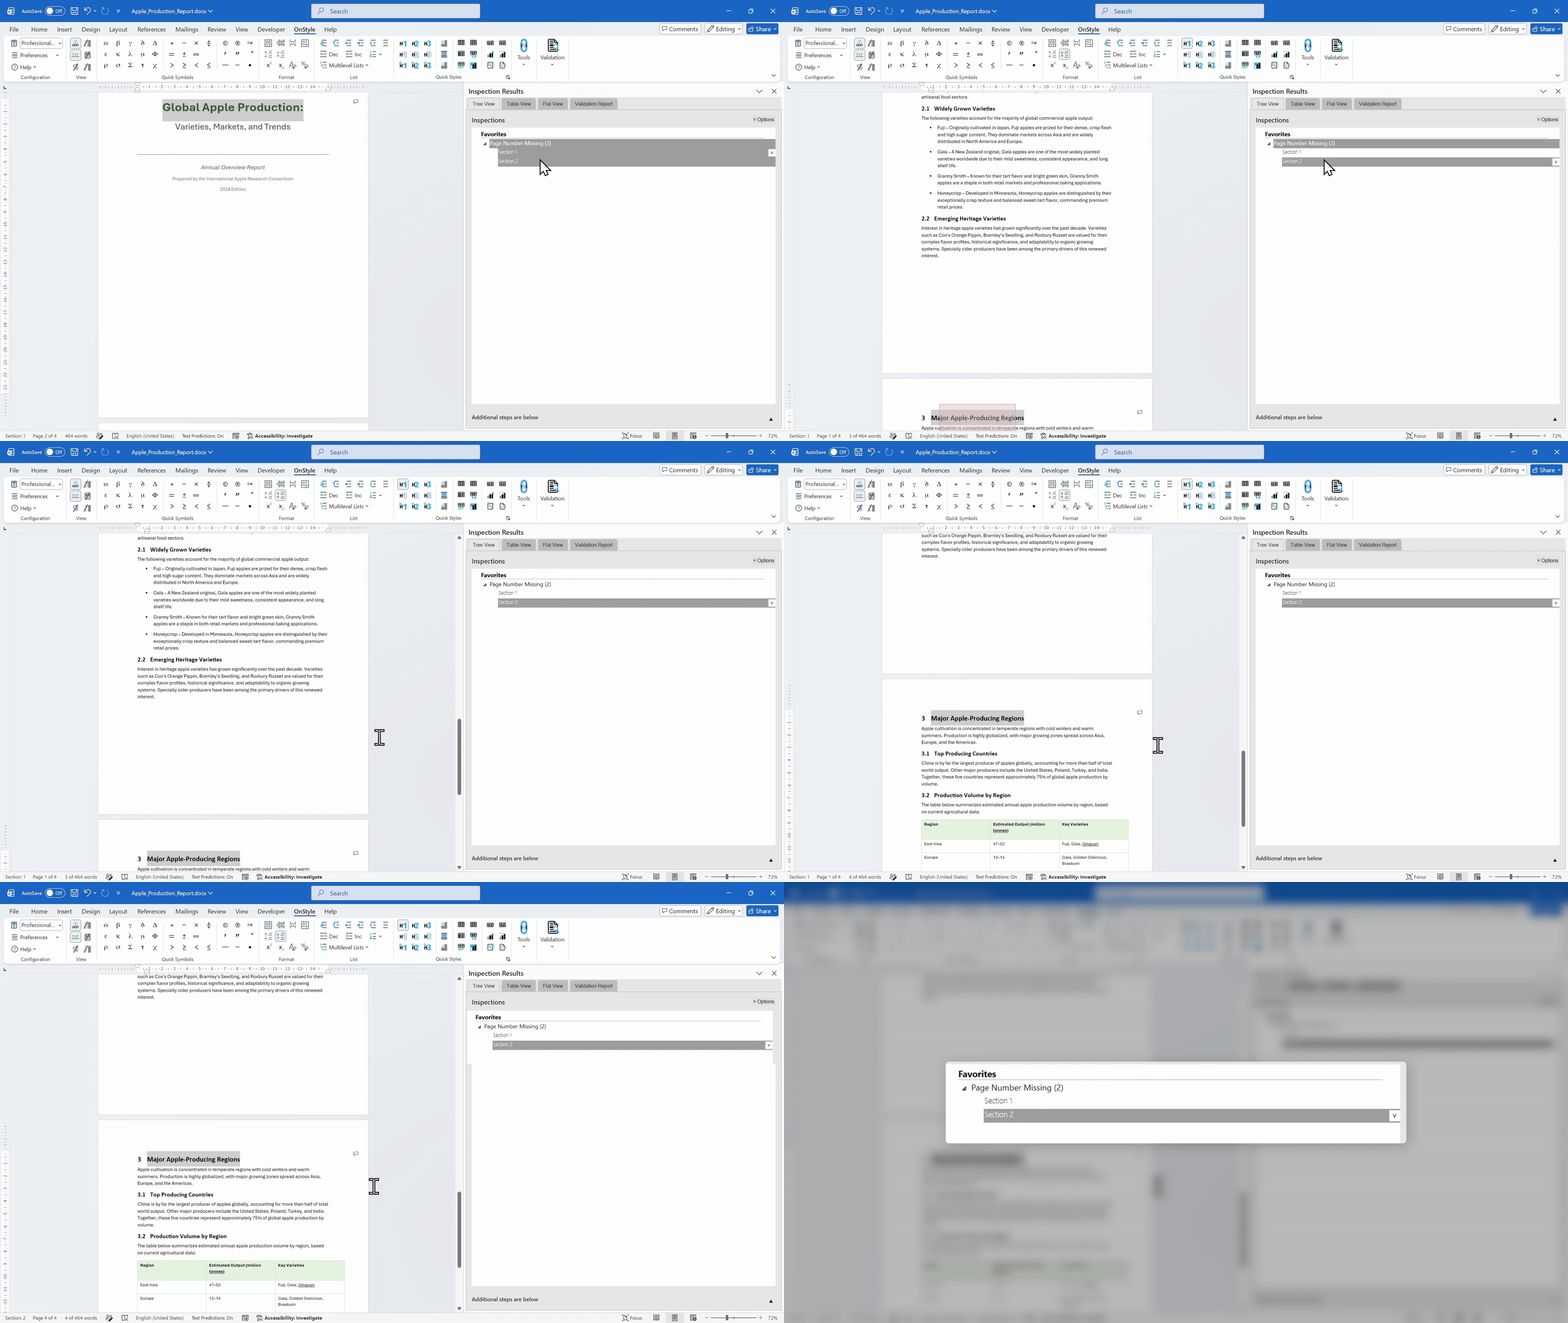
This is useful because complex documents often contain several section breaks. A section can accidentally lose its page number, and that problem may not be obvious until the document is printed, exported, or submitted.
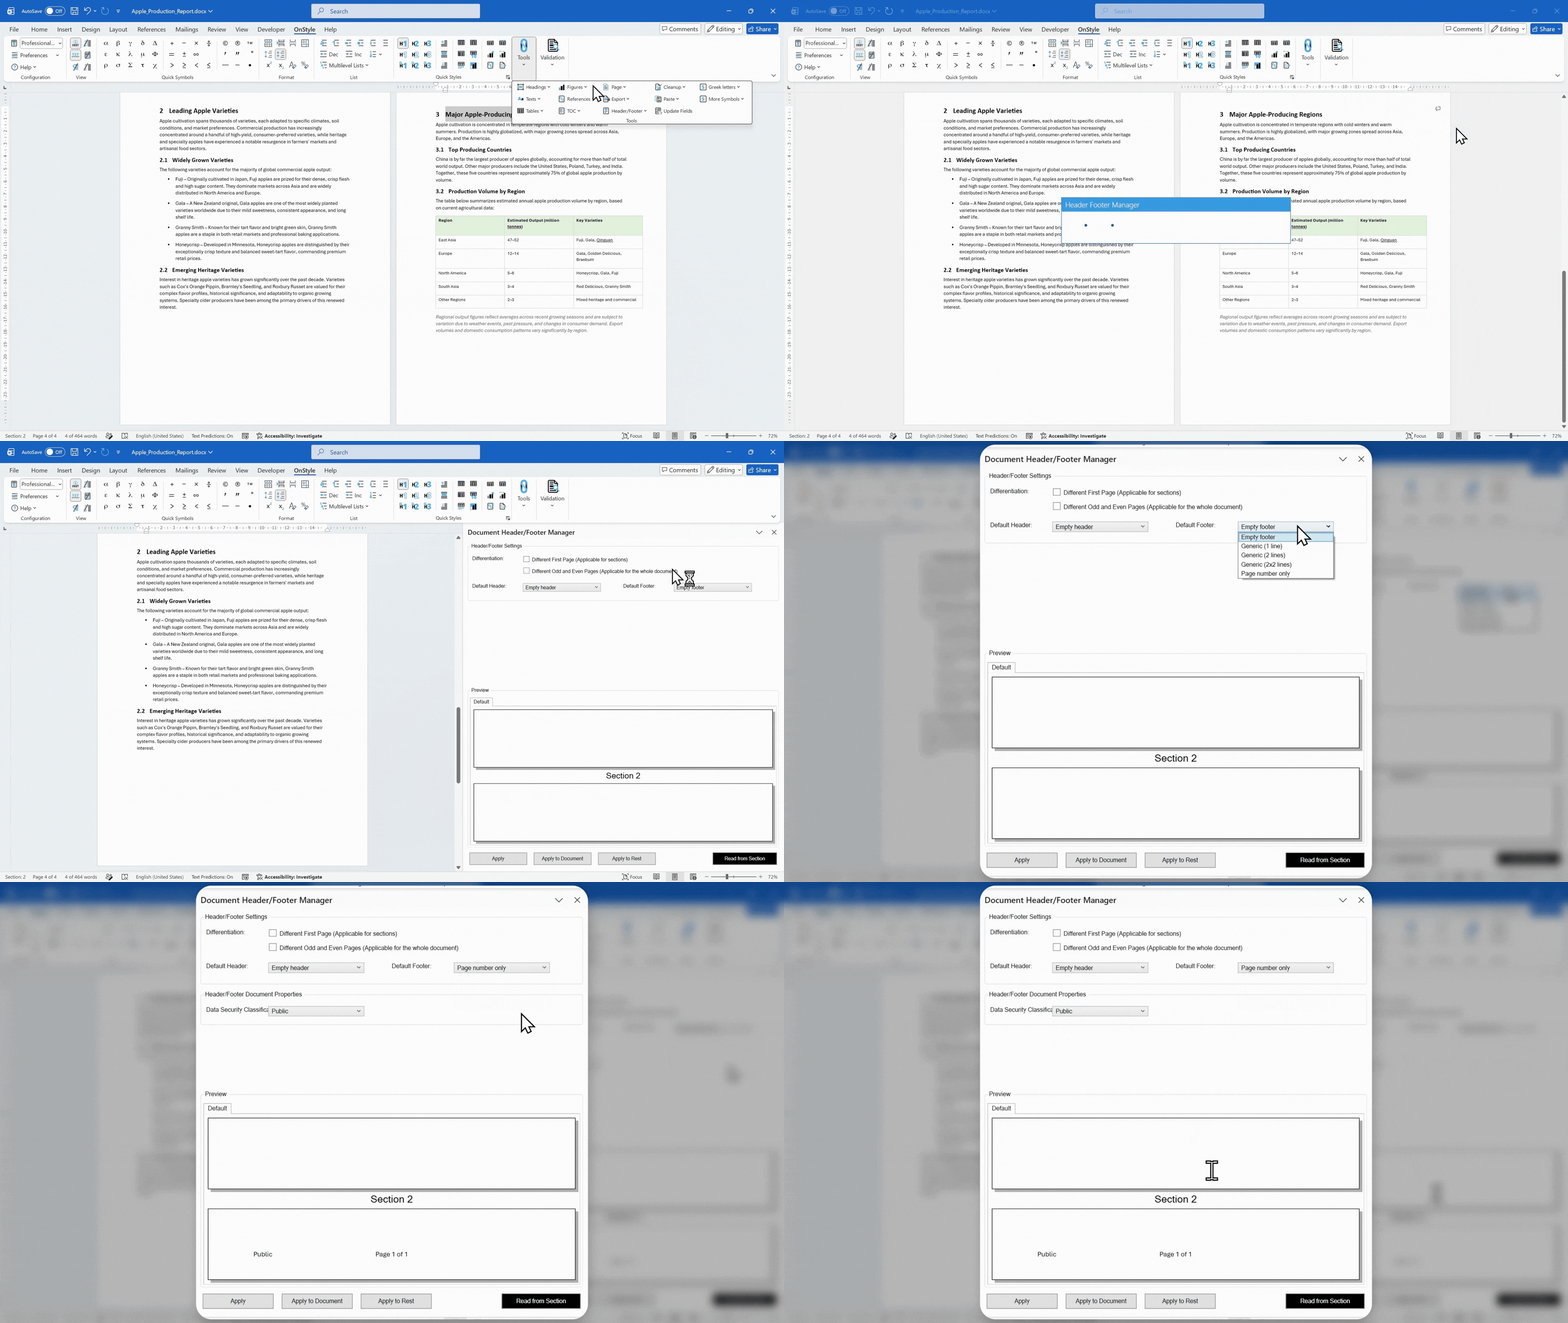
How OnStyle’s Header and Footer Manager Helps with Page Numbering
Section titled “How OnStyle’s Header and Footer Manager Helps with Page Numbering”OnStyle also includes a Header and Footer Manager. This tool lets you select pre-configured header and footer templates defined by your required style guide, including templates that already contain correctly positioned page numbers.
Before applying a template, you can use the live preview to check how it will look. Then you can apply the header and footer to the current section, the whole document, or from the current section forward.
The page number field inserted by OnStyle is the proper built-in Word field, not manually typed text. That keeps the numbering accurate and compatible with Word’s native page-numbering behavior.
How OnStyle Flags Page Numbering Problems
Section titled “How OnStyle Flags Page Numbering Problems”OnStyle can also check for inconsistent page numbering across sections. It can flag cases where numbering restarts unexpectedly, skips a number, or no longer follows the expected sequence.
When a problem is found, OnStyle identifies the page with the issue and shows what the expected value should be. This removes the need to hunt manually through a long document looking for pagination errors.
For documents where pagination accuracy matters, OnStyle turns a manual multi-step process into a structured workflow supported by inspections, templates, and built-in Word fields.
When to Use Native Word and When to Use OnStyle
Section titled “When to Use Native Word and When to Use OnStyle”Use the native Word method when you have a simple document and only need to start page numbers after a cover page or table of contents. It is the best way to understand how Word sections, footers, and page numbering work.
Use OnStyle when the document is long, structured, regulated, or controlled by a company style guide. OnStyle is especially useful when the document has many sections and page-numbering consistency needs to be checked across the entire file.
Common Mistakes When Starting Page Numbers on a Specific Page in Word
Section titled “Common Mistakes When Starting Page Numbers on a Specific Page in Word”- Not removing old page numbers before setting up the new structure.
- Inserting a page break instead of a Next Page section break.
- Forgetting to turn off Link to Previous in the footer of the new section.
- Adding a typed number instead of using Word’s built-in Page Number field.
- Inserting the section break in the wrong place.
- Forgetting to set Start at to 1 after inserting the page number.
Summary
Section titled “Summary”To start page numbers on a specific page in Word, remove existing page numbers, insert a Next Page section break after the last unnumbered page, open the footer in the new section, turn off Link to Previous, insert the page number, and set Start at to 1.
After that, check the cover page, table of contents, and first content page to confirm that the numbering starts in the right place. For professional documents with many sections, OnStyle can help inspect missing or inconsistent page numbers and apply standardized header and footer templates.