
Formatting Marks in Word Explained
What are ¶ Symbols, Page Breaks, Tabs, and Hidden Characters and How to Use Them
Section titled “What are ¶ Symbols, Page Breaks, Tabs, and Hidden Characters and How to Use Them”Why Word Documents Show Unexpected Formatting Issues
Section titled “Why Word Documents Show Unexpected Formatting Issues”Formatting marks in Word can cause unexpected issues such as extra spaces, misaligned text, or unintended page breaks.
These elements define how the document is structured. They do not appear in print, but they directly affect layout, spacing, navigation, and document behavior.
Understanding formatting marks helps identify the root cause of formatting problems before making changes.
When formatting marks are visible, you can:
- Identify the cause of incorrect spacing or alignment
- Detect extra paragraph marks or tabs
- Locate hidden breaks affecting layout
- Understand the structure of complex documents
The following sections provide a complete guide of the most important formatting marks in Microsoft Word, including how they work and when to use them.
Show Formatting Marks
Section titled “Show Formatting Marks”Display formatting marks before editing. This helps identify hidden structural issues.
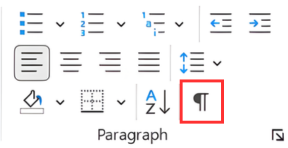
- Go to the Home tab.
- Click Show/Hide (¶) in the Paragraph group.
- Use Ctrl + Shift + 8 (Windows) or Cmd + 8 (Mac).
Customize Which Formatting Marks in Word Are Always Visible
Section titled “Customize Which Formatting Marks in Word Are Always Visible”Go to File → Options → Display. Under Always show these formatting marks on the screen, select the characters you want to display.
This allows you to focus on specific elements such as paragraph marks or tabs when troubleshooting formatting issues.
Formatting Marks in Word and How to Use Them
Section titled “Formatting Marks in Word and How to Use Them”Symbol: Mid-dot (·)
Meaning: Standard word separator.
Why it matters: Double spaces create inconsistent spacing.
Insert**:** Press the space bar
Symbol: Right arrow (→)
Meaning: Moves text to the next tab stop.
Why it matters: Multiple tabs cause alignment issues.
Insert**:** Press the Tab key
Paragraph Mark
Section titled “Paragraph Mark”Symbol: 
Meaning: Ends a paragraph and stores formatting.
Why it matters: Extra marks create unwanted blank lines.
Insert**:** Press Enter
Line Break
Section titled “Line Break”Symbol: Curved arrow pointing down to the left ↵
Meaning: Creates a new line without a new paragraph.
Why it matters: Incorrect use breaks paragraph structure.
Insert: Press Shift + Enter
Page Break
Section titled “Page Break”Symbol: Dotted line labeled Page Break
Meaning: Forces content onto a new page.
Why it matters: Uncontrolled breaks disrupt layout.
Insert: Press Ctrl + Enter

Section Break
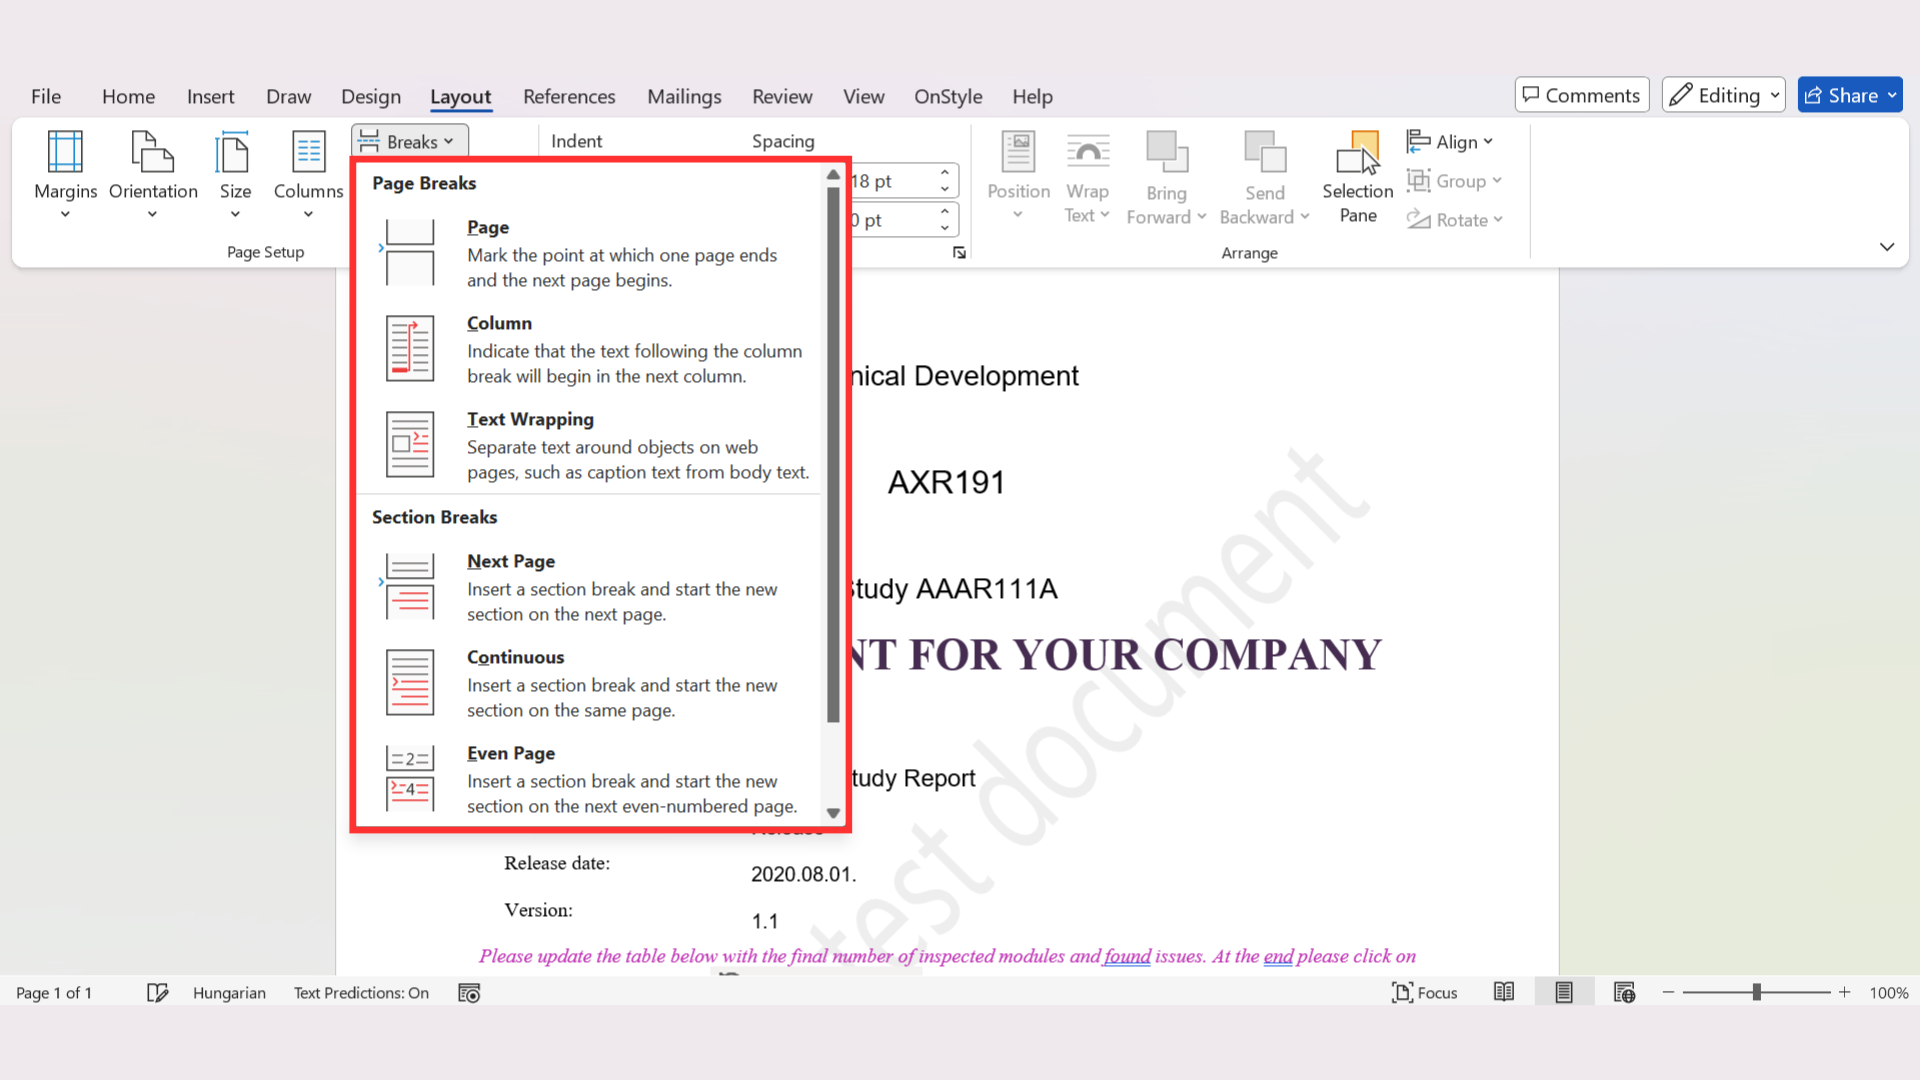
Section titled “Section Break”Symbol: Double dotted line with label (Next Page, Continuous, etc.)
Meaning: Allows different formatting in sections.
Why it matters: Incorrect use affects headers and numbering.
Insert: Layout → Breaks → Section Break
Types include:
- Next Page
- Continuous
- Even Page
- Odd Page

Column Break
Section titled “Column Break”Symbol: Dotted line with Column Break
Meaning: Moves text to the next column.
Why it matters: Only valid in multi-column layouts.
Insert: Layout → Breaks → Column

Hidden Text
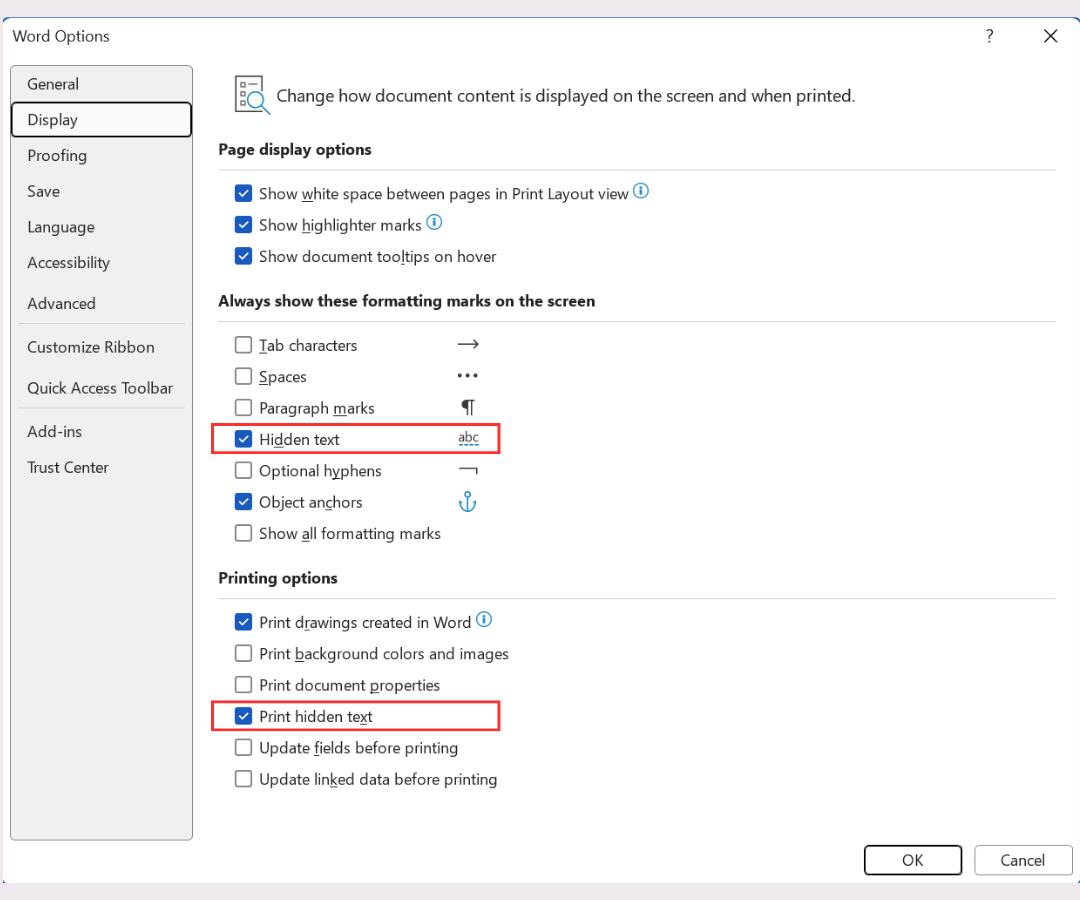
Section titled “Hidden Text”Symbol: Dotted underline (when enabled) Hidden text
Meaning: Text visible on screen but hidden in print.
Why it matters: May be unintentionally excluded from output.
Insert: Select text → Ctrl + Shift + H
Optional Hyphen
Section titled “Optional Hyphen”Symbol: Displays only when a word breaks at the end of a line; invisible otherwise.
Meaning: Controls word breaking.
Why it matters: Incorrect placement affects readability.
Insert: Press Ctrl + -
Nonbreaking Space
Section titled “Nonbreaking Space”Symbol: Degree-like circle (°)
Meaning: Prevents line breaks between words.
Why it matters: Missing usage causes layout inconsistencies.
Insert: Press Ctrl + Shift + Space
Nonbreaking Hyphen
Section titled “Nonbreaking Hyphen”Symbol: Looks like a normal hyphen but prevents line breaks
Meaning: Keeps hyphenated words together.
Why it matters: Prevents incorrect word splitting.
Insert: Press Alt + Shift + -
Object Anchor
Section titled “Object Anchor”Symbol: Small anchor ⚓
Meaning: Links objects to text.
Why it matters: Incorrect placement affects image positioning.
Table Markers
Section titled “Table Markers”Symbol: Dot inside a cell () or at the end of the row (¤)
Meaning: Store table formatting.
Why it matters: Critical for table structure.
Line Break in Tables
Section titled “Line Break in Tables”Symbol: A carriage return arrow (↵) at line ends
Meaning: Break line inside a cell.
Why it matters: Misuse affects table layout.
Insert: Press Shift + Enter inside a cell
Special Paragraph Formatting
Section titled “Special Paragraph Formatting”Symbol: Small black square ■ in the left margin.
Meaning: Controls pagination rules.
Why it matters: Incorrect settings affect layout.
Examples:
- Keep lines together
- Keep with next
- Page break before
Settings are available under Paragraph → Line and Page Breaks
Field Codes (Index/TOC/TOA fields)
Section titled “Field Codes (Index/TOC/TOA fields)”Symbol: Appear as curly-braced field codes in hidden text (dotted underline) when marks are visible (toggle with Alt + F9).
Meaning: Define dynamic elements such as Table of Contents, Index, or cross-references.
Why it matters: Hidden codes affect generated content.
Toggle: Press Alt + F9
Expand/Collapse Headings
Section titled “Expand/Collapse Headings”Symbol: Small triangles next to headings (► collapsed / ▼ expanded).
Meaning: Controls document navigation.
Why it matters: Requires correct styles.
Requires: proper heading styles
Bookmark Brackets
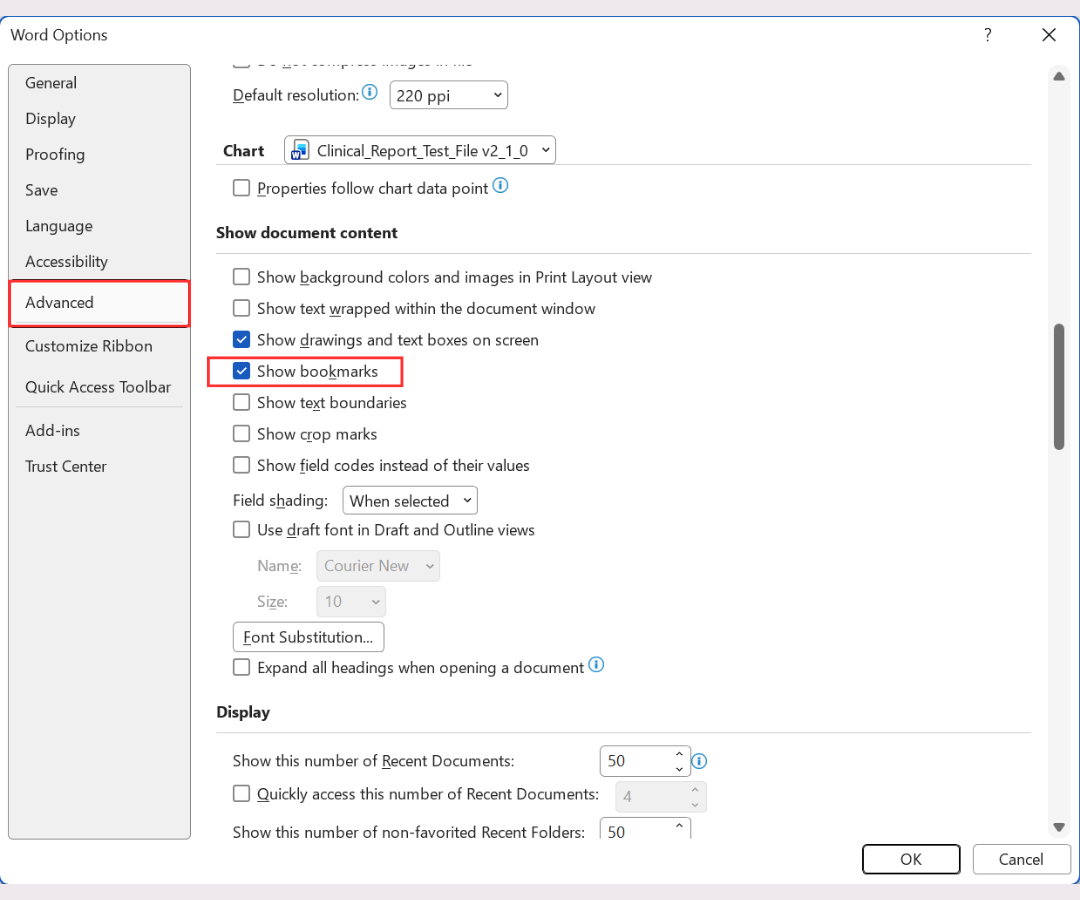
Section titled “Bookmark Brackets”Symbol: Light grey square brackets [ ] around bookmarked text (when enabled). A bookmark placed at a single point (not selected text) is displayed as a grey I-beam.
Meaning: Mark locations in text.
Why it matters: Used for navigation and references.
Enable via File → Options → Advanced → Show bookmarks
Field Shading
Section titled “Field Shading”Symbol: Grey background highlight.
Meaning: Highlights dynamic fields.
Why it matters: Important for editing visibility.
Controlled via File → Options → Advanced → Field shading
Style Area Pane Markers
Section titled “Style Area Pane Markers”Symbol: Style names displayed to the left of text (when enabled).
Meaning: Shows applied styles.
Why it matters: Used in Draft view.
Enable via: File → Options → Advanced → Display → Style area pane width
Style Separator
Section titled “Style Separator”Symbol: Pilcrow in a dotted rectangle
Meaning: Combines formatting behaviors.
Why it matters: Used in advanced layouts.
Insert: Press Ctrl + Alt + Enter
Section Navigation Elements
Section titled “Section Navigation Elements”Meaning: Support structured navigation.
Why it matters: Depend on correct styles.
En Space / Em Space
Section titled “En Space / Em Space”Symbols:
- En space: width of “N”
- Em space: width of “M”
Meaning: Typographic spacing used for alignment.
Insert: Insert → Symbol → More Symbols → Special Characters, or Unicode (U+2002 / U+2003)
Why it matters: Used in structured or print-oriented documents.
Fix Common Formatting Issues
Section titled “Fix Common Formatting Issues”Formatting Marks in Word won’t Turn Off
Section titled “Formatting Marks in Word won’t Turn Off”The Show/Hide (¶) button does not override all settings.
Go to File → Options → Display and clear selected formatting marks under Always show these formatting marks on the screen.
Also check:
File → Options → Advanced → Show document content
Remove Extra Paragraph Marks in Word
Section titled “Remove Extra Paragraph Marks in Word”Extra paragraph marks create unwanted spacing and break text flow.
Use Find and Replace to remove them across the document.
- Press Ctrl + H.
- In Find what, enter ^p.
- In Replace with, press Space once.
- Click Replace All.
Replace Manual Page Breaks
Section titled “Replace Manual Page Breaks”Manual page breaks can create unexpected blank pages and layout issues.
- Press Ctrl + H.
- In Find what, enter ^m.
- In Replace with, enter ^p.
- Click Replace All.
Formatting Marks in Word Reappear When Editing Tables
Section titled “Formatting Marks in Word Reappear When Editing Tables”Formatting marks may reappear when editing tables. Keep them visible when working with complex structures to avoid layout issues.
Pro Tips for Working with Formatting Marks Explained
Section titled “Pro Tips for Working with Formatting Marks Explained”Use Draft View together with the Style Area Pane to review both structure and formatting.
Use Find and Replace with special characters to clean up formatting:
- ^p – Paragraph mark
- ^t – Tab
- ^m – Page break
Customize visible formatting marks in File → Options → Display based on your workflow.
Why Formatting Marks Matter for Controlled Documents
Section titled “Why Formatting Marks Matter for Controlled Documents”Formatting marks help identify structural issues that affect consistency, validation, and output quality. In regulated environments, hidden formatting errors can lead to rework or compliance issues.
Automate Document Formatting with OnStyle
Section titled “Automate Document Formatting with OnStyle”- Working with formatting marks in Word helps identify issues, but detection and correction remain manual.
- The OnStyle Word add-in automates document formatting validation while keeping control over content.
- OnStyle can:
- Detect document formatting inconsistencies, including hidden issues
- Check compliance with internal or regulatory standards (for example, FDA or EMA)
- Identify issues in spacing, breaks, styles, and structure
- Provide one-click fixes or guided corrections
- Support consistent, submission-ready document output
Summary
Section titled “Summary”- Formatting marks define how a document behaves. When visible, they help identify the cause of layout and spacing issues and support controlled document formatting.
- Use them to:
- diagnose document formatting problems
- understand document structure
- prepare documents for validation and export
- for complex or regulated documents, combine formatting visibility with automated validation to ensure consistency and compliance.