
How to Convert Word to PDF Without Losing Formatting
Knowing how to convert a Word document to PDFis one of the easiest ways to share a file while keeping the layout consistent across screens, devices, and systems. A PDF is easier to send, print, upload, and review because it is less dependent on the recipient’s Word version, fonts, device, or editing settings.
However, converting Word to PDF is not only about choosing PDF as the file type. Page breaks, tables, images, headings, tracked changes, comments, document properties, accessibility settings, fields, and hyperlinks can all affect the final file.
This guide explains how to convert Word to PDF in Microsoft Word, what the PDF export options mean, why Microsoft Print to PDF is not usually the best method, what to check before sharing a PDF, and how OnStyle can help prepare a Word document before export.
Why Convert Word to PDF
Section titled “Why Convert Word to PDF”Before learning how to convert Word to PDF, it helps to understand why PDF is often the better format for sharing finished documents. PDF is useful when a Word document needs to look the same for every reader. This is especially important for reports, forms, official files, client documents, submissions, and files that should no longer be edited directly.
A PDF helps preserve:
- Page layout.
- Fonts and spacing.
- Images and tables.
- Page numbers.
- Headings and document structure.
- A stable version of the document for sharing or printing.
PDF export is also useful when the document needs to be uploaded to a portal, sent by email, archived, printed, or reviewed by someone who may not use the same version of Microsoft Word.
Here’s how to convert Word to PDF using the built-in export options in Microsoft Word.
How to Convert Word to PDF in Microsoft Word
Section titled “How to Convert Word to PDF in Microsoft Word”The easiest way to learn how to convert Word to PDF is to use Word’s Save As or Export feature.
Step 1: Open Save As
Section titled “Step 1: Open Save As”- Open the Word document.
- Open the File tab.
- Select Save As.
- Choose a recent location, or select More Options or Browse.
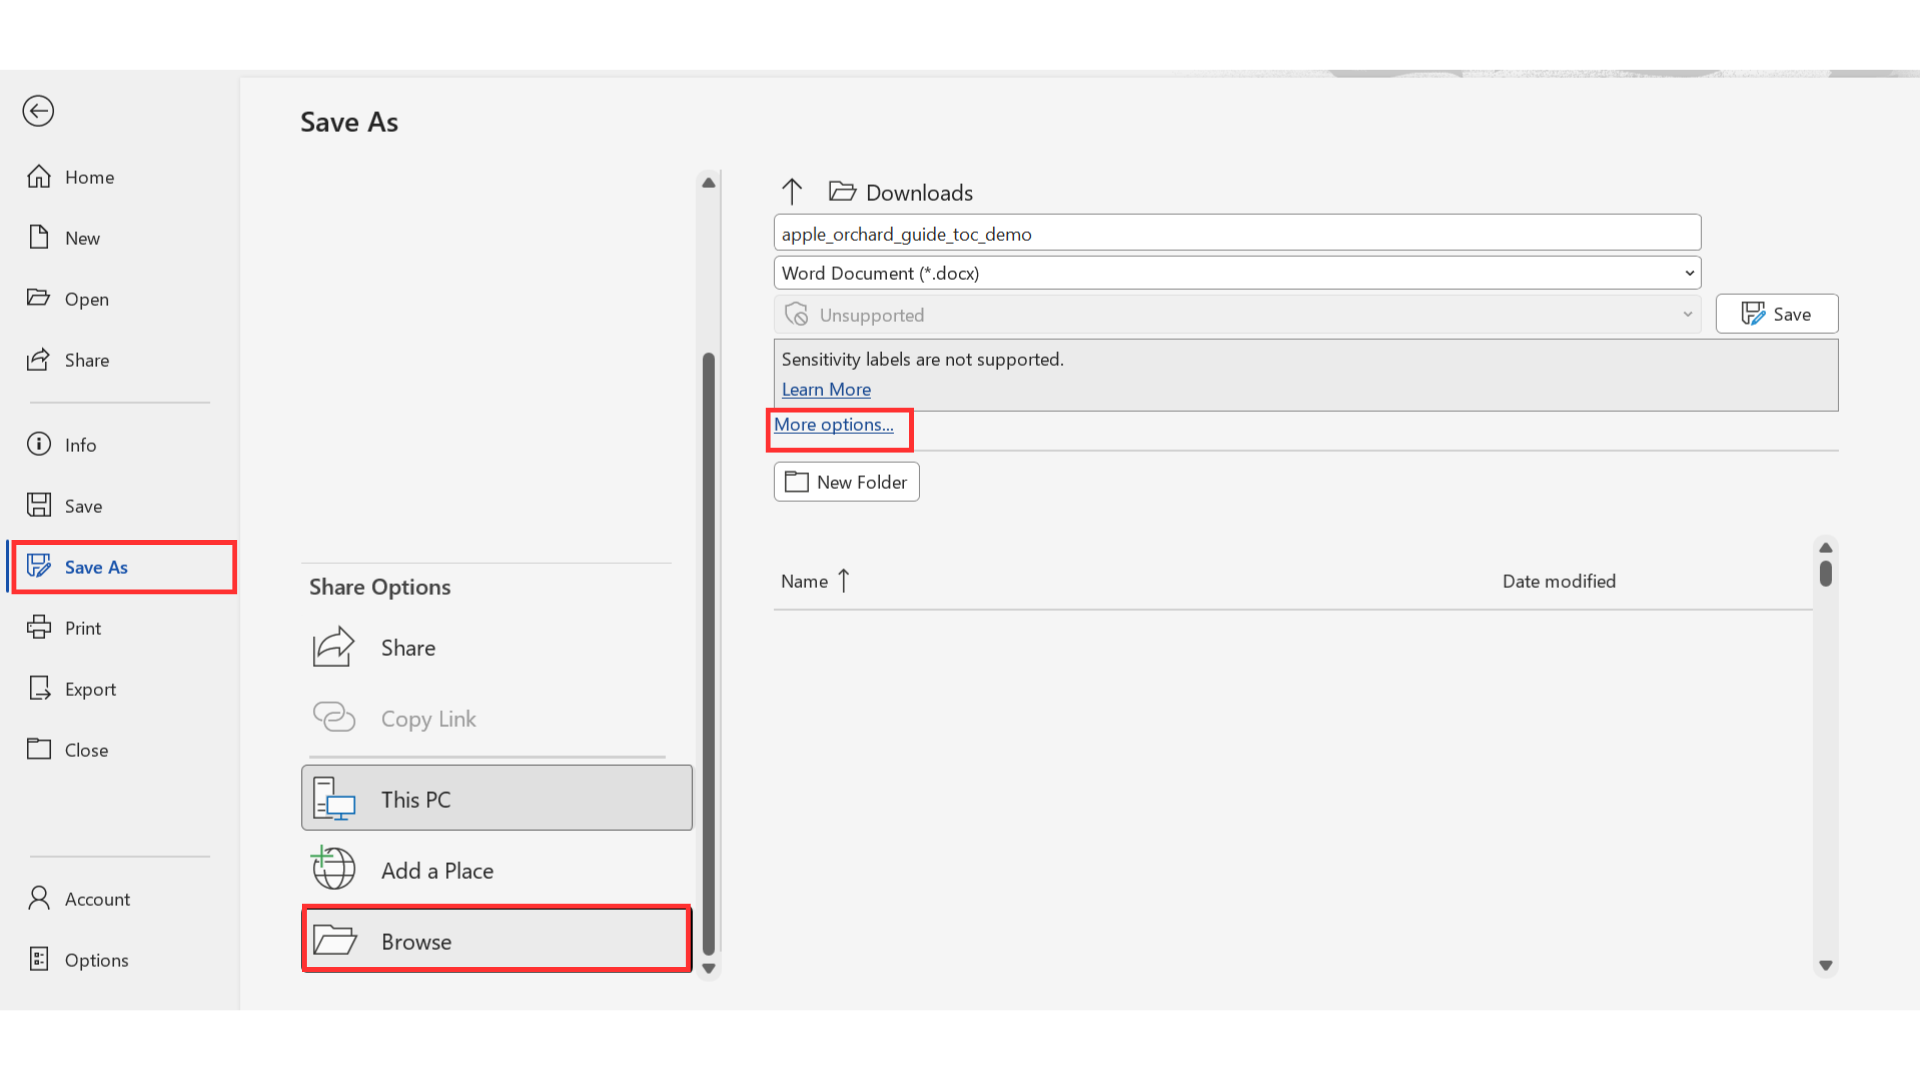
Both More Options and Browse open the same full save window. This makes it easier to navigate to the exact folder where the PDF should be saved.
Step 2: Choose PDF as the File Type
Section titled “Step 2: Choose PDF as the File Type”- Choose the save location.
- Open the File type drop-down menu.
- Select PDF.
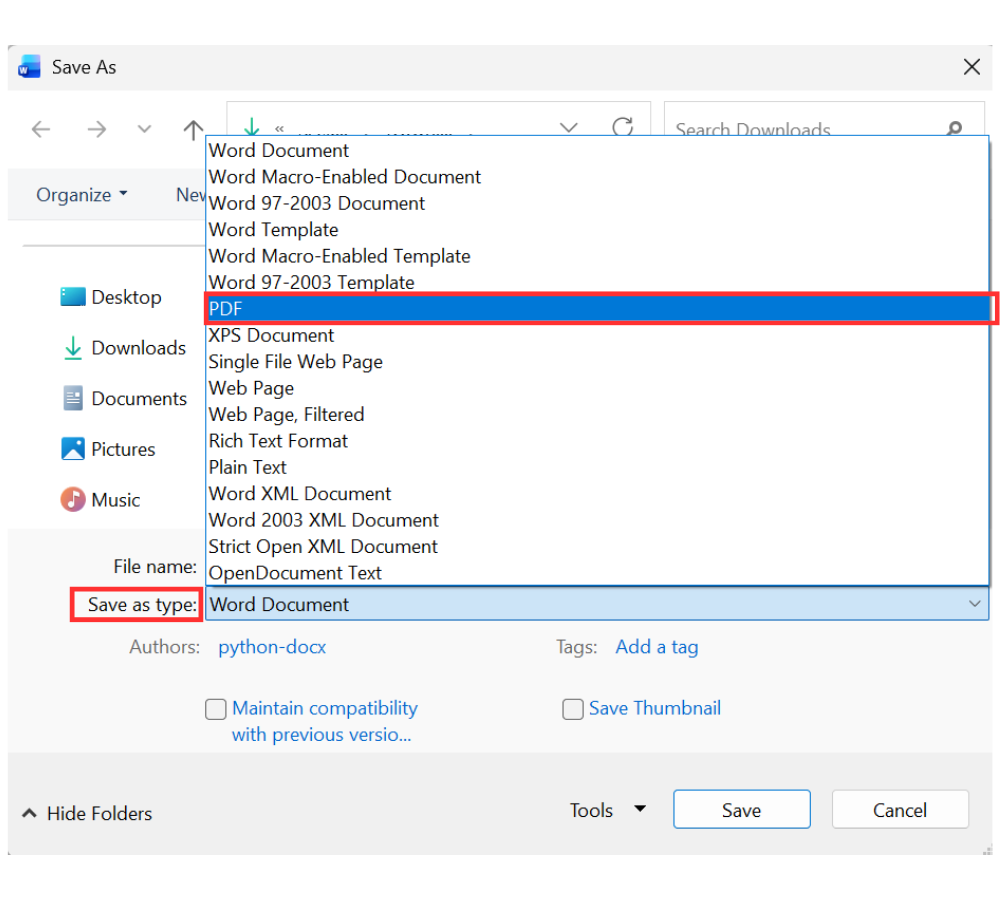
After PDF is selected, Word displays additional options that should be reviewed and can be changed if needed before saving.
Step 3: Review Basic PDF Settings
Section titled “Step 3: Review Basic PDF Settings”In the save window, check the file name and document details before saving. The lower part of the window may show document properties, such as author information or tags.
Word also allows selection between two options for file size:
- Standard.
- Minimum size.
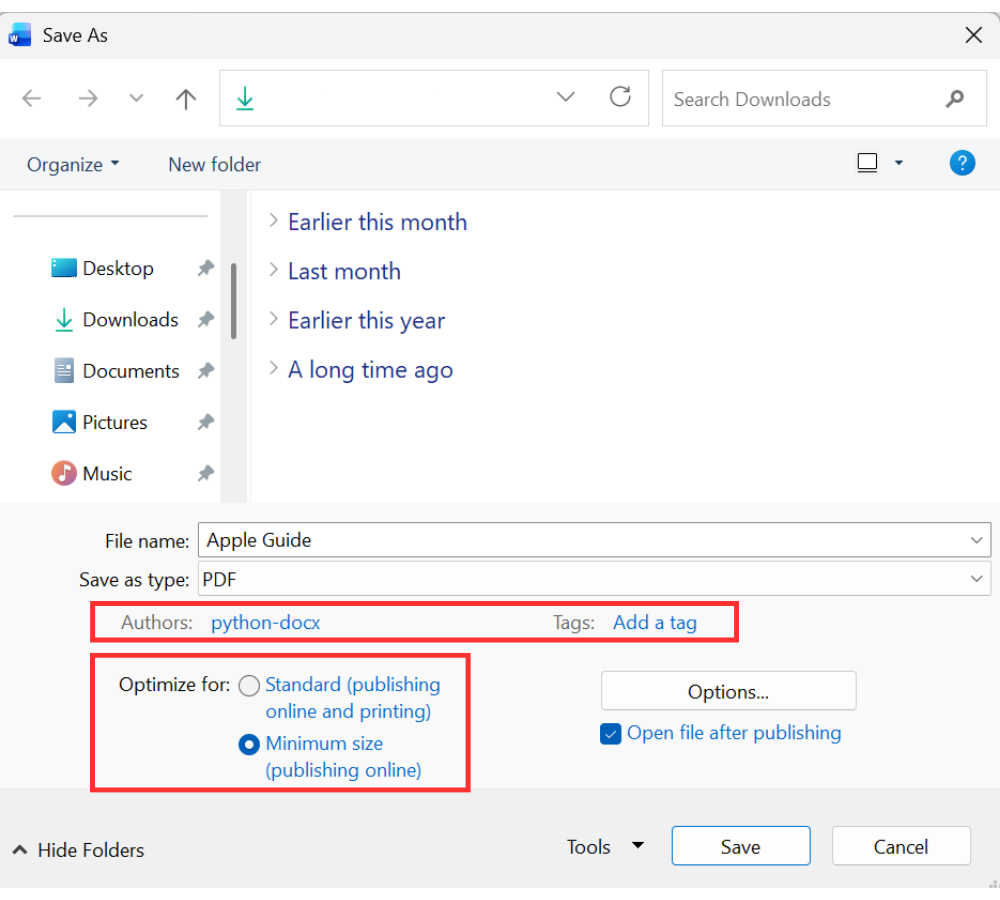
Use Standard when layout and image quality matter. Use Minimum size when the file needs to be smaller for email or upload.
Step 4: Open PDF Options
Section titled “Step 4: Open PDF Options”- Select Options.
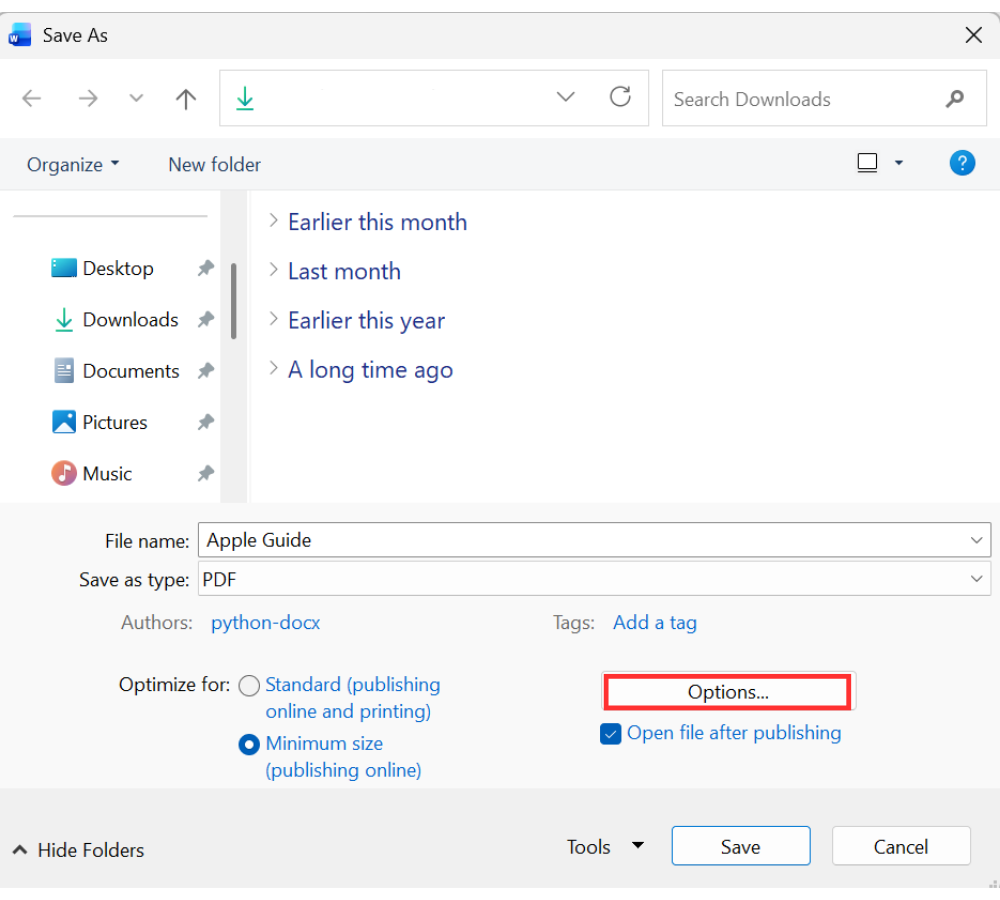
The Options dialog box gives more control over what is included in the PDF.
What PDF Options Mean in Microsoft Word
Section titled “What PDF Options Mean in Microsoft Word”The Options dialog box contains settings that affect the exported PDF. These settings are important because they control what information is included and how the PDF behaves.
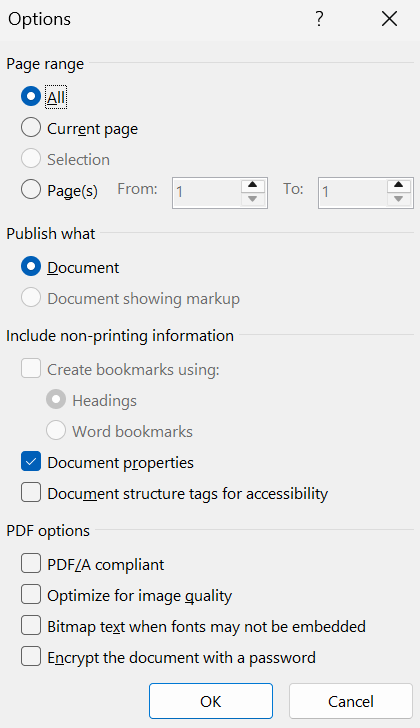
Page Range
Section titled “Page Range”At the top of the Options dialog box, choose which pages should be converted into PDF. This is useful when only part of the document should be exported.
Markup
Section titled “Markup”The markup option controls whether visible tracked changes are included in the PDF. Markup refers to tracked changes and review markup controlled on the Review tab of the Ribbon. If markup is available, Word may select this option by default.
Warning: Check the markup setting before exporting. If markup is included, tracked changes may appear in the final PDF.
Include Non-Printing Information
Section titled “Include Non-Printing Information”The Include non-printing information section contains options that affect PDF navigation and document metadata.
Word can create PDF bookmarks from:
- Headings.
- Word bookmarks.
The heading option creates bookmarks in the PDF based on standard Word heading styles. This works only if heading styles were used correctly in the Word document.
Document Properties
Section titled “Document Properties”The Document properties option controls whether document properties are carried over into the PDF. This can include information already stored in the document or shown in the save window.
Document Structure Tags for Accessibility
Section titled “Document Structure Tags for Accessibility”The Document structure tags for accessibility check box carries automatic accessibility tags into the PDF. If there is no specific reason to remove these tags, keep this option checked.
PDF/A Compliance
Section titled “PDF/A Compliance”PDF/A compliant creates the file using the PDF/A archival standard. Use PDF/A compliant when the PDF needs to be preserved, archived, or filed officially. Leave it unchecked when a normal PDF is needed and compatibility with interactive features is more important.
Optimize for Image Quality
Section titled “Optimize for Image Quality”Select Optimize for image quality when the document contains images that should remain sharp in the PDF. This is useful for documents with screenshots, diagrams, charts, or high-quality visual content.
Bitmap Text When Fonts May Not Be Embedded
Section titled “Bitmap Text When Fonts May Not Be Embedded”The Bitmap text when fonts may not be embedded option allows Word to convert some text into a bitmap image if the font cannot be embedded in the PDF. Leave this option off when searchability, accessibility, or text copying is important.
Password Protection
Section titled “Password Protection”The last option can be used to encrypt the PDF with a password. This is useful when the PDF contains sensitive content and should not be opened without authorization.
Step 5: Save the PDF
Section titled “Step 5: Save the PDF”- Select OK.
- Enter a clear file name.
- Select Save.
Word creates a PDF version of the document that is easier to share, print, or upload.
How to Use the Export PDF Option in Word
Section titled “How to Use the Export PDF Option in Word”Microsoft Word also includes an Export option for creating PDFs.
Step 1: Open Export
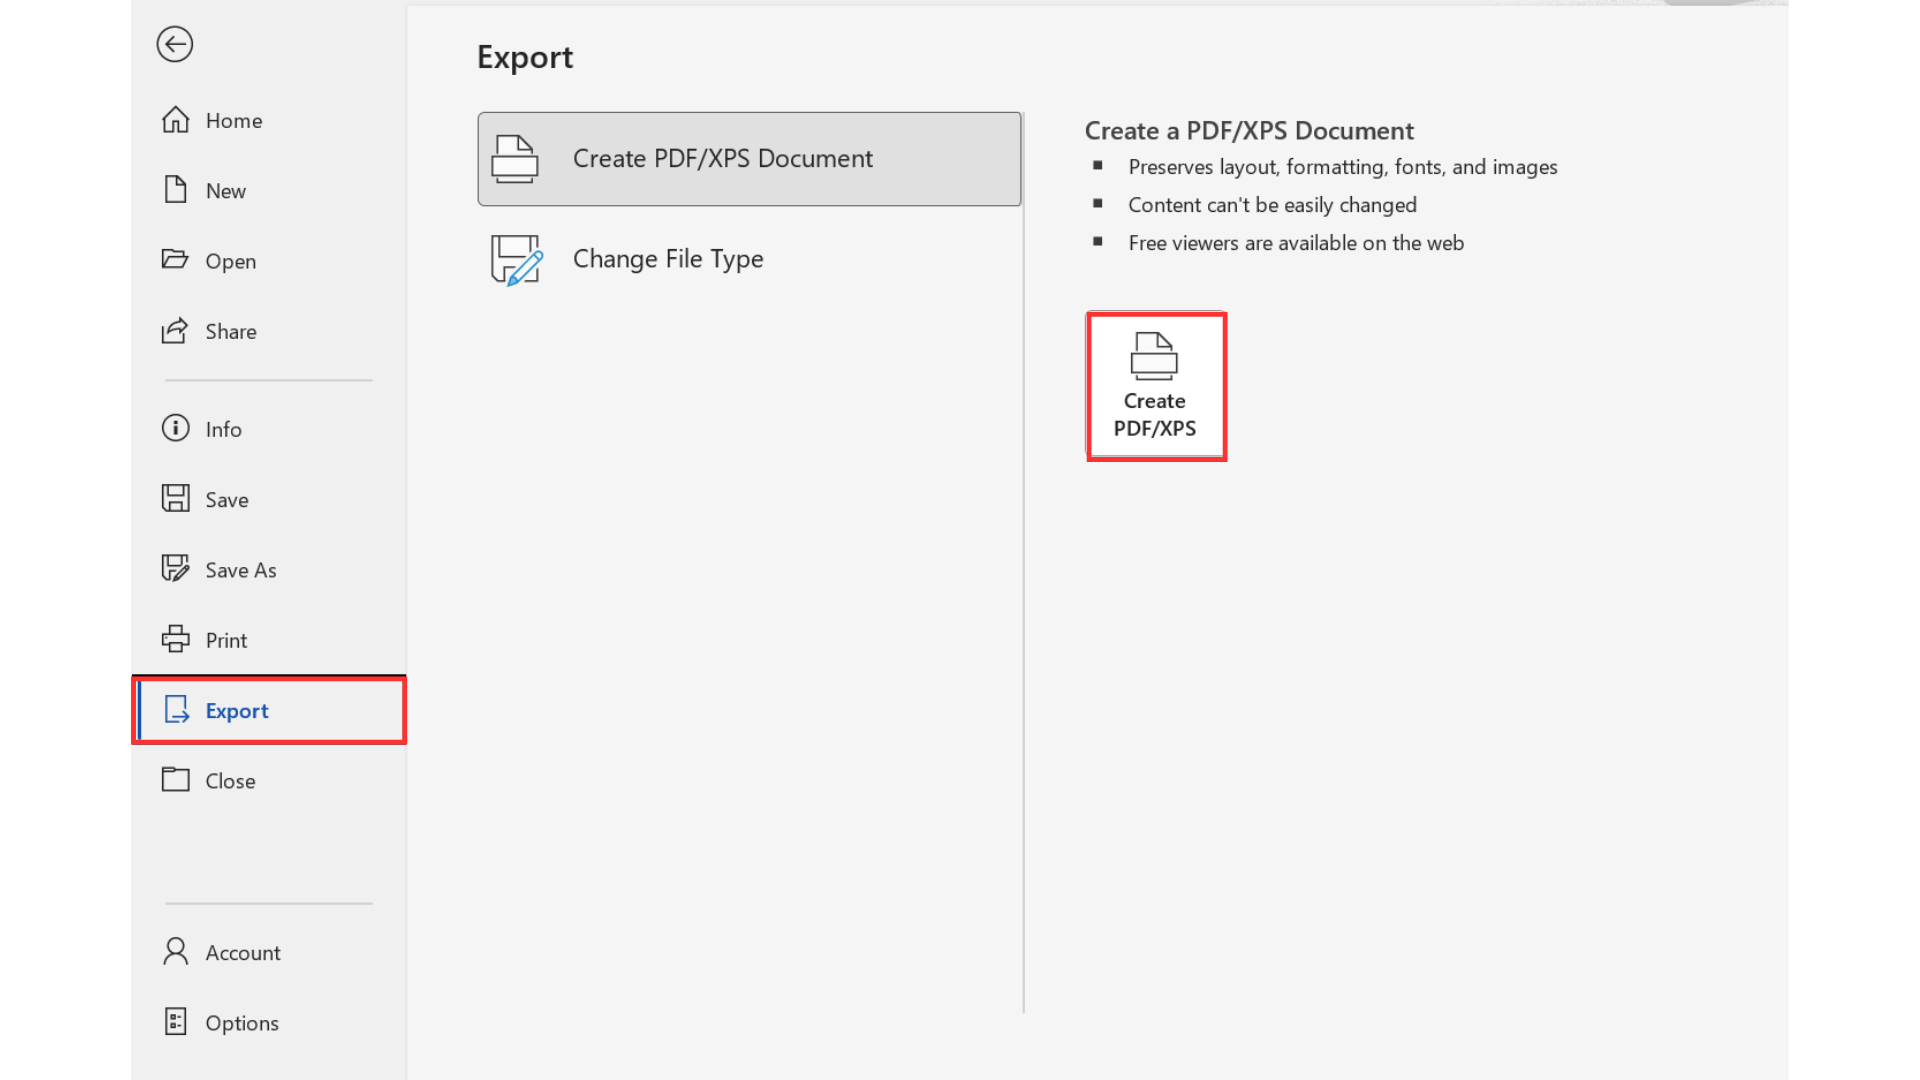
Section titled “Step 1: Open Export”- Open the File tab.
- Select Export.
- Select Create PDF/XPS, if available.
Step 2: Publish the PDF
Section titled “Step 2: Publish the PDF”In the publish window, choose the file name, save location, quality setting, and available options. Then select Publish.
The Export method creates a PDF like Save As, but it does not provide the same possibility for setting document properties in the save window.
Some sources suggest that Export may use a different PDF rendering process than Save As. If one method creates issues, try the other method to see whether it produces a better result.
Disadvantages of Printing to PDF Another common method is using Print and selecting Microsoft Print to PDF. This can feel straightforward because it follows the normal print workflow, but it is usually not the best method for exporting Word documents.
How Print to PDF Works
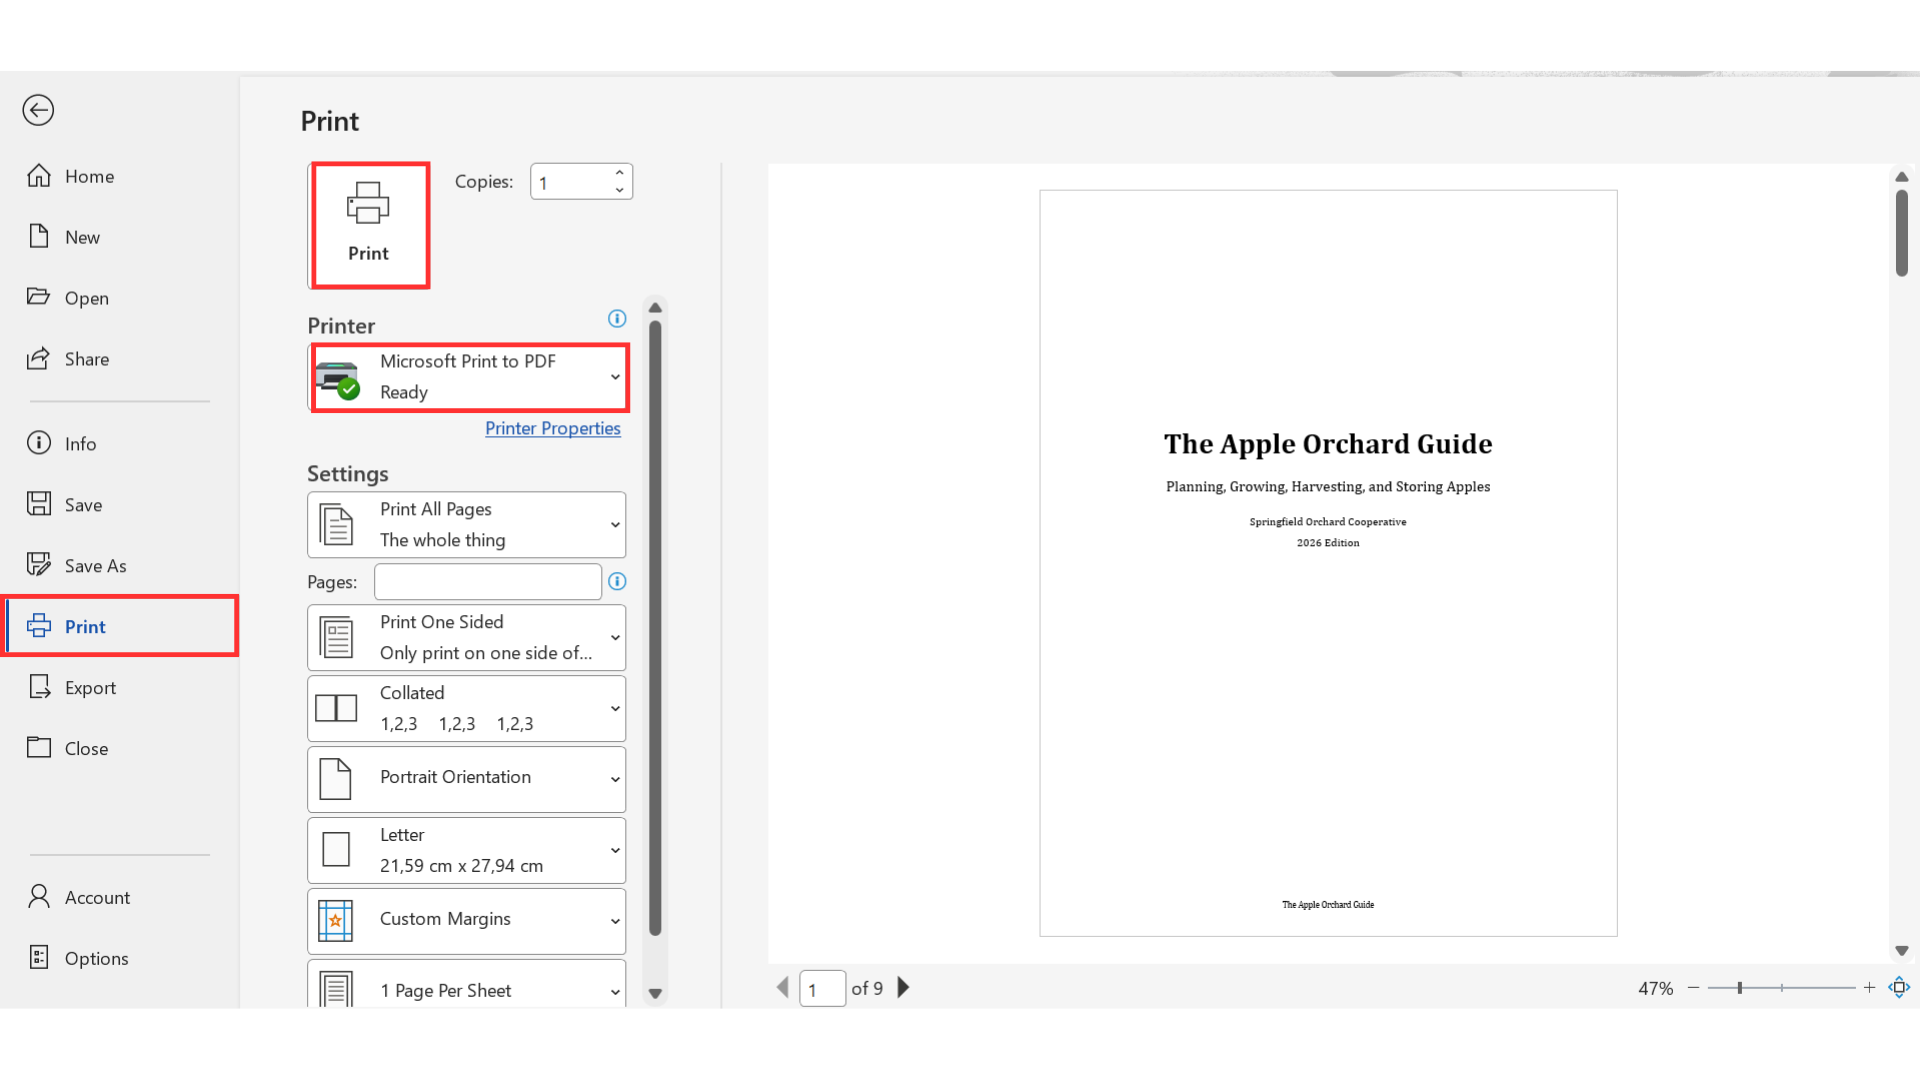
Section titled “How Print to PDF Works”- Open the File tab.
- Select Print.
- In the printer list, select Microsoft Print to PDF.
- Select Print.
- Choose a file name and save location.
- Click Save.
Why This Method Is Not Recommended
Section titled “Why This Method Is Not Recommended”When using Microsoft Print to PDF, Word creates the PDF through the print workflow. This means it does not provide the same publishing control as Save As or Export.
The print workflow does not provide the same options for:
- Document properties.
- Publishing options.
- PDF bookmarks.
- Accessibility tags.
- Image quality.
- Font handling.
- Password protection.
This method is not recommended for professional Word documents because it usually removes hyperlinks and may introduce visual errors.
Convert Word to PDF in Microsoft Word for the Web
Section titled “Convert Word to PDF in Microsoft Word for the Web”You can also learn how to convert Word to PDF with online tools, but Word’s built-in option is usually safer for private or work documents.
Step 1: Download a PDF from Microsoft Word for the Web
Section titled “Step 1: Download a PDF from Microsoft Word for the Web”- Open the document in Word for the web.
- Open the File tab.
- Select Export.
- Select Download as PDF.
Word for the web prepares the file and downloads it as a PDF. This method is useful when working on a shared online document or when the desktop version of Word is not available on the device.
What to Check in PDFs Before Sharing
Section titled “What to Check in PDFs Before Sharing”Before sharing a PDF, always open it and do a quick review. A Word document can look correct before export, but the final PDF may still show layout issues.
Check:
- Page breaks.
- Headings.
- Tables.
- Images.
- Bullet lists.
- Page numbers.
- Hyperlinks.
- Cross-references.
- Table of contents.
- Blank pages.
- Extra spacing.
Sometimes the final PDF shows an awkward page break, a squeezed table, a shifted image, or extra blank space that was not obvious in Word. A quick review can prevent unnecessary corrections and back-and-forth after the file has already been sent.
Typical Word Issues That Can Cause Problems After PDF Export
Section titled “Typical Word Issues That Can Cause Problems After PDF Export”Many PDF problems are caused by issues that already exist in the Word document. These issues may not be obvious until the file is exported.
Common Word issues that can affect the PDF include:
- Outdated table of contents entries.
- Broken cross-references.
- Incorrect figure or table numbering.
- Large tables that do not fit on the page.
- Rows splitting awkwardly across pages.
- Floating images or objects that move during export.
- Manual page breaks in the wrong location.
- Extra blank paragraphs creating empty space.
- Hidden text that should not appear in the final file.
- Comments or tracked changes still visible.
- Hyperlinks that were not tested.
- Missing or inconsistent heading styles.
- Fonts that may not embed correctly.
- Bullet lists or numbering that shift.
- Page numbers that were not updated.
- Tables, images, or text boxes placed too close to page margins.
These issues should be corrected in Word before the PDF is created. Exporting first and fixing problems later usually creates more work.
How to Prevent PDF Issues in Word with OnStyle
Section titled “How to Prevent PDF Issues in Word with OnStyle”OnStyle helps catch problems in Word before the PDF is created. This is useful because many PDF problems come from formatting, structure, or layout issues in the source document.
OnStyle is a Word add-in that detects and fixes document issues while helping bring documents into a standard format. It includes more than 150 checks and fixes for document quality and consistency.
Step 1: Assign the Right DocConfig
Section titled “Step 1: Assign the Right DocConfig”Start by assigning a DocConfig to the document if required.

A DocConfig helps standardize:
- Styles.
- Fonts.
- Page layout.
- Table formats.
- Figure captions.
- Table of contents settings.
Assigning a DocConfig is optional, and many OnStyle features work without it. However, functions tied to document standards, such as styles, fonts, or page layout, require the correct DocConfig.
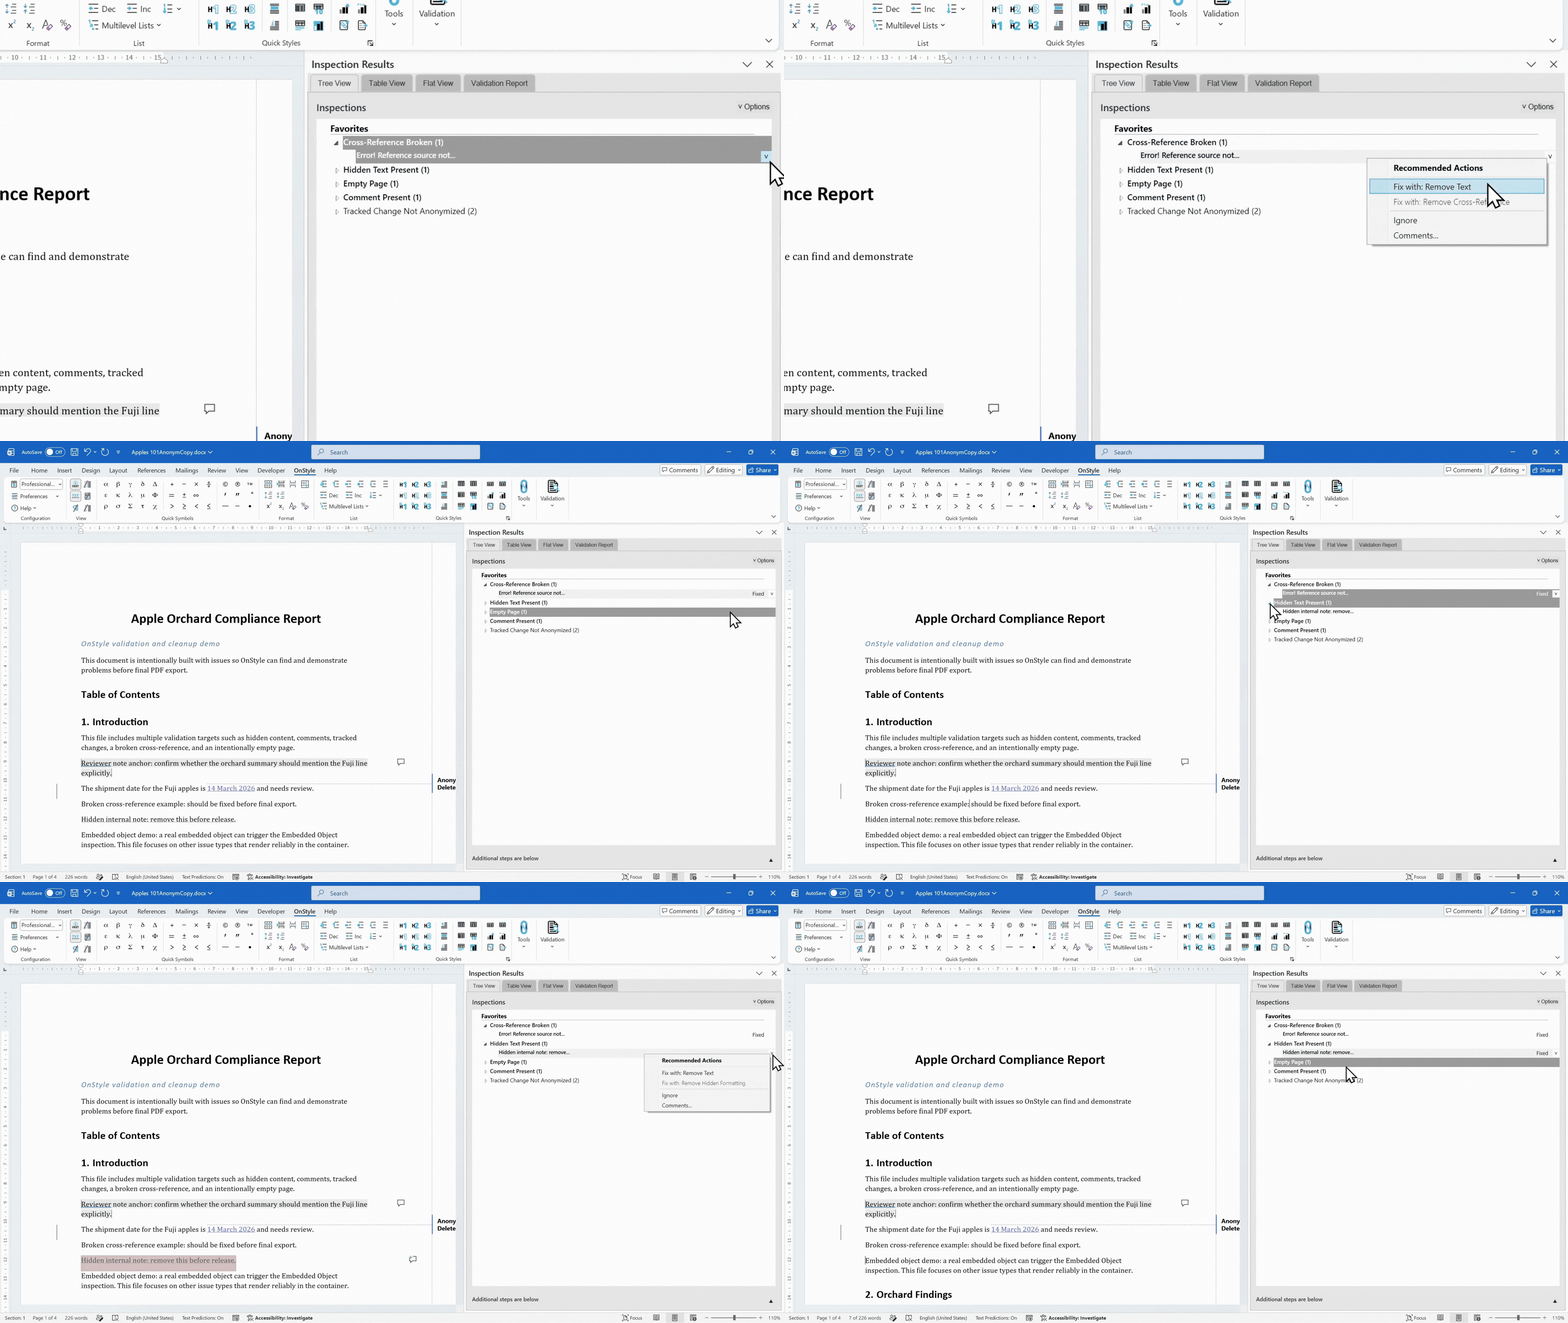
Step 2: Run Validation
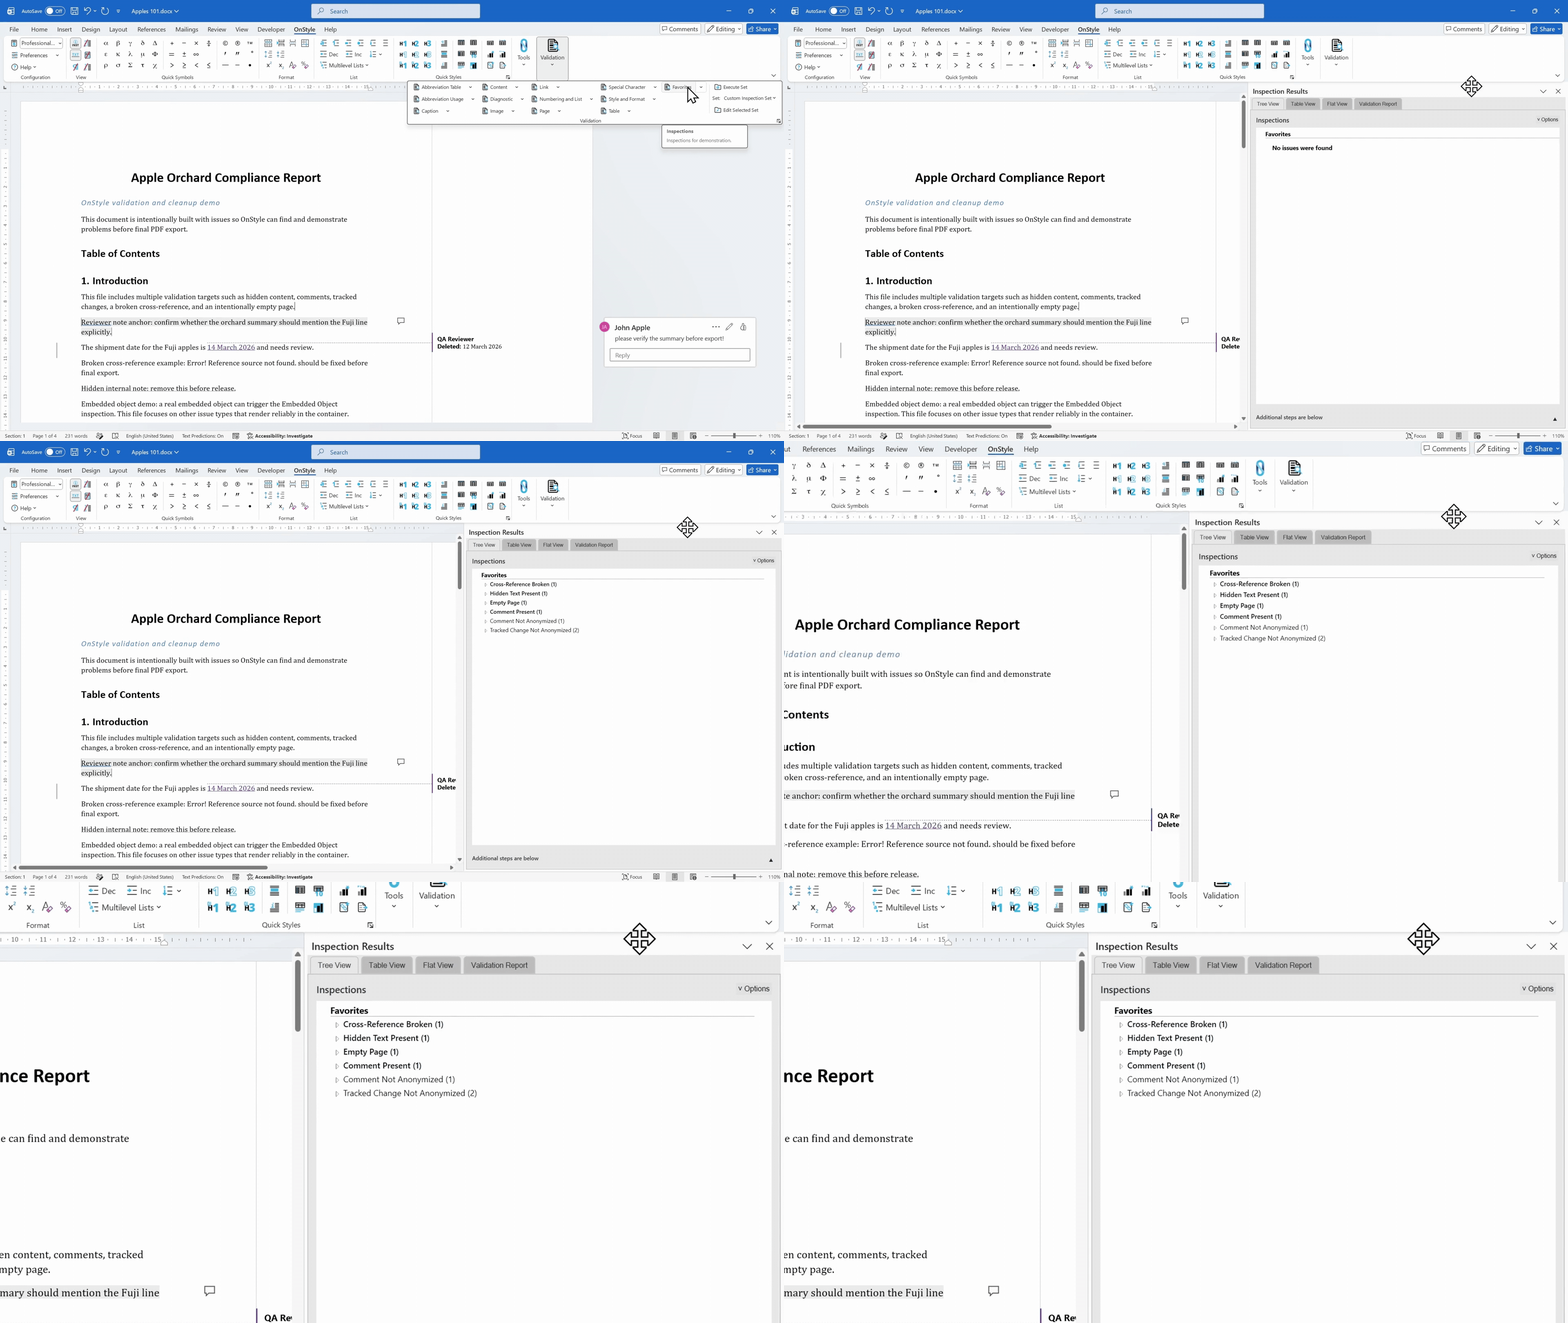
Section titled “Step 2: Run Validation”Next, run validation. Validation checks the document for formatting, structural, and layout issues that can cause PDF output problems later.
For example, validation can help detect:
- Broken cross-references.
- Hidden content.
- Empty pages.
- Comments.
- Tracked changes.
- Formatting inconsistencies.
- Layout issues.
- Other issues that should usually be fixed before final export.
Step 3: Fix Detected Issues Before Export
Section titled “Step 3: Fix Detected Issues Before Export”After validation, review the detected issues and fix the important ones before exporting. This helps create a cleaner final PDF and reduces last-minute surprises.
Fixing issues before export can help prevent:
- Incorrect references.
- Outdated table of contents entries.
- Hidden content appearing unexpectedly.
- Empty pages.
- Inconsistent formatting.
- Layout problems around tables and images.
How to Insert a Correctly Formatted Table of Contents with OnStyle
Section titled “How to Insert a Correctly Formatted Table of Contents with OnStyle”Before exporting, the document should have a correctly formatted table of contents if one is required.
OnStyle can help insert a standardized table of contents that follows the document configuration and formatting requirements.
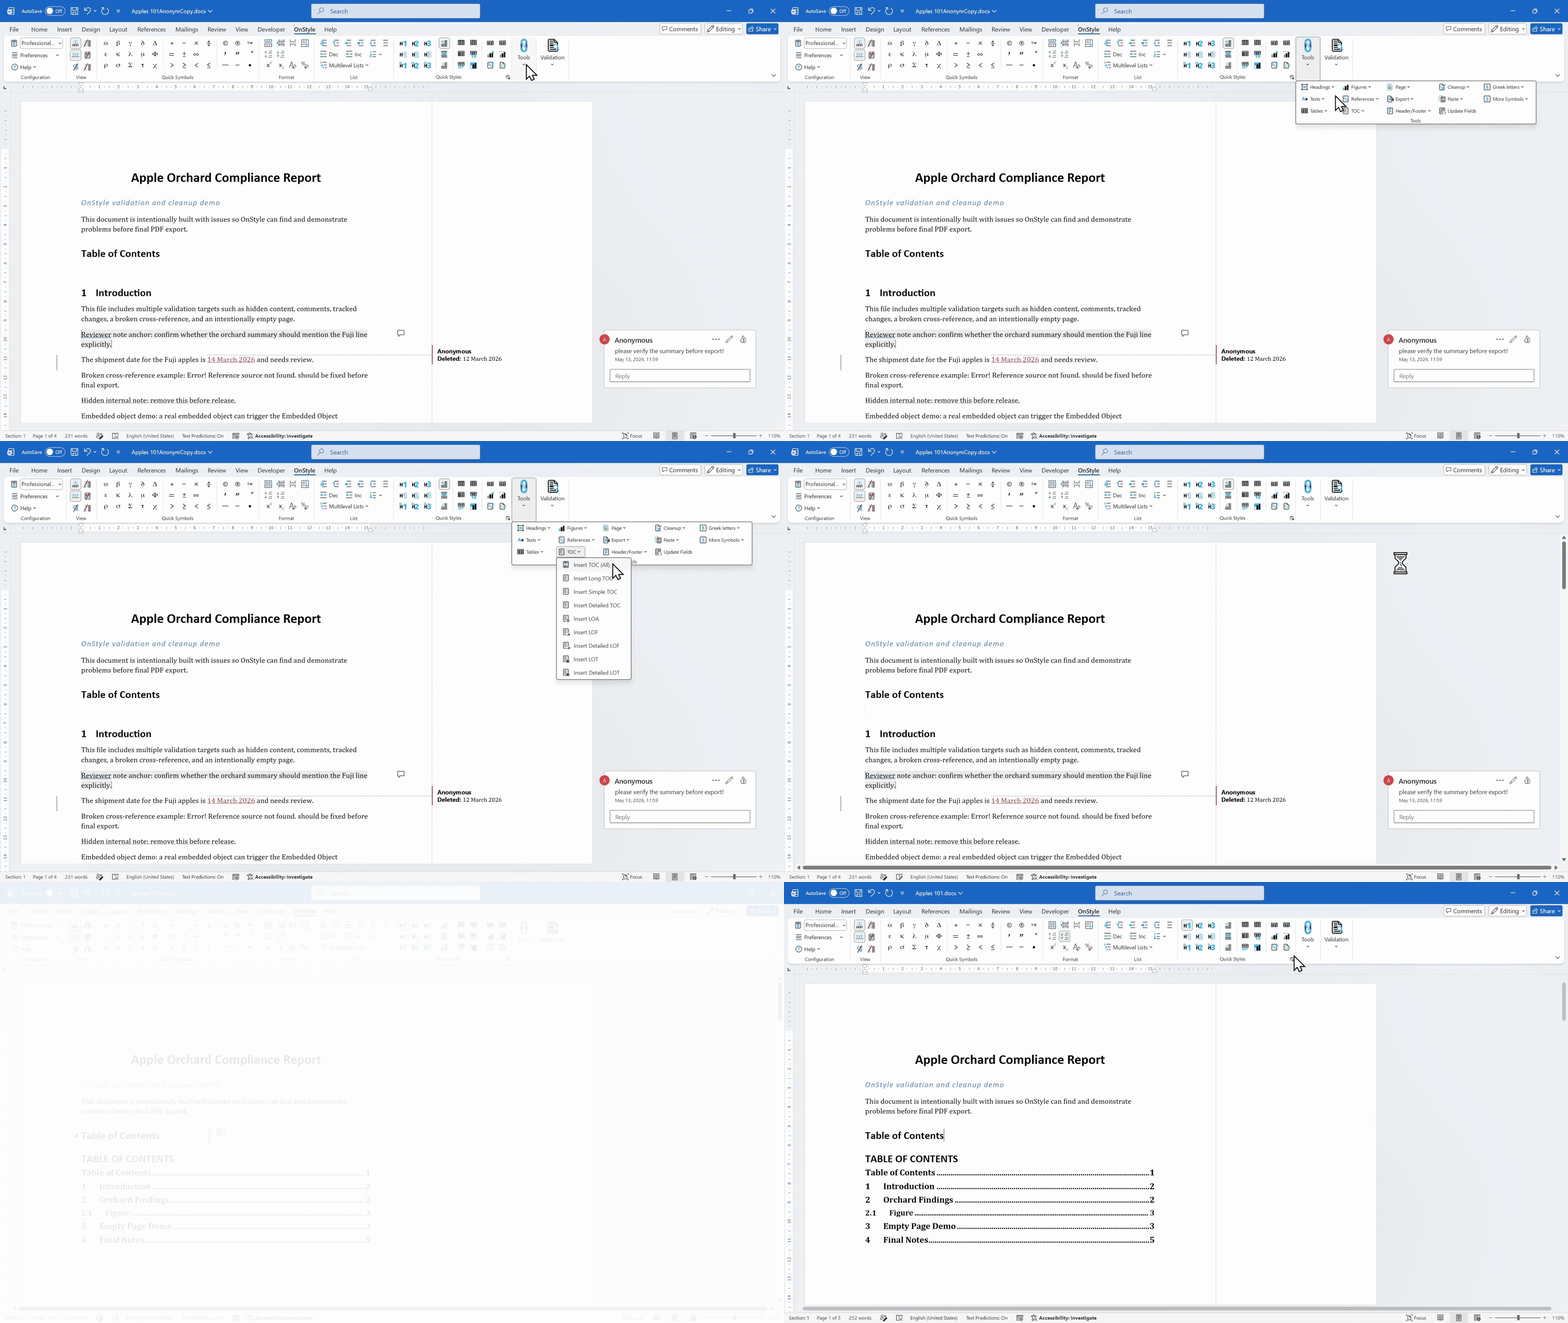
This is useful because the table of contents is often one of the first areas where outdated fields, incorrect headings, or inconsistent formatting become visible in the exported PDF.
Step 4: Update Fields Before Export
Section titled “Step 4: Update Fields Before Export”Before exporting to PDF, update document fields so everything is current. OnStyle provides a shortcut for updating fields from its user interface.
Updated fields can include:
- Table of contents.
- Figure numbering.
- Table numbering.
- Cross-references.
- Hyperlinks.
Shortcut: Alt + Ctrl + U
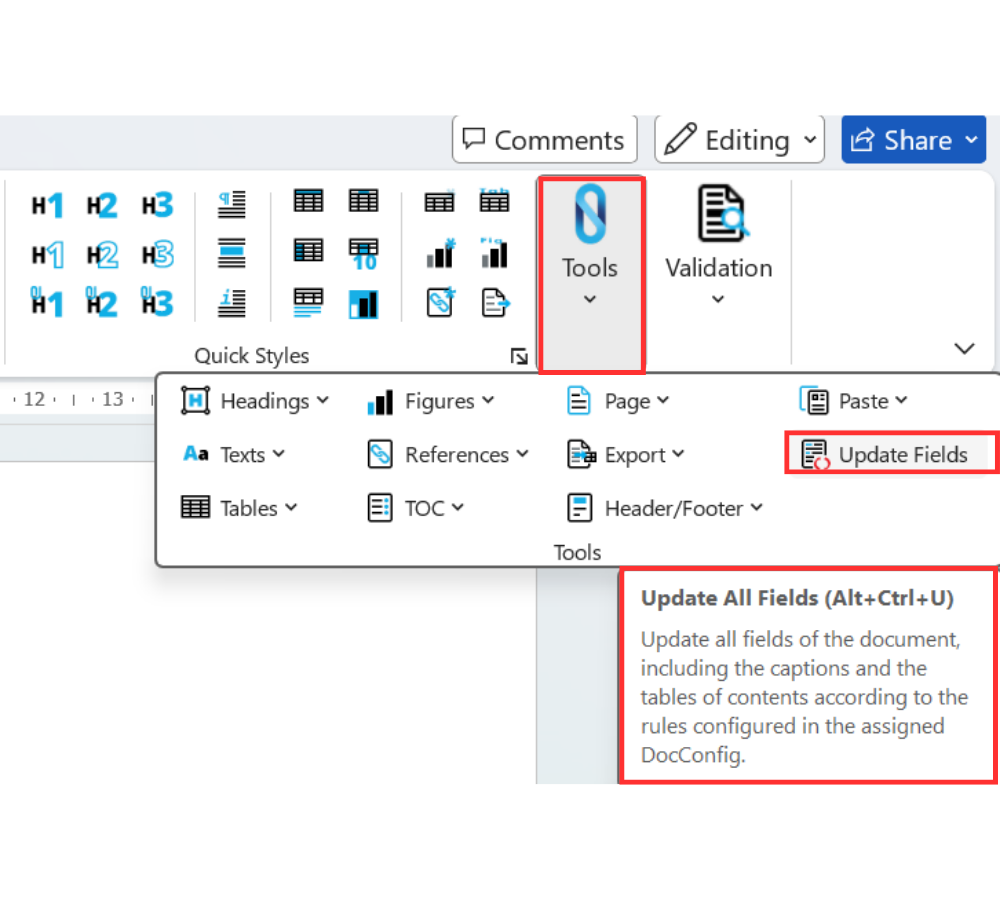
Updating fields helps prevent the PDF from preserving outdated references, incorrect numbering, or old table of contents entries.
Step 5: Use Cleanup Tools if Needed
Section titled “Step 5: Use Cleanup Tools if Needed”If the document still contains unwanted content, use OnStyle cleanup tools before exporting.
Cleanup tools can remove:
- Hidden text.
- Instructions.
- Unused nonstandard styles.
OnStyle can also help restore styles if document formatting has drifted from the expected standard.
How to Hide Comments and Turn Off Track Changes Before Export
Section titled “How to Hide Comments and Turn Off Track Changes Before Export”Before creating the final PDF, comments should be hidden and document changes should be turned off on the Review tab of the Ribbon. This helps prevent review information from appearing in the final file.
- On the Review tab of the Ribbon, open the Display for Review drop-down menu.
- Select No Markup to hide comments and tracked changes from the visible document.
- In the Tracking group, select Track Changes to turn it off if it is enabled.
- If comments are no longer needed, delete them before exporting.
- Export the document to PDF only after checking that no comments or tracked changes are visible.

Export an Anonymized Document for Easier Sharing
Section titled “Export an Anonymized Document for Easier Sharing”When a document contains comments, tracked changes, or metadata, sharing it may expose reviewer names or editing information.
This is not the same as fixing PDF layout problems. It is a separate sharing step that makes the document easier and safer to share with external reviewers, clients, partners, or other teams.
OnStyle can create an anonymized copy with Export Anonymized Document.
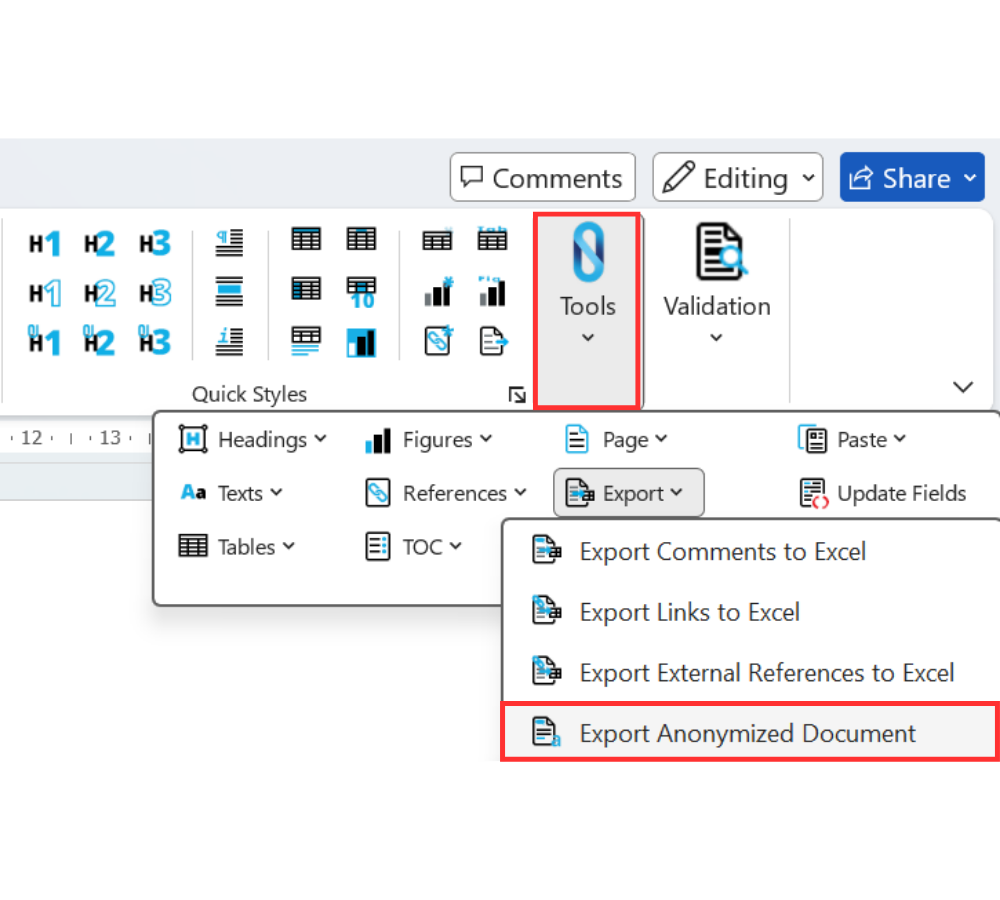
This function can:
- Create a separate copy of the document.
- Add AnonymCopy to the file name by default.
- Anonymize comment authors.
- Anonymize tracked-change authors.
- Turn off Track Changes.
- Replace document metadata such as Creator and Last Modified By.
Use this when the file needs to be shared without exposing review metadata.
Step 6: Export to PDF with Word
Section titled “Step 6: Export to PDF with Word”After the document is standardized, validated, updated, and cleaned up, use one of the Word export options covered earlier. Use Save As or Export for the best publishing control.
This provides the convenience of Word’s PDF output, but with a much better-prepared source document first.
Common Mistakes When Converting Word to PDF
Section titled “Common Mistakes When Converting Word to PDF”Common mistakes include:
- Saving over the original file by mistake.
- Exporting before updating the document.
- Leaving tracked changes or comments visible.
- Ignoring layout issues before export.
- Choosing Minimum size when image quality matters.
- Using Microsoft Print to PDF when hyperlinks and properties should remain available.
- Forgetting to check the final PDF before sending.
- Exporting a document with outdated table of contents entries.
- Not reviewing page breaks, tables, or images.
Always give the PDF its own file name, update the document first, and review the final PDF before sharing.
Summary
Section titled “Summary”Converting Word to PDF can be done quickly with Save As, Export, Print to PDF or Download as PDF in Word for the web. For professional documents, Save As or Export provides more control than Microsoft Print to PDF.
Before exporting, check the document for issues that can affect the final PDF, including outdated fields, visible markup, broken references, layout problems, hidden content, comments, tracked changes, and metadata.
For a cleaner and more reliable result, prepare the Word document first with OnStyle. Assign the correct DocConfig if needed, run validation, fix important issues, update fields, use cleanup tools, hide comments, turn off document changes, and export an anonymized copy when safer sharing is required. Then create the final PDF from the prepared Word document.
Once you know how to convert Word to PDF, you can create files that are easier to share, upload, print, and review.