
How to Rotate a Single Page in Word
To rotate a single page in Word controlling page orientation at the section level is required. Word applies orientation to the entire document by default, so rotating one page requires isolating it into a separate section.
Why Rotating a Single Page in Word is not Simple
Section titled “Why Rotating a Single Page in Word is not Simple”Microsoft Word applies page orientation settings to the entire document unless sections are used. This becomes a limitation when working with content that requires a different layout, such as wide tables, large figures, or landscape-oriented charts.
To rotate only one page, the page must be separated from the rest of the document using section breaks. This allows page orientation in Word to be applied only to the selected part of the document.
Method 1: How to Rotate A Page in Word Using Section Breaks
Section titled “Method 1: How to Rotate A Page in Word Using Section Breaks”Section breaks divide a document into independent parts. Each section can have its own layout settings, including page orientation.
Step 1: Insert Section Breaks
Section titled “Step 1: Insert Section Breaks”- Place the cursor at the beginning of the page you want to rotate.
- Go to the Layout tab.
- Click Breaks.
- Select Next Page under Section Breaks.
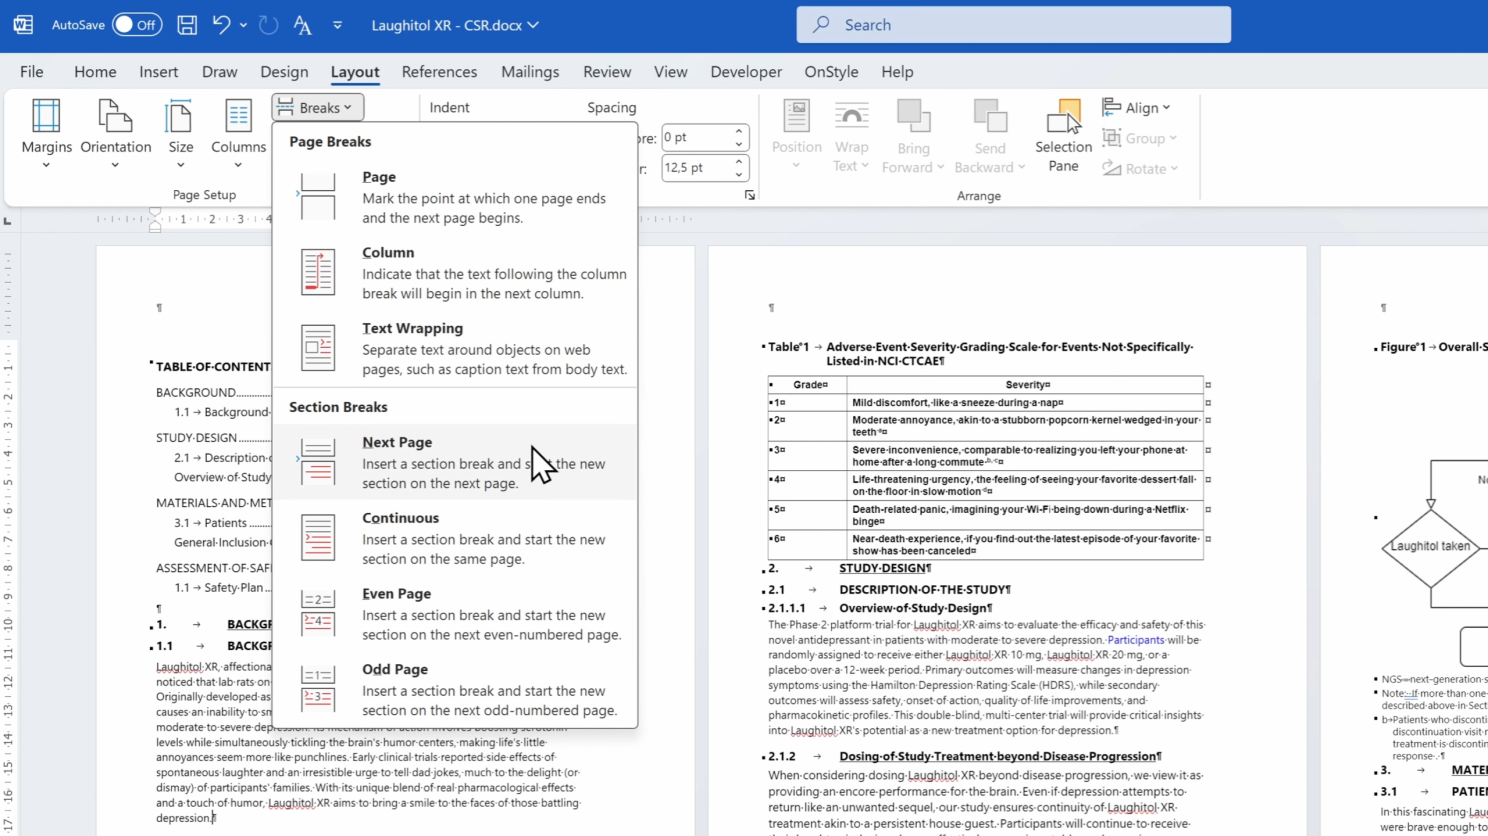
Repeat the same steps at the end of the page. This creates a separate section that contains only the page you want to rotate.
After inserting the section breaks, the document is divided into three parts: the content before the page, the page itself, and the content after it. This structure ensures that layout changes apply only to the selected page.
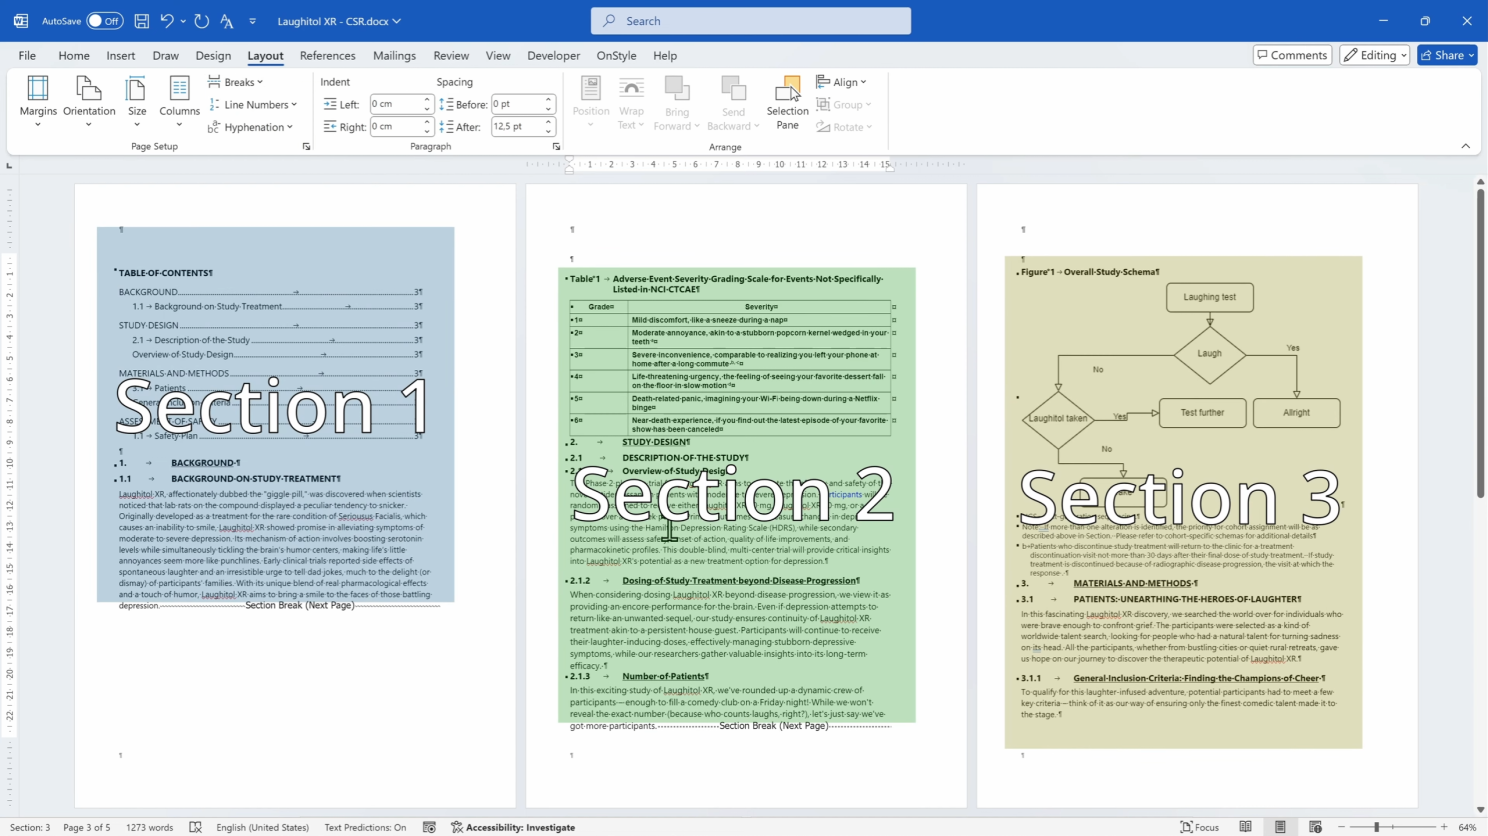
Step 2: Change Page Orientation in Word
Section titled “Step 2: Change Page Orientation in Word”- Click anywhere inside the page you want to rotate.
- Go to the Layout tab.
- Click Orientation.
- Select Landscape (or Portrait).
Why This Method Works
Section titled “Why This Method Works”Section breaks allow Word to treat parts of the document independently. This makes it possible to apply different orientations without affecting surrounding content.
Using sections helps maintain consistent formatting across the document while allowing controlled layout changes where needed.
Common Issues When Rotating Pages in Word
Section titled “Common Issues When Rotating Pages in Word”When working with section breaks, formatting issues can occur if breaks are misplaced or not clearly visible. Common problems include extra blank pages, unexpected changes in headers or footers, and incorrect page numbering. These issues occur because each section has its own formatting settings.
Method 2: How to Rotate Specific Content Instead Of The Page
Section titled “Method 2: How to Rotate Specific Content Instead Of The Page”In some cases, rotating the entire page is not required. Instead, specific elements such as tables, images, or text boxes can be rotated.
Rotating content in Word avoids section breaks and can be useful for smaller layout adjustments. However, it may not produce the desired result when working with full-page content or complex layouts.
Limitations Of Manual Page Rotation
Section titled “Limitations Of Manual Page Rotation”Managing section breaks manually becomes more complex in large or heavily formatted documents. Tracking multiple sections and maintaining consistent formatting can be difficult.
These challenges are more common in structured or regulated documents where layout consistency is required.
Automate Layout and Formatting with OnStyle
Section titled “Automate Layout and Formatting with OnStyle”In standard Microsoft Word, rotating a single page in Word requires manually inserting section breaks and applying orientation to that section.
OnStyle provides a faster way by applying page orientation directly to selected content and managing the required section structure automatically.
How to Rotate a Single Page in Word with OnStyle
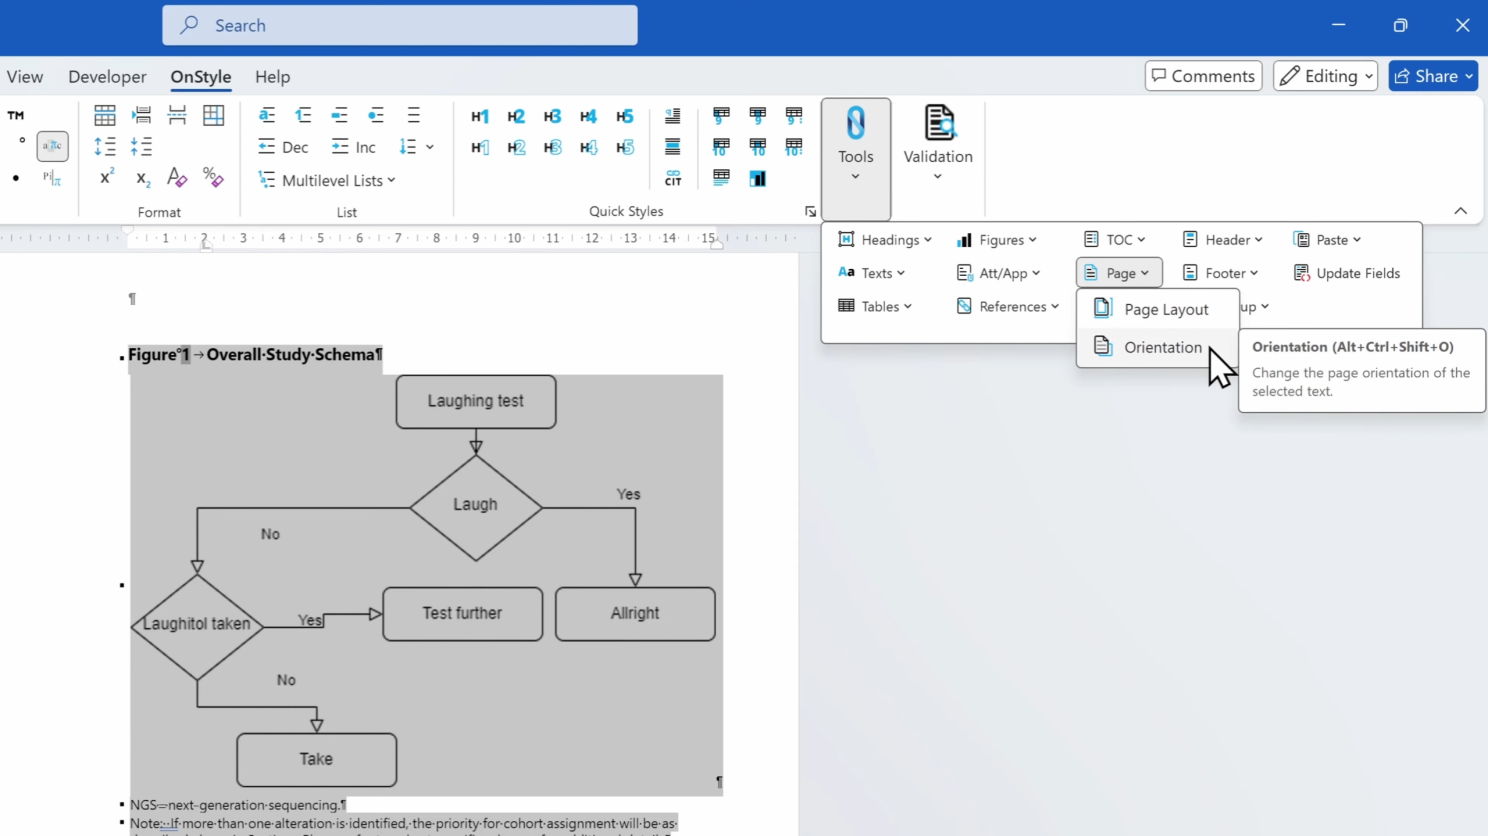
Section titled “How to Rotate a Single Page in Word with OnStyle”- Select the page you want to rotate.
- Go to the OnStyle Ribbon.
- In the Tools group, click Page Orientation.
- Select Landscape.
The selected page is placed in landscape orientation without affecting the rest of the document.
How to Rotate Content in Word with OnStyle
Section titled “How to Rotate Content in Word with OnStyle”- Select the content (for example, a table, paragraph, or figure).
- Go to the OnStyle Ribbon.
- In the Tools group, click Page Orientation.
- Select Landscape.
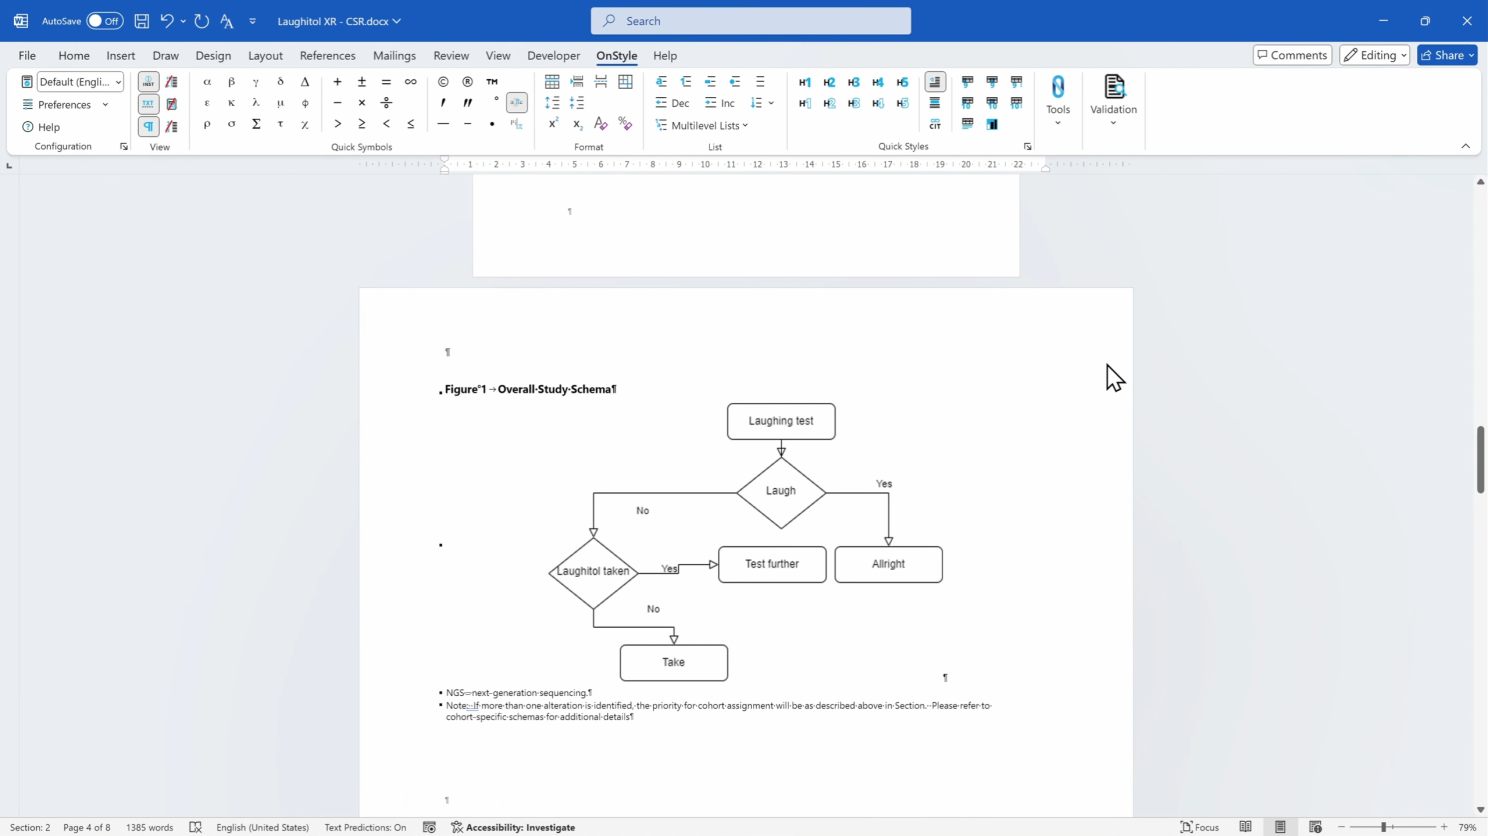
OnStyle places the selected content on a new landscape page and creates the required section breaks automatically. This is useful when only part of the document requires a different layout.
What Happens to Tables and Figures
Section titled “What Happens to Tables and Figures”Tables and figures adjust to the new page orientation in Word. When using OnStyle to create or standardize content:
- Tables fit within page margins after rotation
- Figures rotate together with related elements such as notes or captions
Summary
Section titled “Summary”Rotating a single page in Word requires separating the page into its own section and applying orientation to that section.
Section breaks provide control over layout but must be used carefully to avoid formatting issues.
For complex documents, automation tools like OnStylecan help maintain consistency and reduce manual effort.