
How to Adjust Line Spacing in Word
Line Spacing in Word Explained: Single, 1.5, Double, and Custom Settings
Section titled “Line Spacing in Word Explained: Single, 1.5, Double, and Custom Settings”Line spacing in Word controls the vertical space between lines of text. This is different from paragraph spacing, which controls the space before and after a paragraph. These two settings are often confused, which leads to documents that look too cramped or too spread out.
A document may appear incorrectly formatted even when line spacing is adjusted, because an incorrect paragraph spacing may still be applied. Understanding both settings is necessary to achieve consistent formatting.
Common Line Spacing Mistakes in Microsoft Word
Section titled “Common Line Spacing Mistakes in Microsoft Word”Common line spacing mistakes in Microsoft Word often lead to inconsistent formatting, incorrect spacing, and reduced readability across a document. These issues typically occur when:
- Changing line spacing when the actual issue is paragraph spacing
- Applying formatting to only part of the document, which can result in inconsistent spacing
- Using multiple blank lines by pressing Enter, which creates structural issues
- Not adjusting spacing for different elements such as headings, tables, and captions, which may require separate settings
How to Change Line Spacing in Word from the Ribbon
Section titled “How to Change Line Spacing in Word from the Ribbon”The fastest way to adjust line spacing is from the Ribbon. This method is suitable for quick formatting changes.
Step 1: Select the Text
Section titled “Step 1: Select the Text”- Select the text that should be changed.
- To change a specific section, select only that section.
- To change the entire document, press Ctrl + A.
Step 2: Change Line Spacing in Word from the Ribbon
Section titled “Step 2: Change Line Spacing in Word from the Ribbon”- On the Home tab of the Ribbon, in the Paragraph group, select Line and Paragraph Spacing. A dropdown menu appears with common spacing options.
- Select one of these options:
- Single spacing (1.0) provides a compact layout.
- 1.5 spacing provides a balanced layout for readability.
- Double spacing (2.0) creates a more open layout often used in formal or review documents.
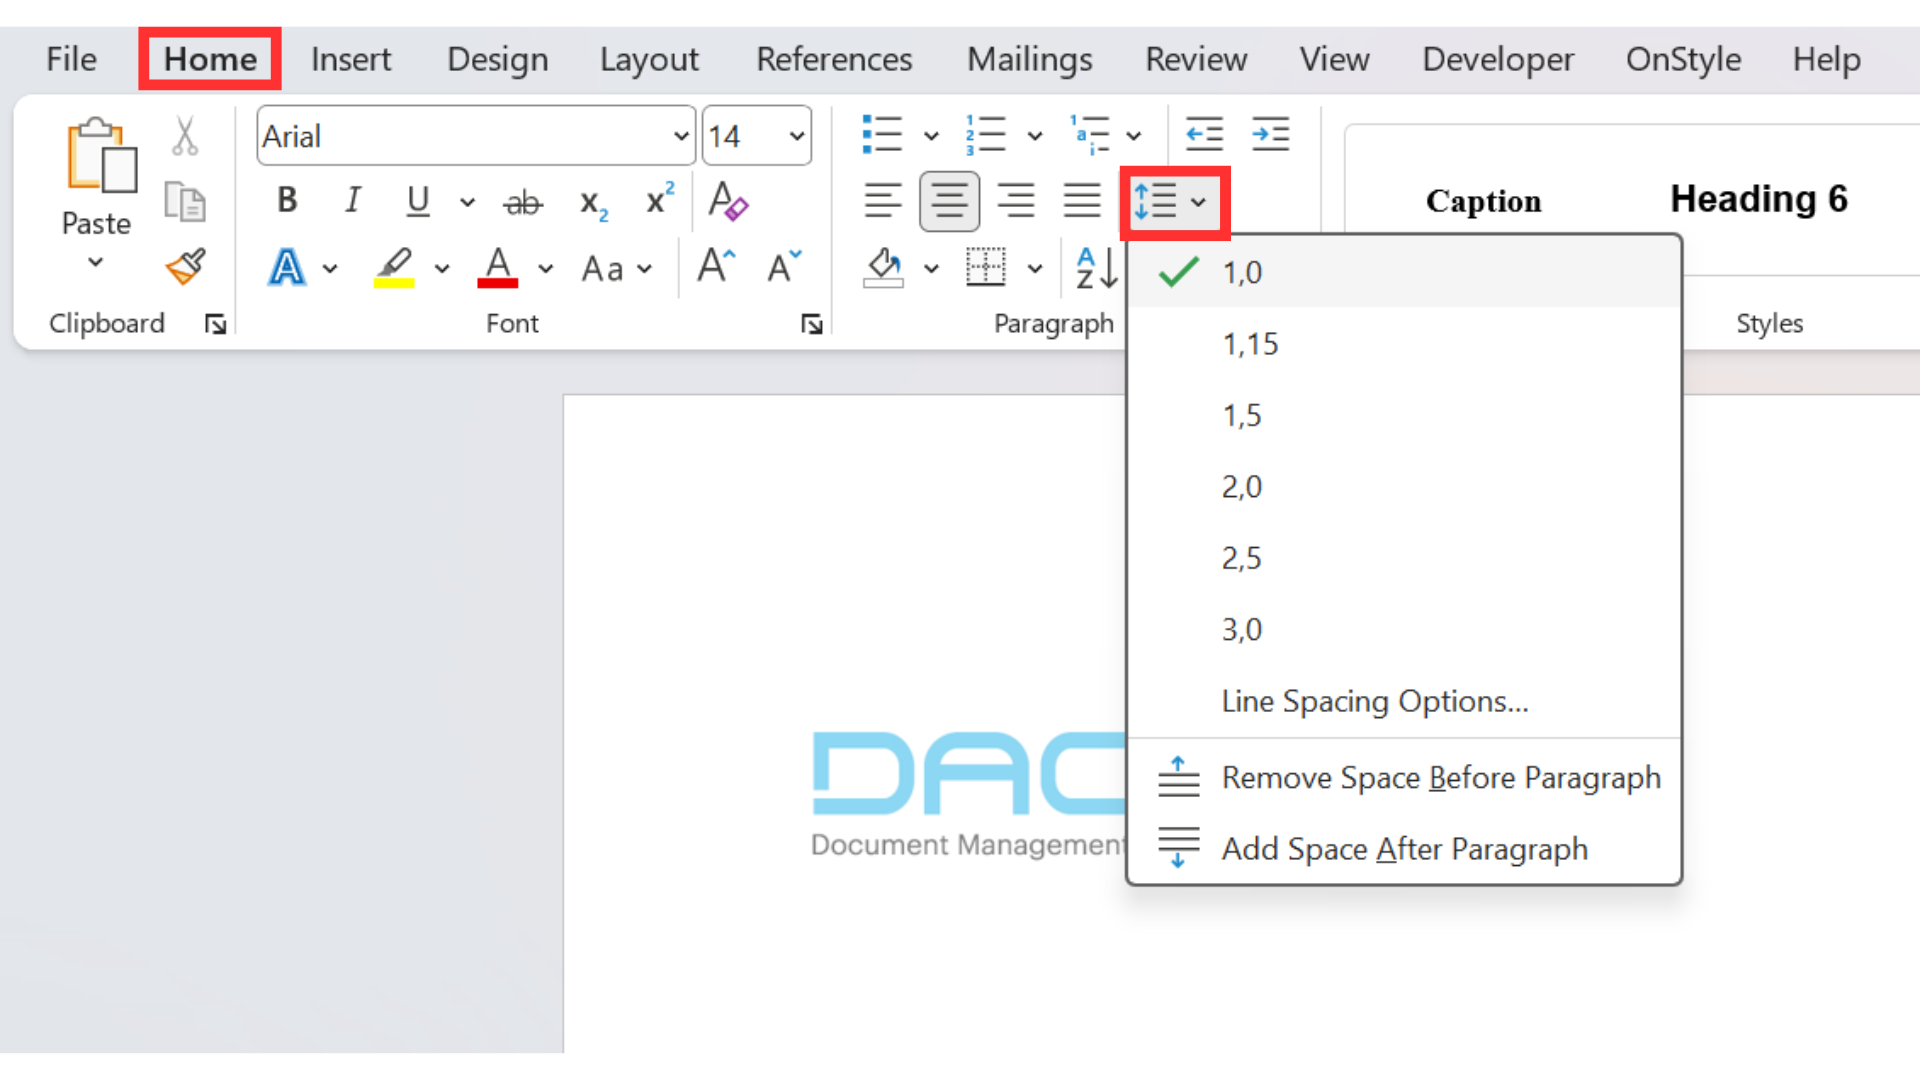
Options such as ‘Add Space After Paragraph’ and ‘Remove Space Before Paragraph’ do not change line spacing. They adjust the spacing between paragraphs.
How to Use Formatting Marks to Identify Spacing Issues in Word
Section titled “How to Use Formatting Marks to Identify Spacing Issues in Word”Formatting marks help identify hidden causes of spacing issues. These include paragraph breaks and other non-printing characters.
How to Display Formatting Marks
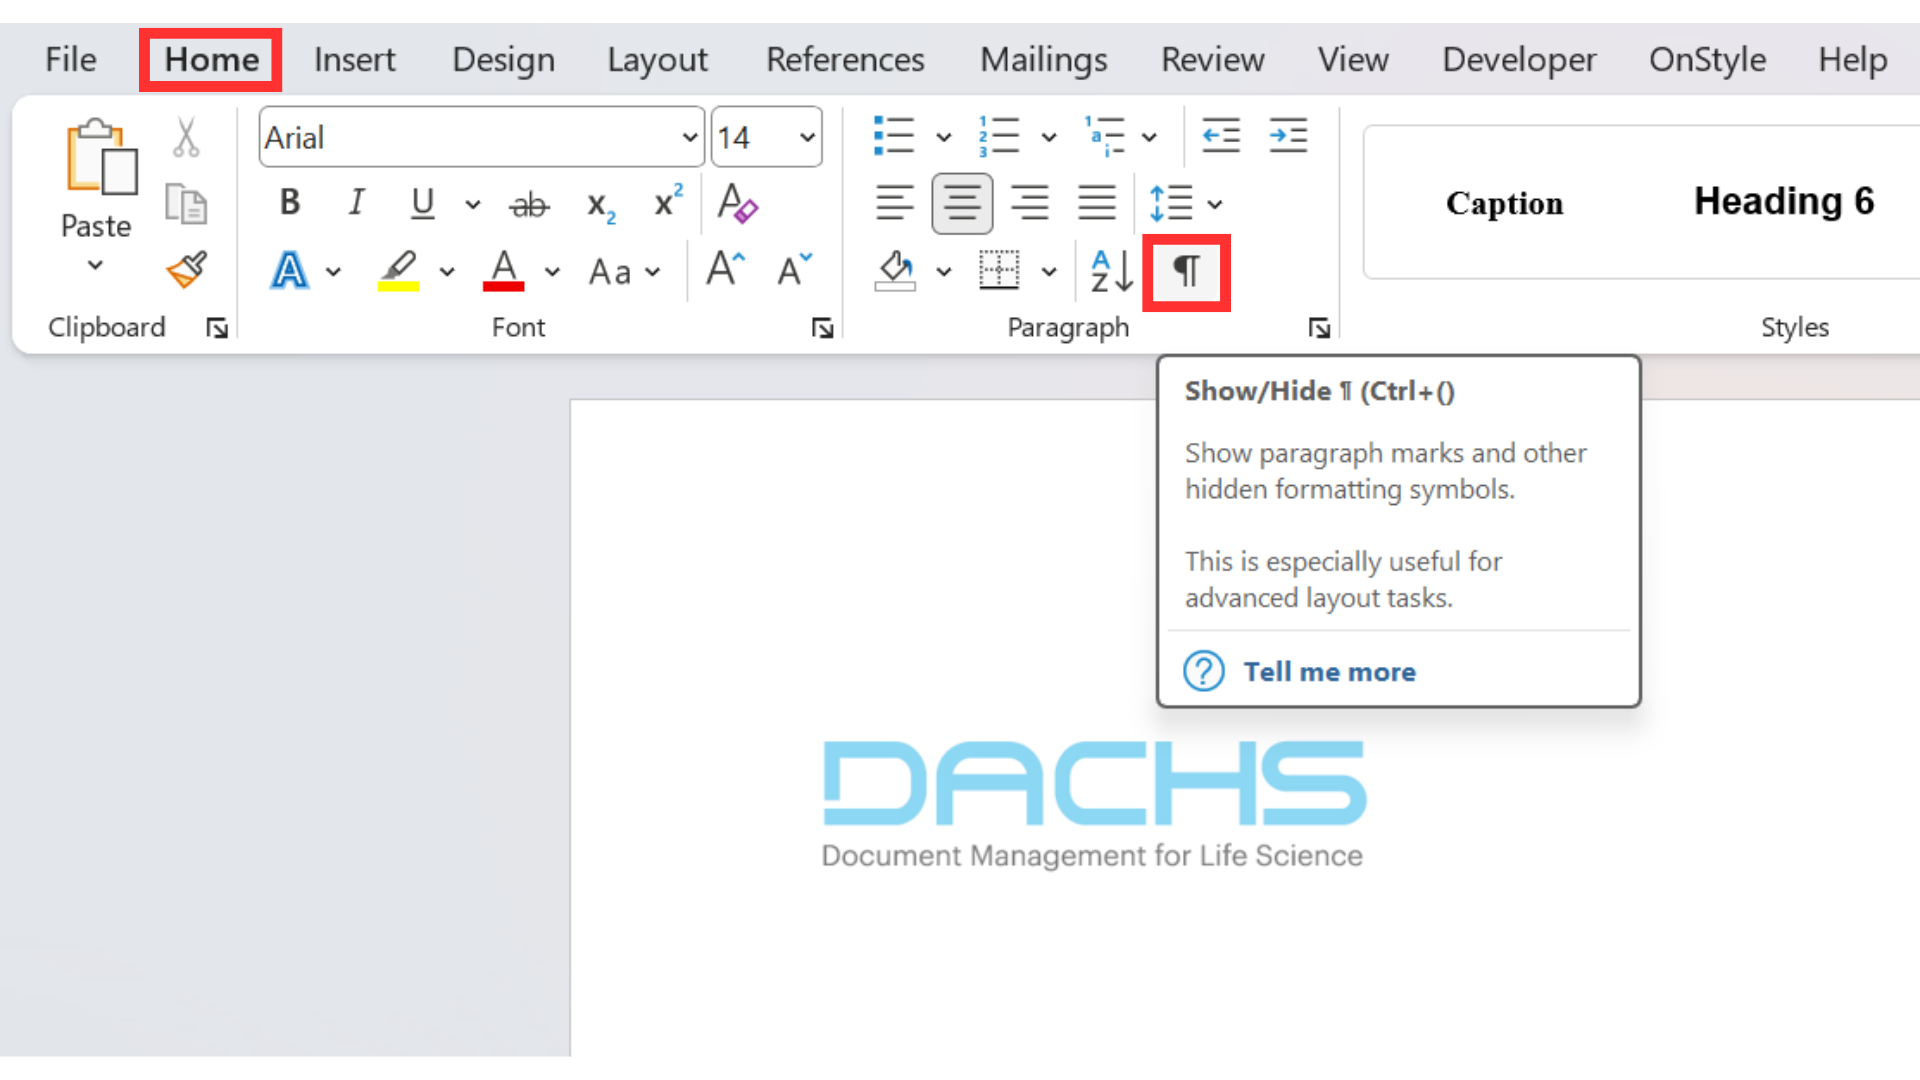
Section titled “How to Display Formatting Marks”On the Home tab of the Ribbon, in the Paragraph group, select the ¶ (Show/Hide) button. This displays paragraph marks and other formatting symbols.
How to Adjust Line and Paragraph Spacing in Word Using the Paragraph Dialog Box
Section titled “How to Adjust Line and Paragraph Spacing in Word Using the Paragraph Dialog Box”The Paragraph dialog box provides full control over both line spacing and paragraph spacing.
Step 1: Open the Paragraph Dialog Box
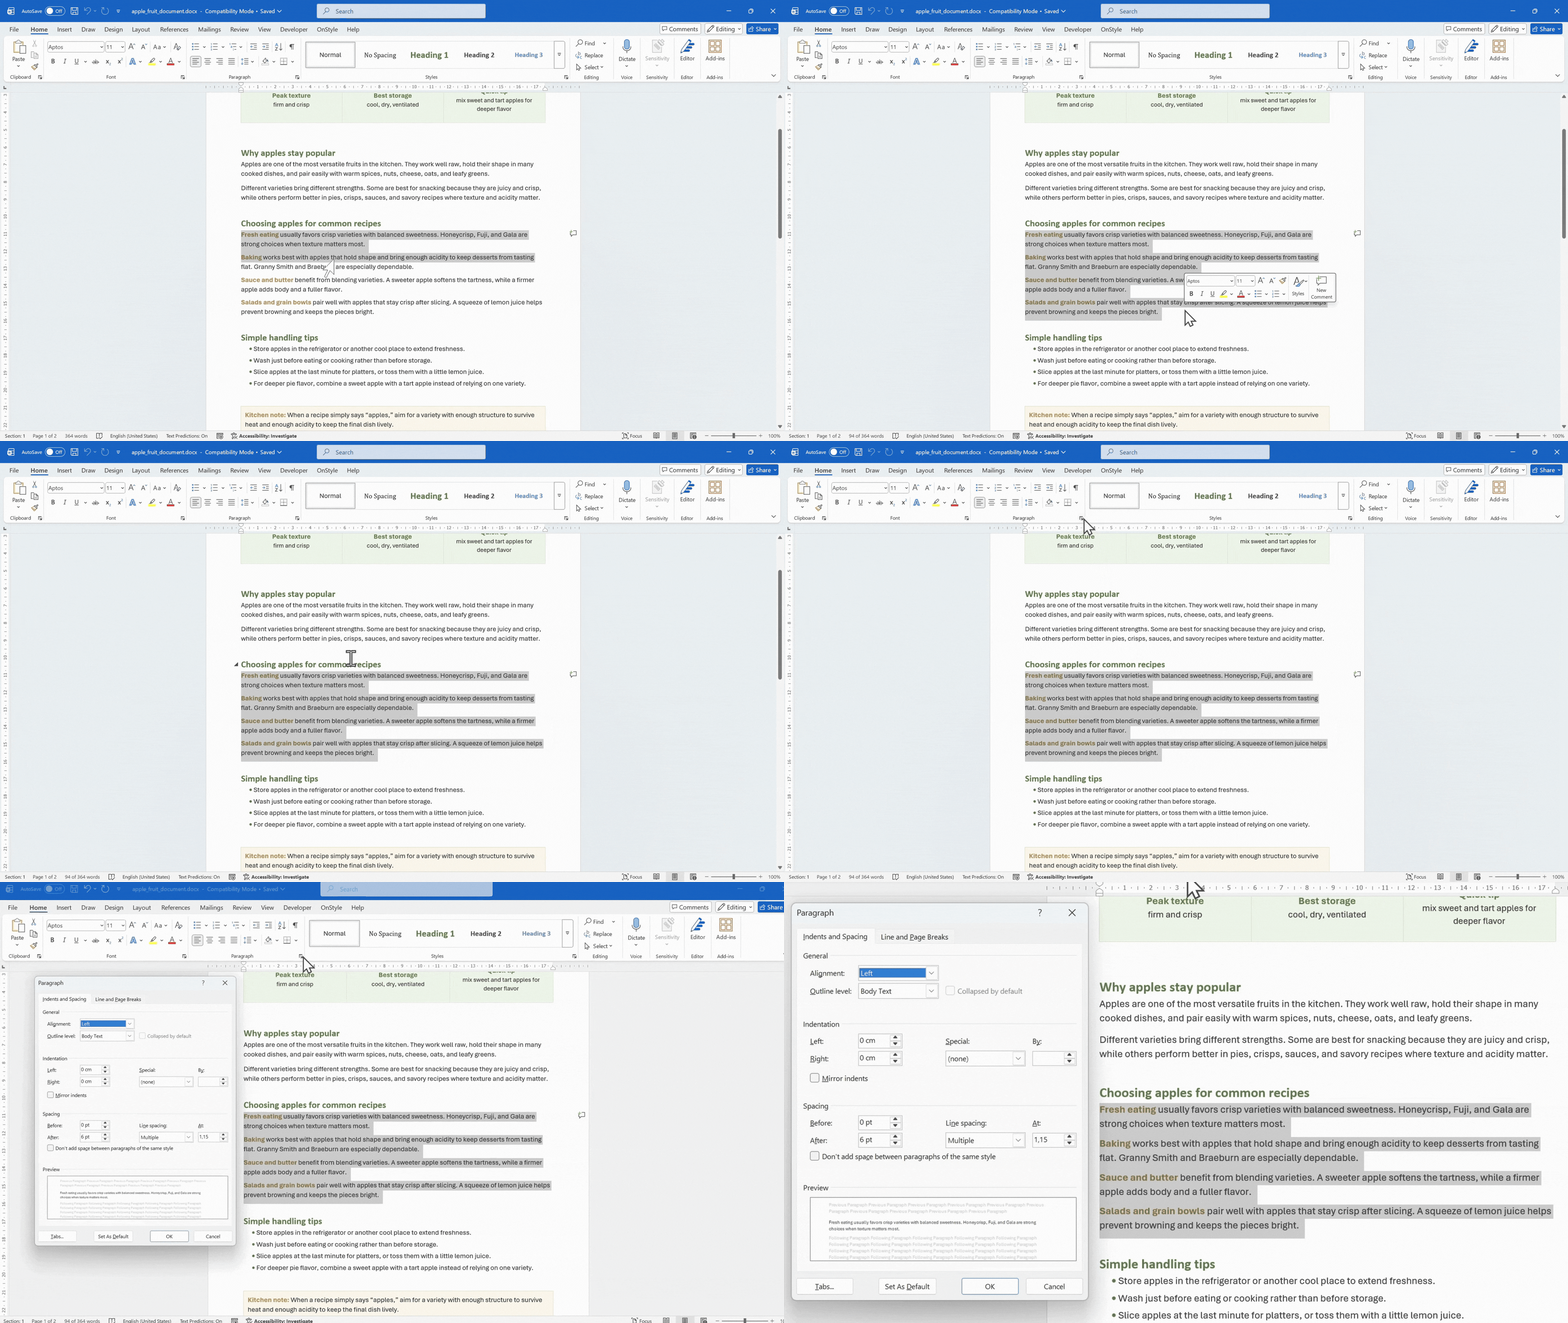
Section titled “Step 1: Open the Paragraph Dialog Box”- Select the text.
- On the Home tab of the Ribbon, in the Paragraph group, select the dialog box launcher.
Step 2: Adjust Paragraph Spacing in Word
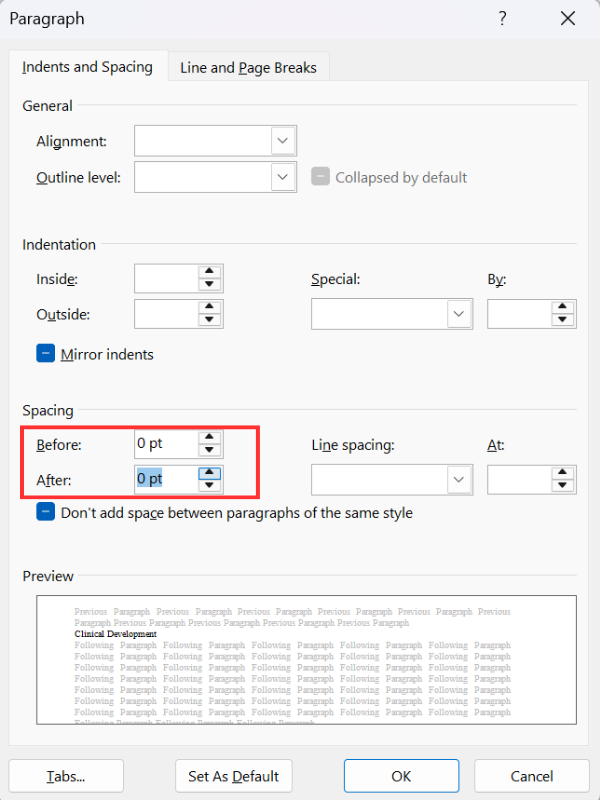
Section titled “Step 2: Adjust Paragraph Spacing in Word”In the Spacing section, the “Before” and “After” values control the space around paragraphs. Increasing these values adds more space between paragraphs. Reducing them creates a tighter layout.
- “Before” → controls space before a paragraph
- “After” → controls space after a paragraph
Step 3: Adjust Line Spacing Options
Section titled “Step 3: Adjust Line Spacing Options”- In the “Line spacing” drop-down menu, select a spacing option.
- “Single” (Provides standard spacing)
- “1.5 lines” (Increases readability with moderate spacing)
- “Double” (Creates wider spacing often used for review or editing)
- Advanced line spacing options include:
- “At least” (Defines a minimum spacing value)
- “Exactly” (Sets a fixed spacing regardless of content)
- “Multiple” (Applies a custom multiplier to line spacing)
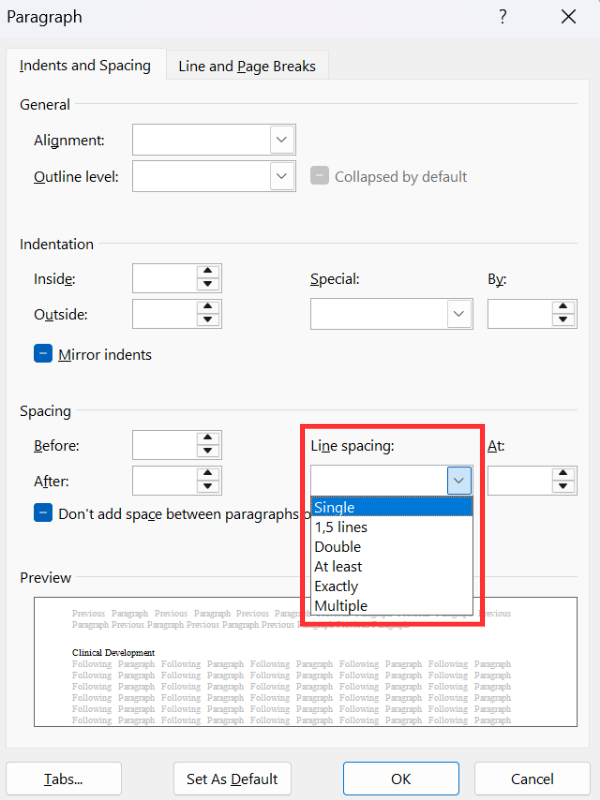
Example: Selecting Multiple and entering 1.2 creates slightly more spacing than single spacing without increasing to 1.5.
How to Single-Space an Entire Document in Word
Section titled “How to Single-Space an Entire Document in Word”To remove all extra spacing and apply consistent formatting across the document, both line spacing and paragraph spacing must be adjusted.
How to Apply Single Spacing to the Entire Document
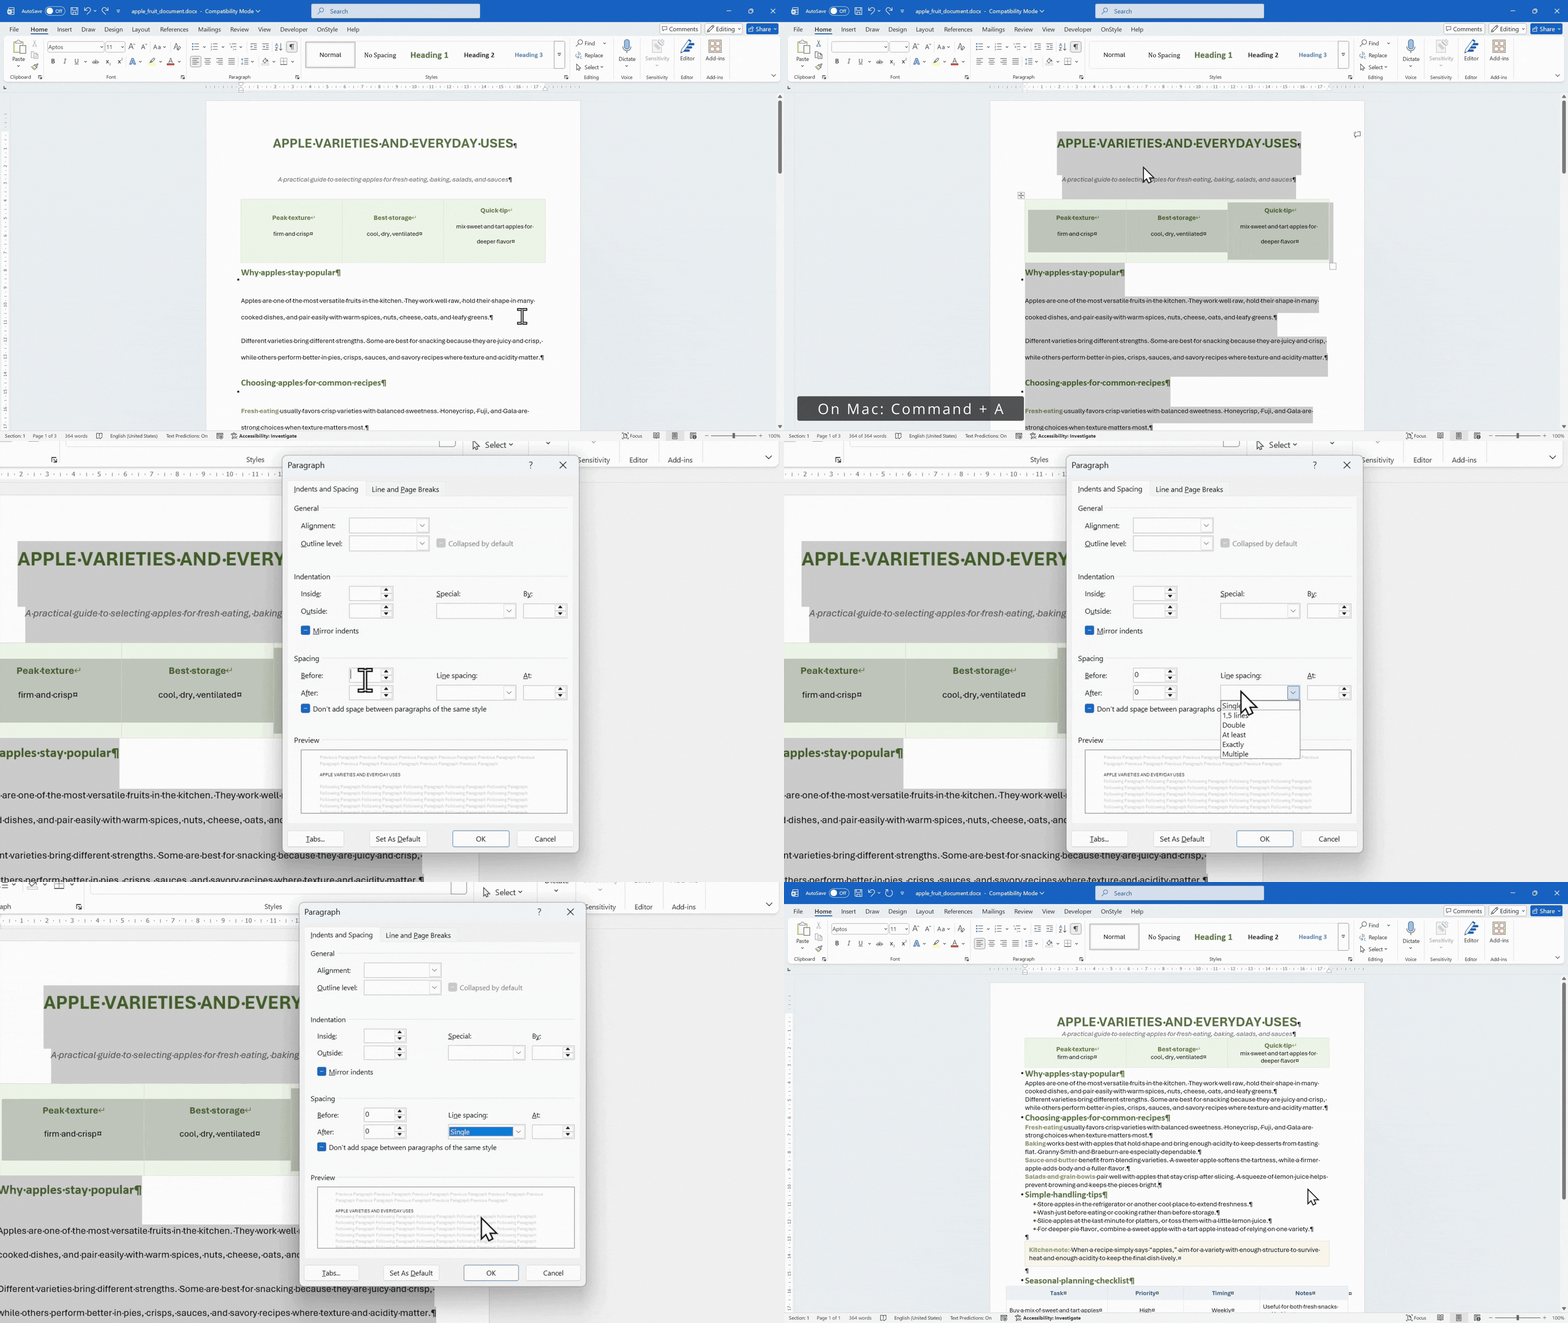
Section titled “How to Apply Single Spacing to the Entire Document”- Press Ctrl + A to select all content.
- Open the Paragraph dialog box.
- Set Before to “0 pt”.
- Set After to “0 pt”.
- Set “Line spacing” to “Single”.
- Select OK.
Using OnStyle to Automatically Detect and Fix Line Spacing Issues
Section titled “Using OnStyle to Automatically Detect and Fix Line Spacing Issues”The OnStyle Word Add-in provides automated validation for document formatting. It can identify issues related to spacing that are difficult to detect manually.
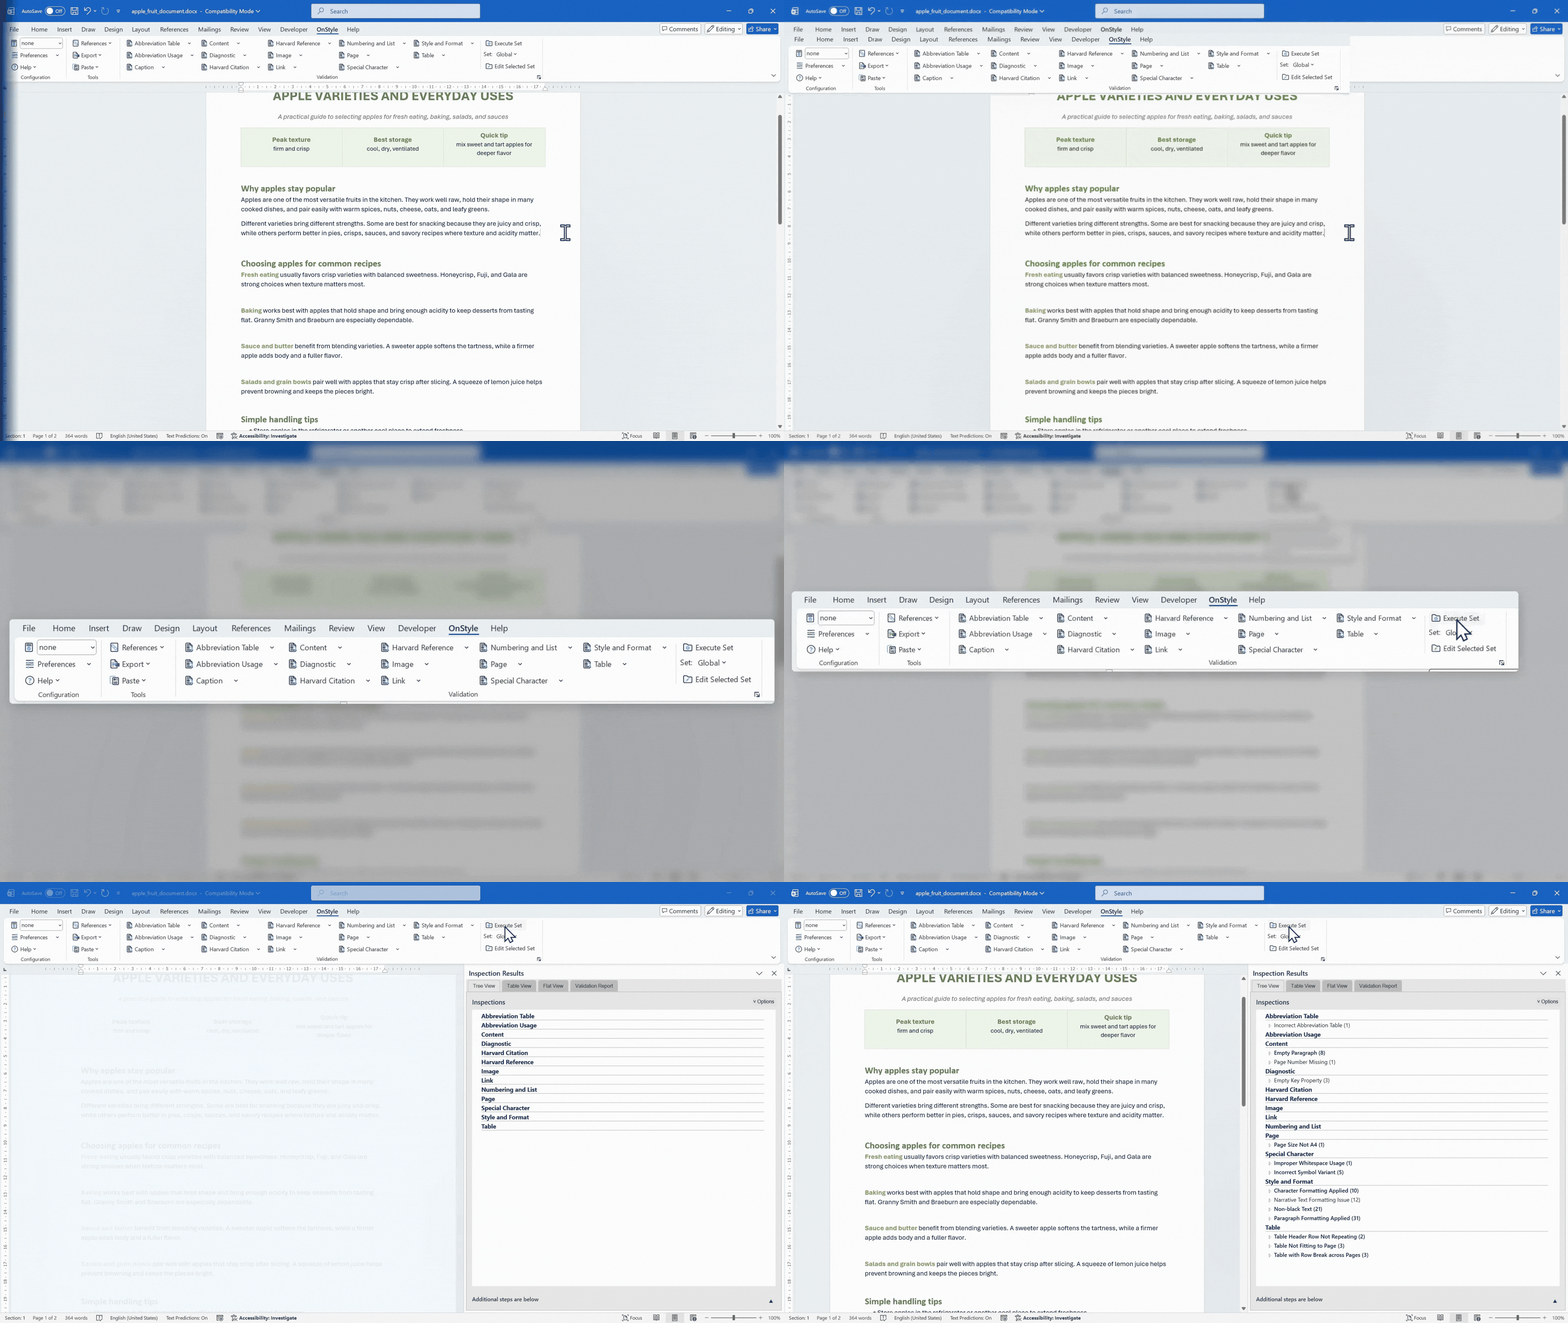
In this context, OnStyle can detect when paragraph breaks are incorrectly used to create spacing instead of proper spacing settings. The tool can highlight inconsistent spacing across the document and provide options to correct these issues.
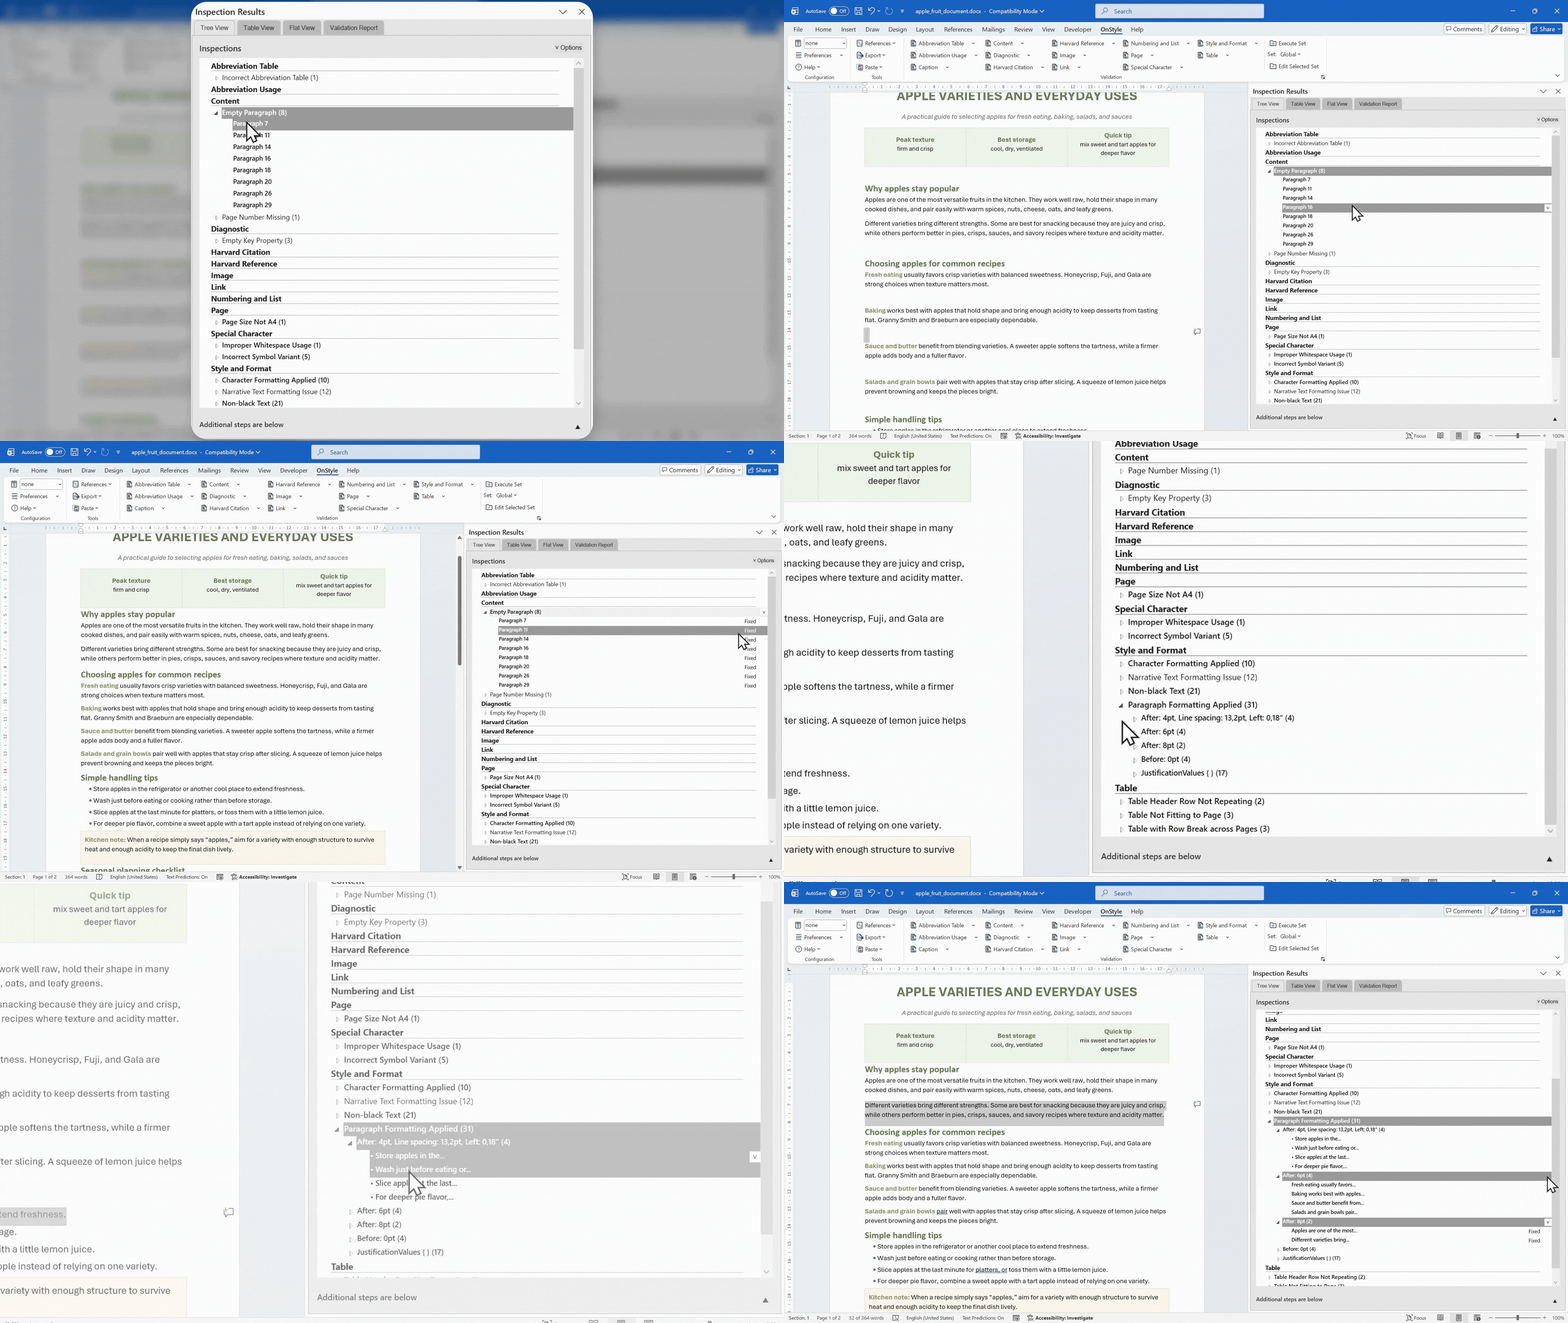
Corrections can be applied by selecting ‘Fix all’ or by resolving issues individually.
Summary
Section titled “Summary”Line spacing controls spacing within paragraphs, while paragraph spacing controls spacing between them. Using both settings correctly ensures consistent and readable document formatting. Quick adjustments can be made from the Ribbon, while the Paragraph dialog box provides full control. Proper use of spacing settings improves document structure, readability, and overall quality.