
How to Create a Table of Contents in Word
If you are typing a table of contents manually in Microsoft Word, there is a much easier and safer method. Word can create a table of contents automatically, add page numbers, make the entries clickable, and update the table when the document changes. This tutorial explains how to create a table of contents in Word, how to apply Heading 1, Heading 2, and Heading 3 styles, how to update page numbers, how to customize the layout, and how to use the Navigation Pane while editing long documents.
The key idea is simple: Word builds the table of contents from heading styles. If the headings are formatted correctly, the table of contents can be inserted, updated, customized, and used for navigation without manually typing page numbers or section titles.
What a Table of Contents Does in Word
Section titled “What a Table of Contents Does in Word”A table of contents is generated from the headings in the document. Instead of typing section names and page numbers manually, Word reads the heading styles applied to the document body and builds a structured table.
This is useful for reports, manuals, proposals, theses, business documents, regulatory documents, and any long Word document that needs a clean structure. A table of contents is also useful when the document will be shared, printed, exported to PDF, or read electronically.
A clickable table of contents in Word helps readers jump to a section faster. In an electronic document, readers can hold Ctrl and click a table of contents entry to move directly to that heading.
How to Create a Table of Contents in Word
Section titled “How to Create a Table of Contents in Word”Step 1: Click where the table of contents should appear.
Open the Word document and click where you want the table of contents to go. In most documents, the table of contents is placed after the title page or near the start of the document, before the main content begins.
Step 2: Open the table of contents menu.
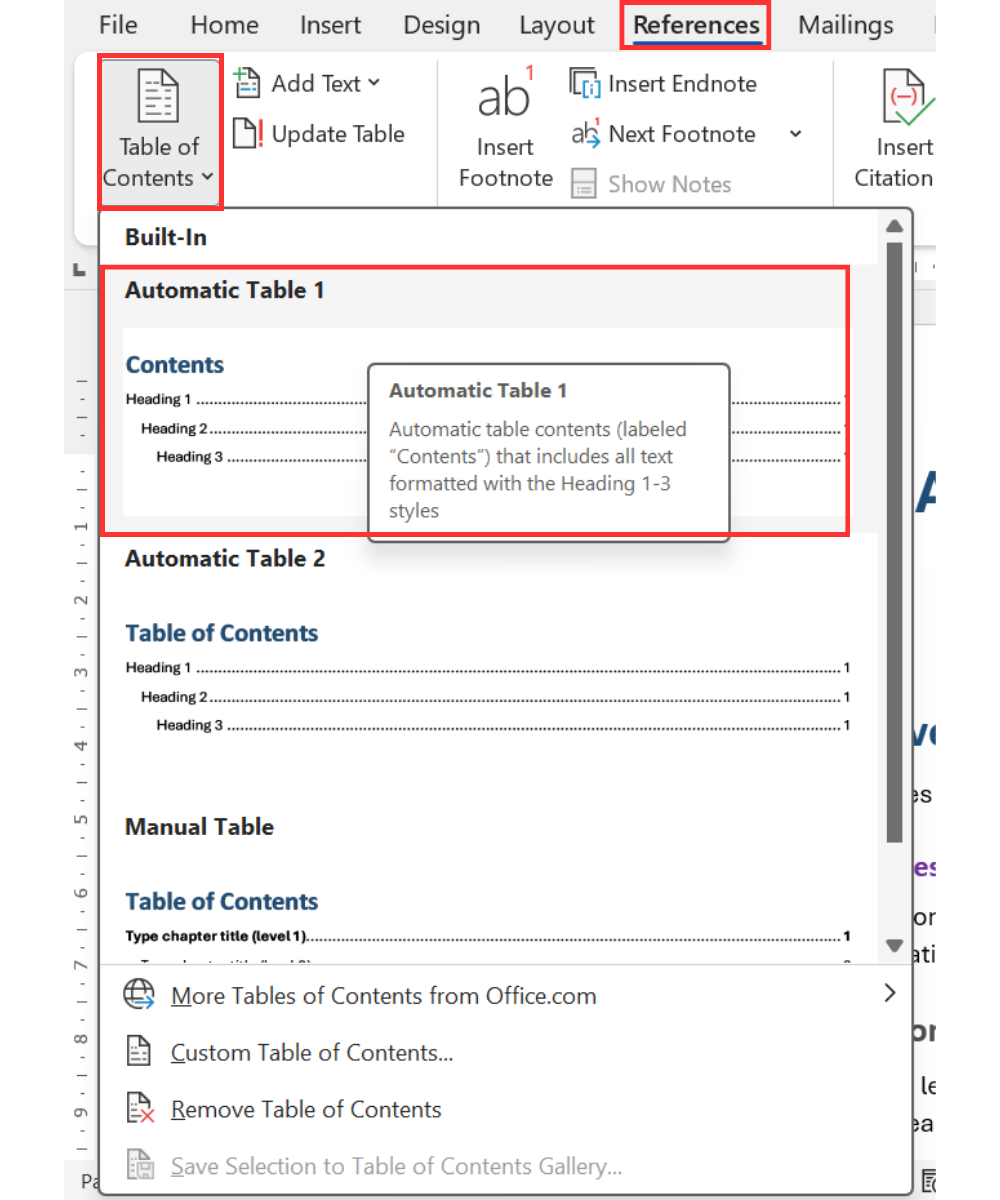
Go to the References tab. On the left side of the Ribbon, select Table of Contents.
Step 3: Choose an automatic table.
Choose for example Automatic Table 1. Word inserts a table of contents field at the cursor position. If Word says that heading styles need to be applied, that means Word does not yet know which text should appear in the table of contents. That message is normal when the document does not contain proper heading styles yet. Select OK and apply heading styles next.
How to Apply Heading Styles for a Word Table of Contents
Section titled “How to Apply Heading Styles for a Word Table of Contents”A table of contents in Word works only when the source text uses heading styles. Making a line bold, larger, or centered does not tell Word that the line is a heading. The line must use a built-in heading style or another style mapped to a TOC level.
Step 1: Select the first main section title.
Scroll to the first section title that should appear in the table of contents. Select the title text.
Step 2: Apply Heading 1.
Go to the Home tab. In the Styles gallery, select Heading 1. This marks the selected text as a main section.
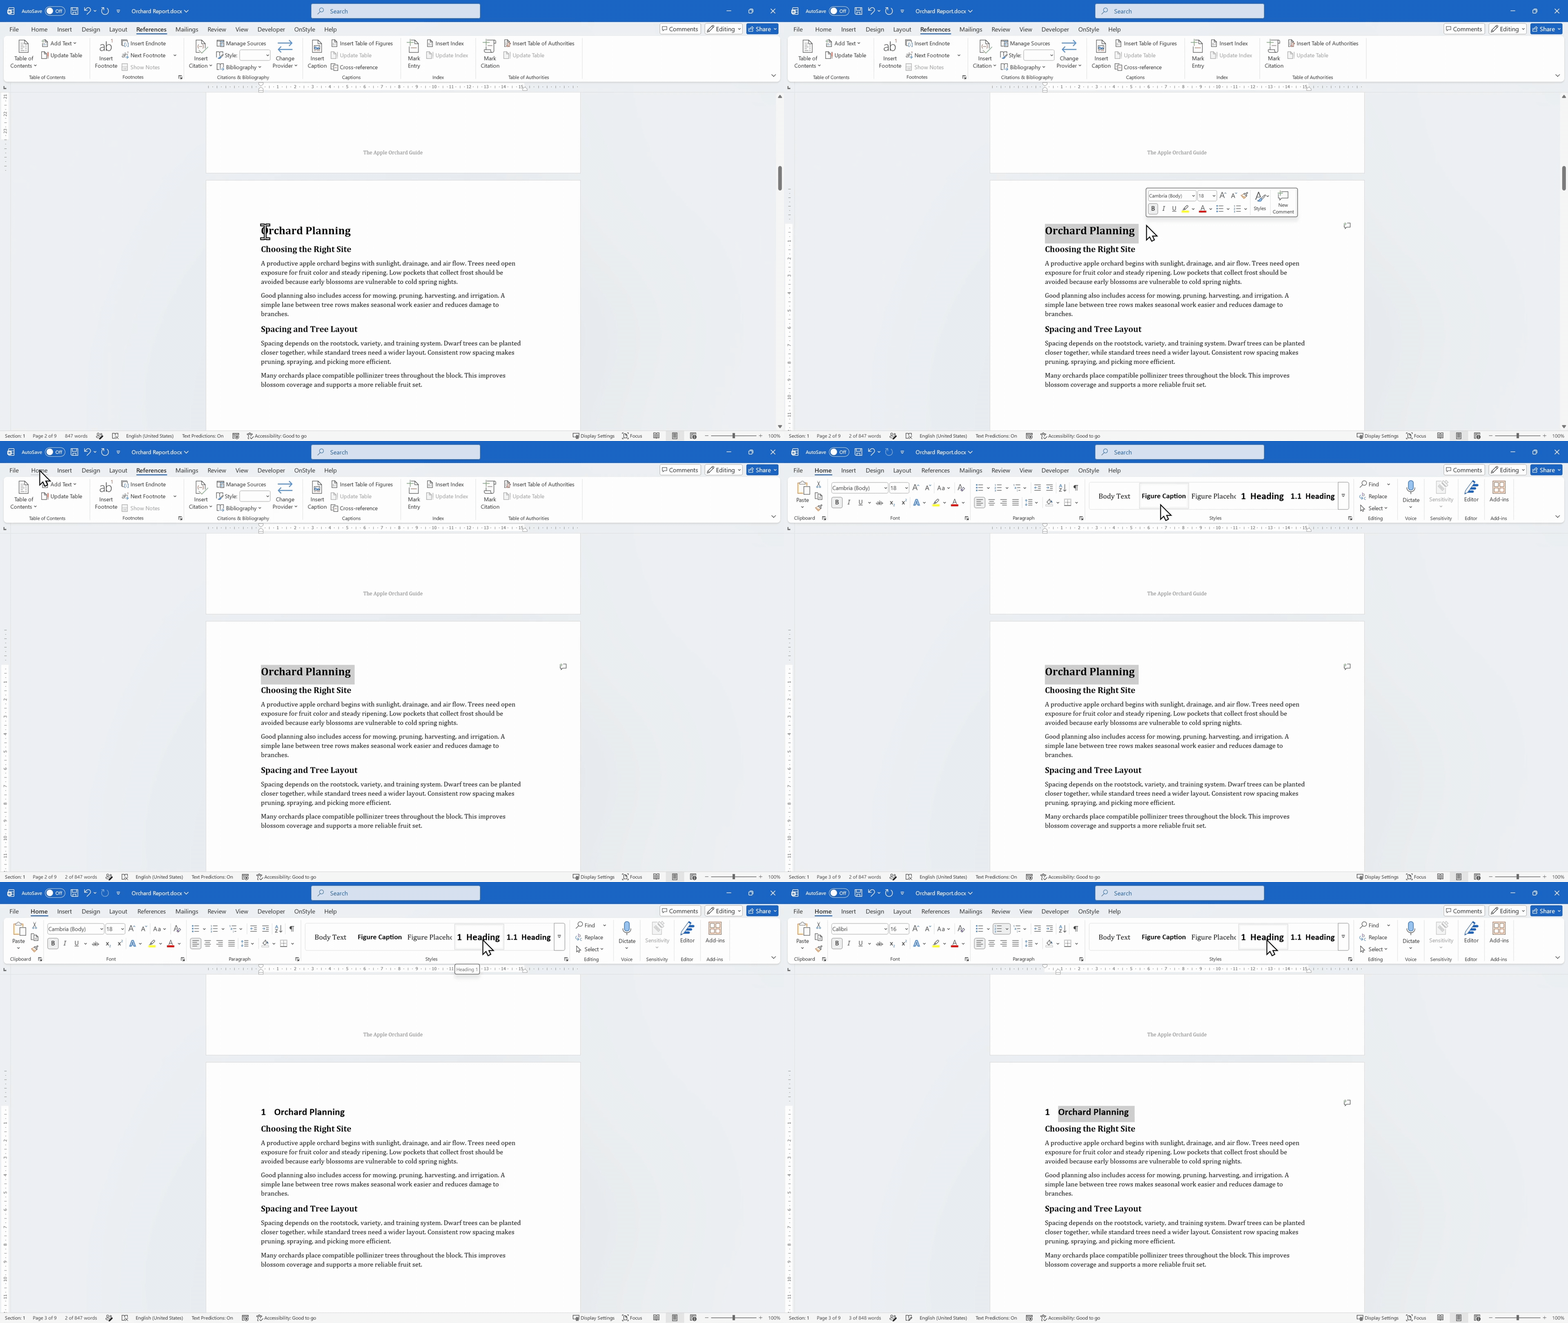
Step 3: Repeat for the other main sections.
Continue through the document and apply Heading 1 to every main section that should appear as a top-level entry in the table of contents.
How to Update Table of Contents in Word
Section titled “How to Update Table of Contents in Word”After heading styles are applied, return to the table of contents.
Step 1: Click inside the table of contents.
Click anywhere inside the table of contents field.
Step 2: Select Update Table.
Select Update Table. Word pulls in the headings and adds the correct page numbers automatically.
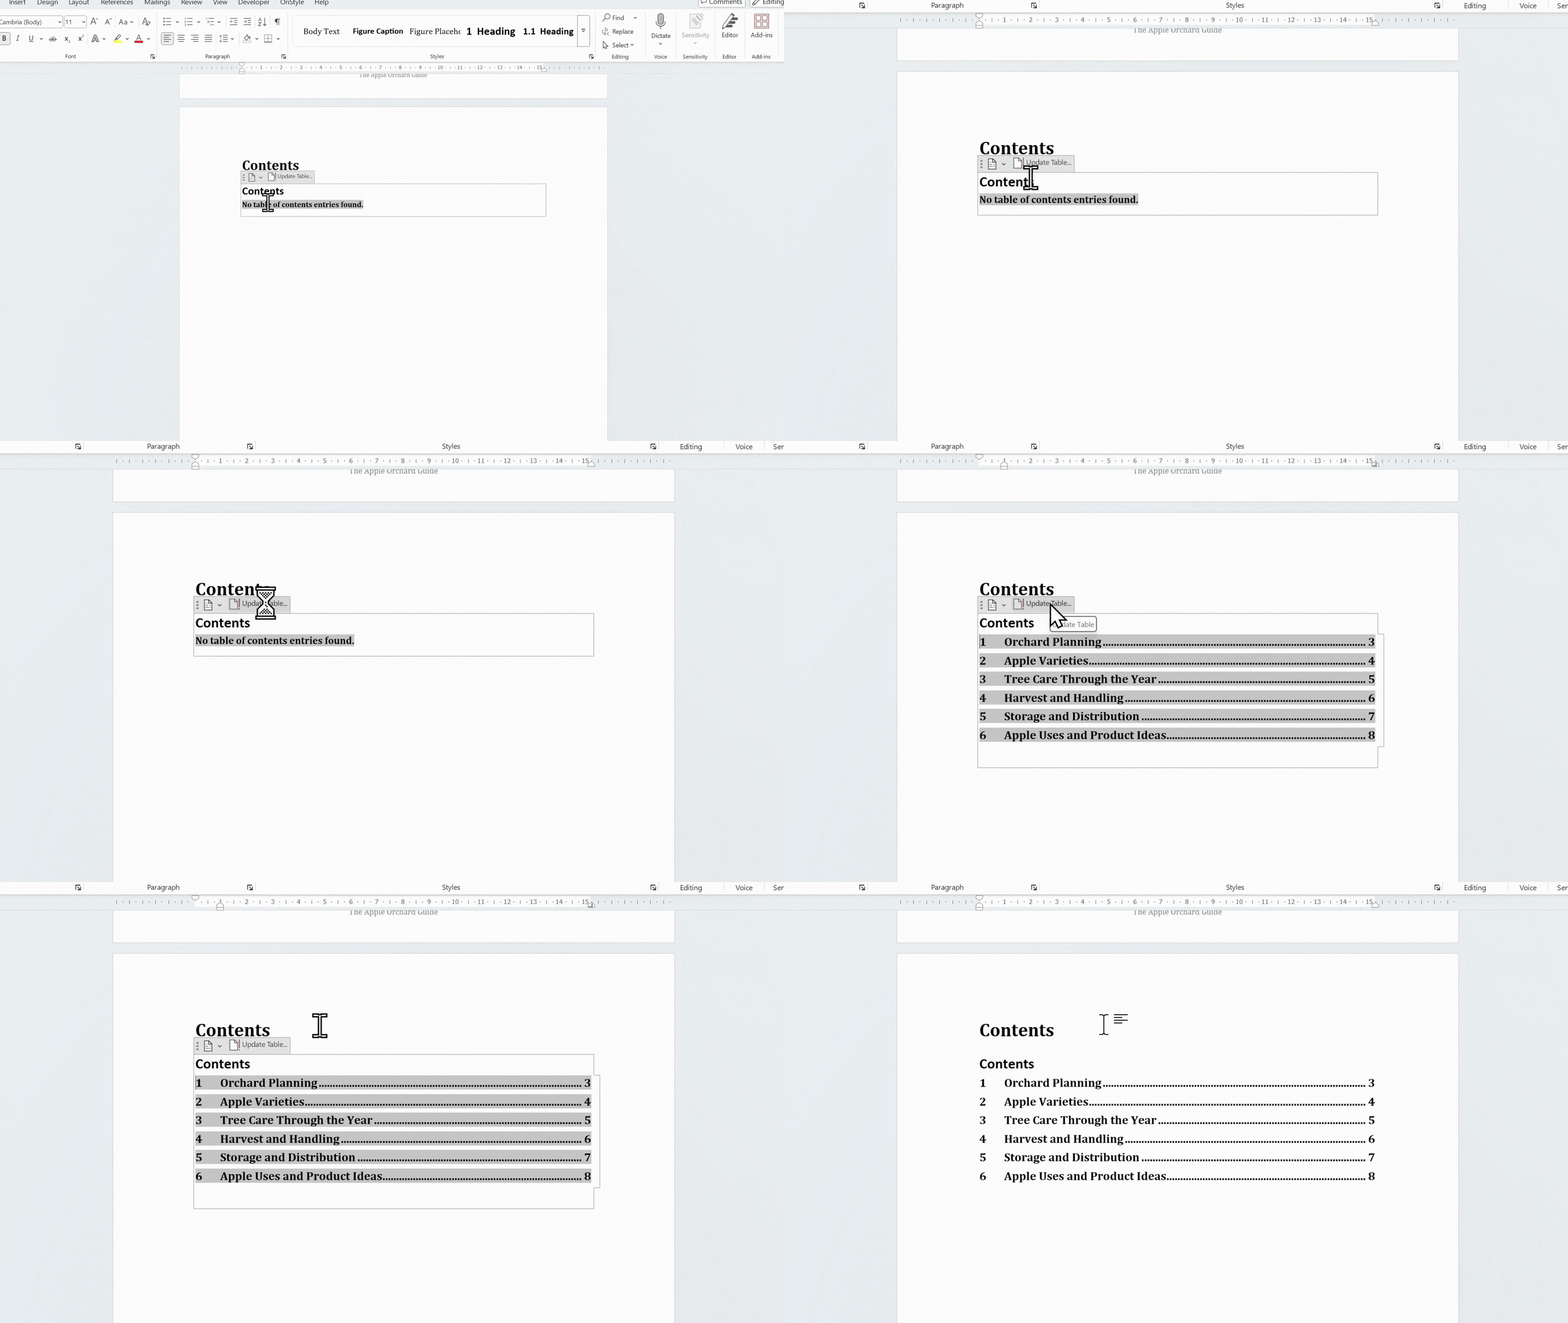
At this point, the table of contents should list the main sections that use Heading 1. If the table is still empty or a heading is missing, check whether that heading actually uses a heading style.
How to Add Subheadings to a Table of Contents in Word
Section titled “How to Add Subheadings to a Table of Contents in Word”A basic table of contents can show only main sections, but most long documents need more structure. Use Heading 2 for subsections and Heading 3 for smaller sections under those subsections.
Step 1: Select a subsection title.
Scroll to a smaller section title that belongs under a main section. Select the text.
Step 2: Apply Heading 2.
Go to the Home tab and choose Heading 2 from the Styles gallery.
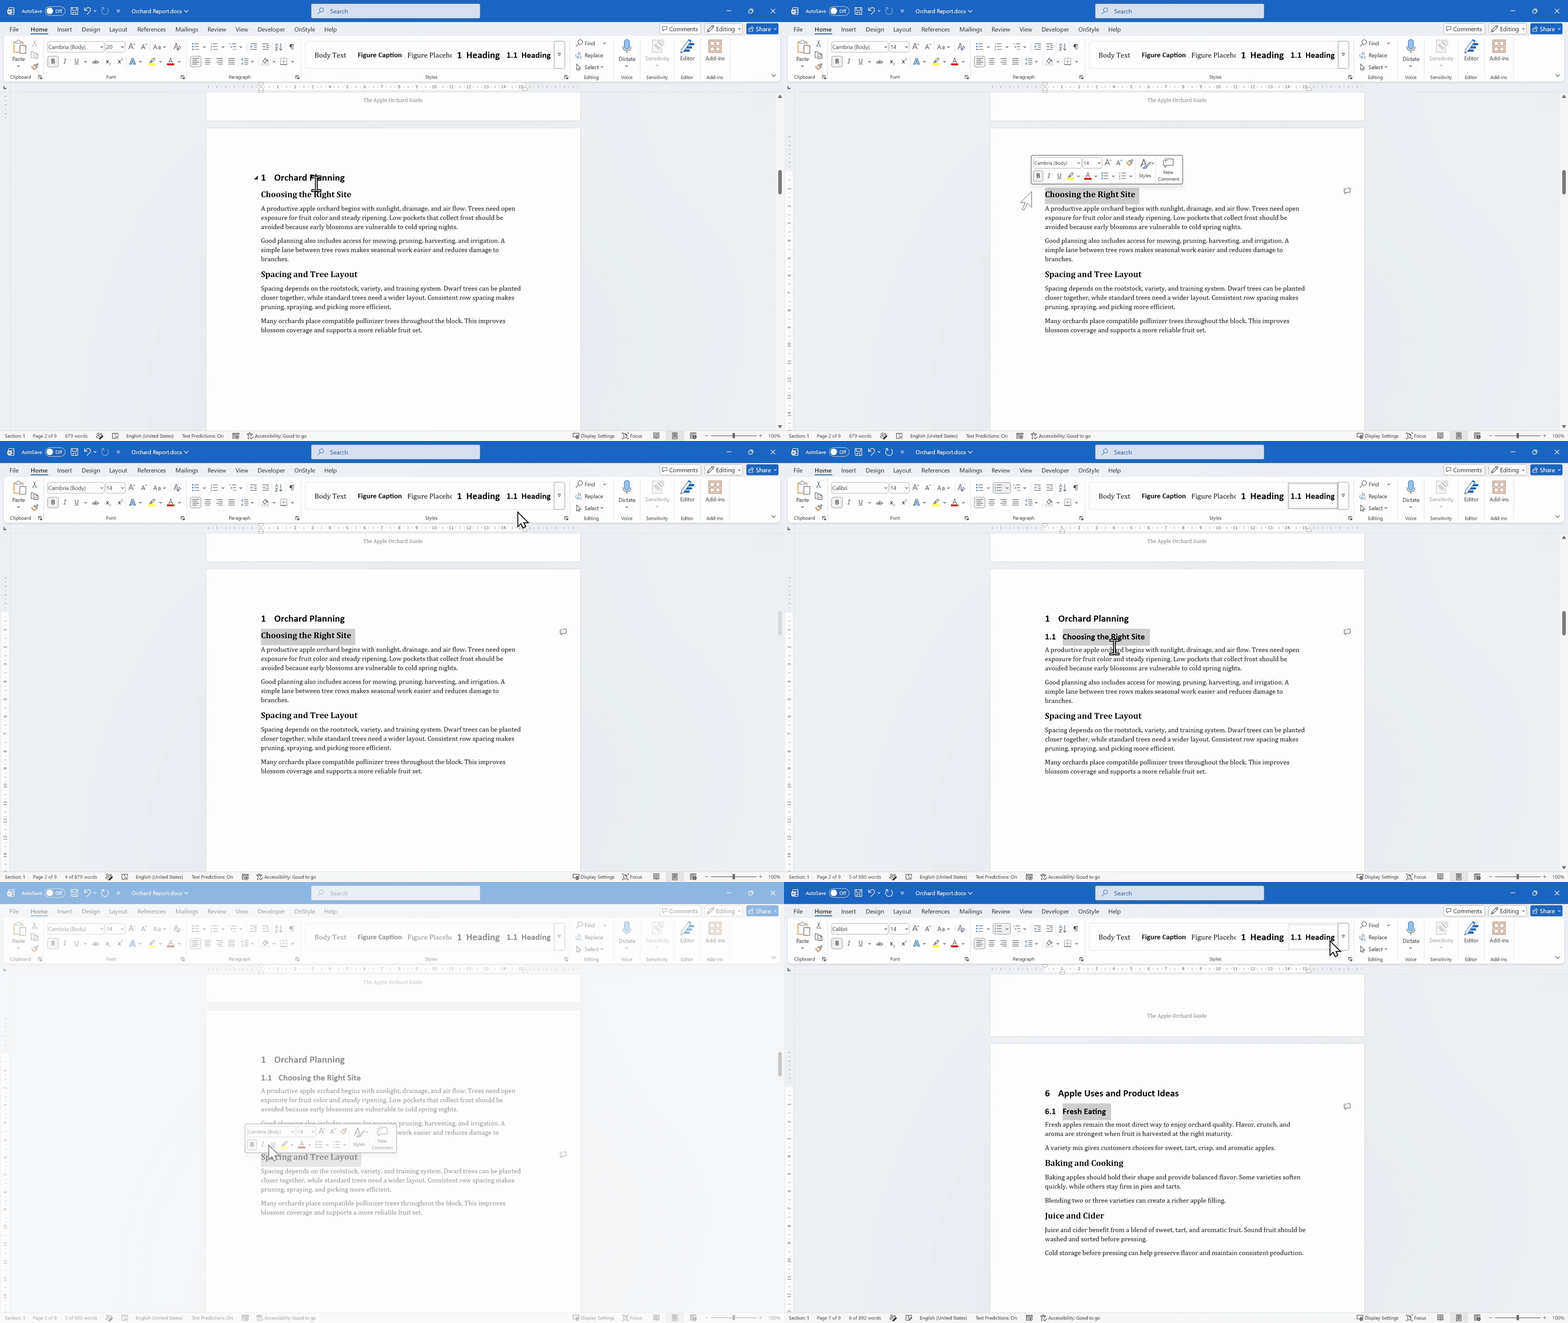
Step 3: Apply Heading 3 when needed.
If there is a smaller section inside a subsection, select it and apply Heading 3.
The structure is simple:
- Heading 1 is for main sections.
- Heading 2 is for subsections.
- Heading 3 is for smaller sections under those subsections.
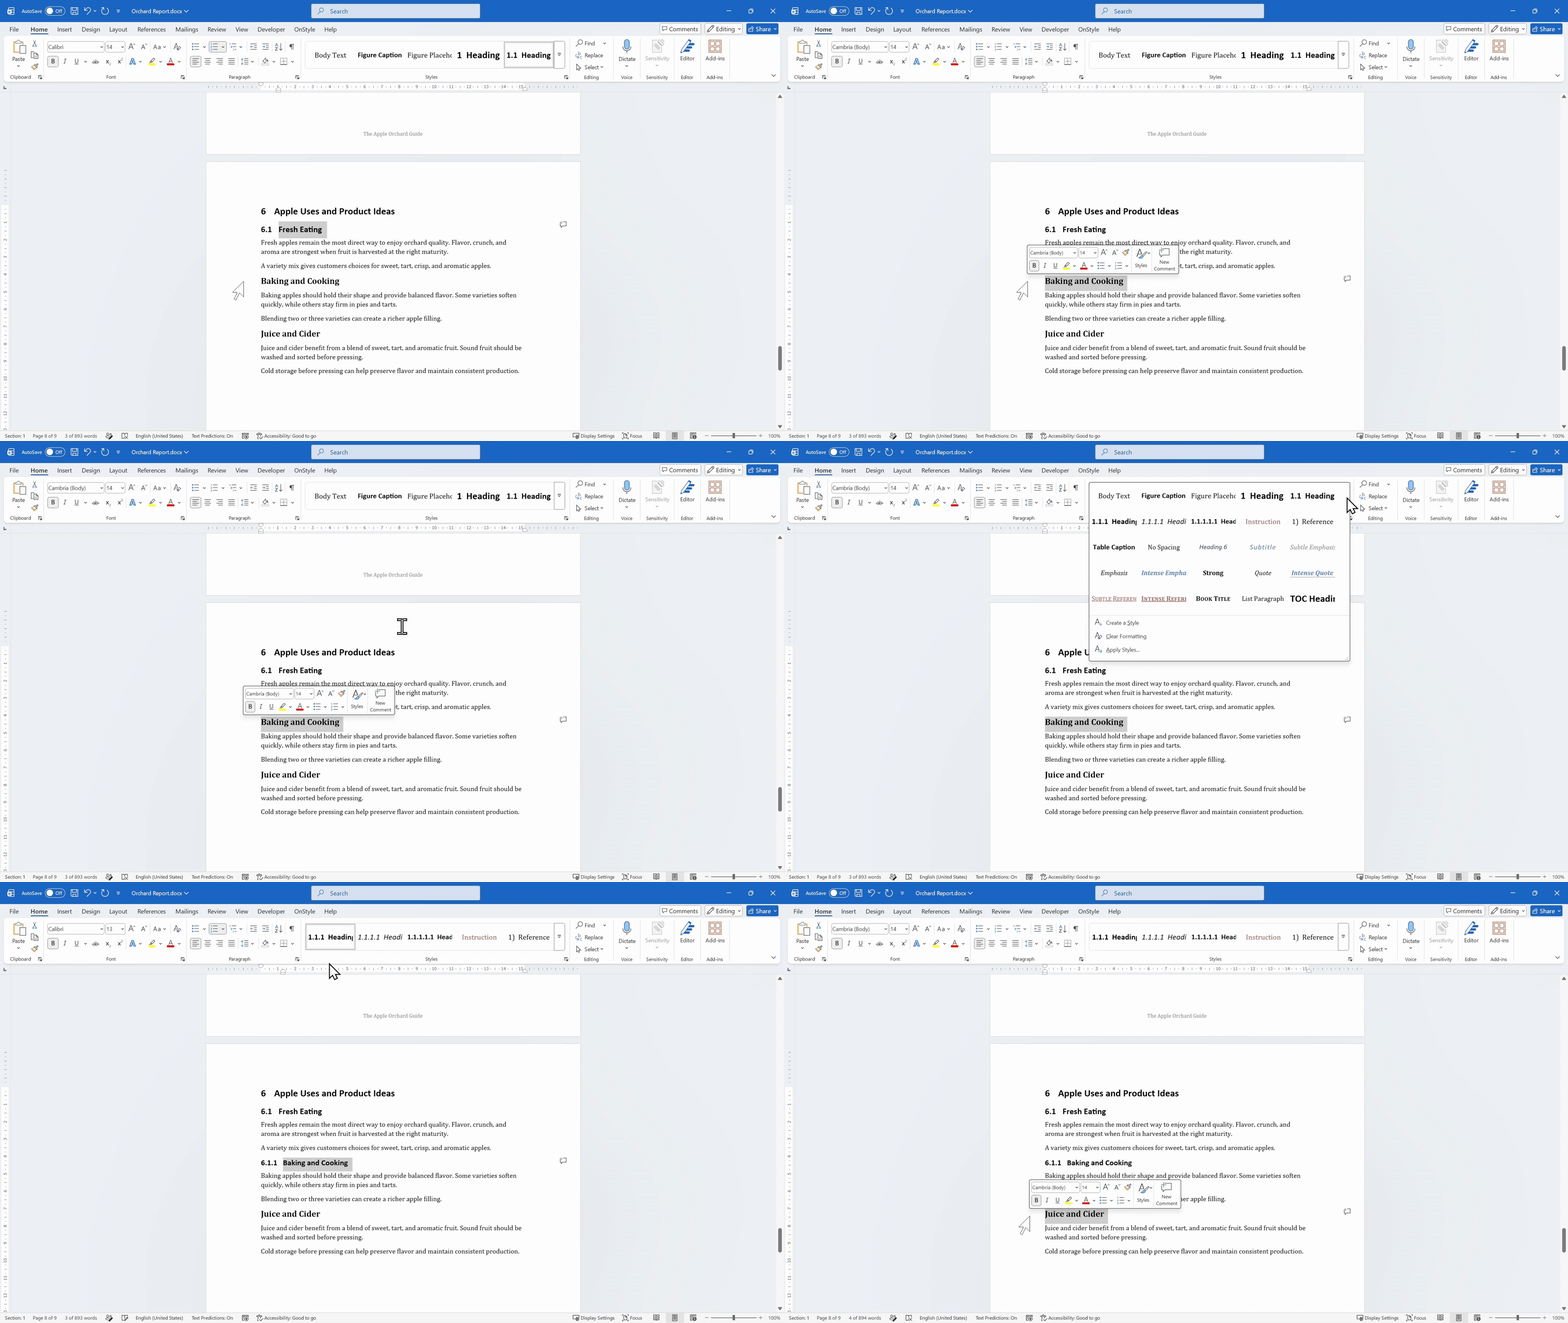
Step 4: Update the table again.
Return to the table of contents, select Update Table, and choose Update entire table. The table of contents now shows multiple levels.
How to Update Page Numbers in Word Table of Contents
Section titled “How to Update Page Numbers in Word Table of Contents”If content moves to different pages, you do not need to rebuild the entire table manually. Word can refresh page numbers for you.
For example, if you insert a page break before a section, that section may move to a different page. The table of contents may still show the old page number until it is updated.
Step 1: Click inside the table of contents.
Select the table of contents field near the beginning of the document.
Step 2: Select Update Table.
Choose Update Table to open the update options.
Step 3: Choose the correct update option.
Choose Update page numbers only when the headings are the same but the content moved to different pages. This keeps the same headings in the table of contents and refreshes only the page numbers.
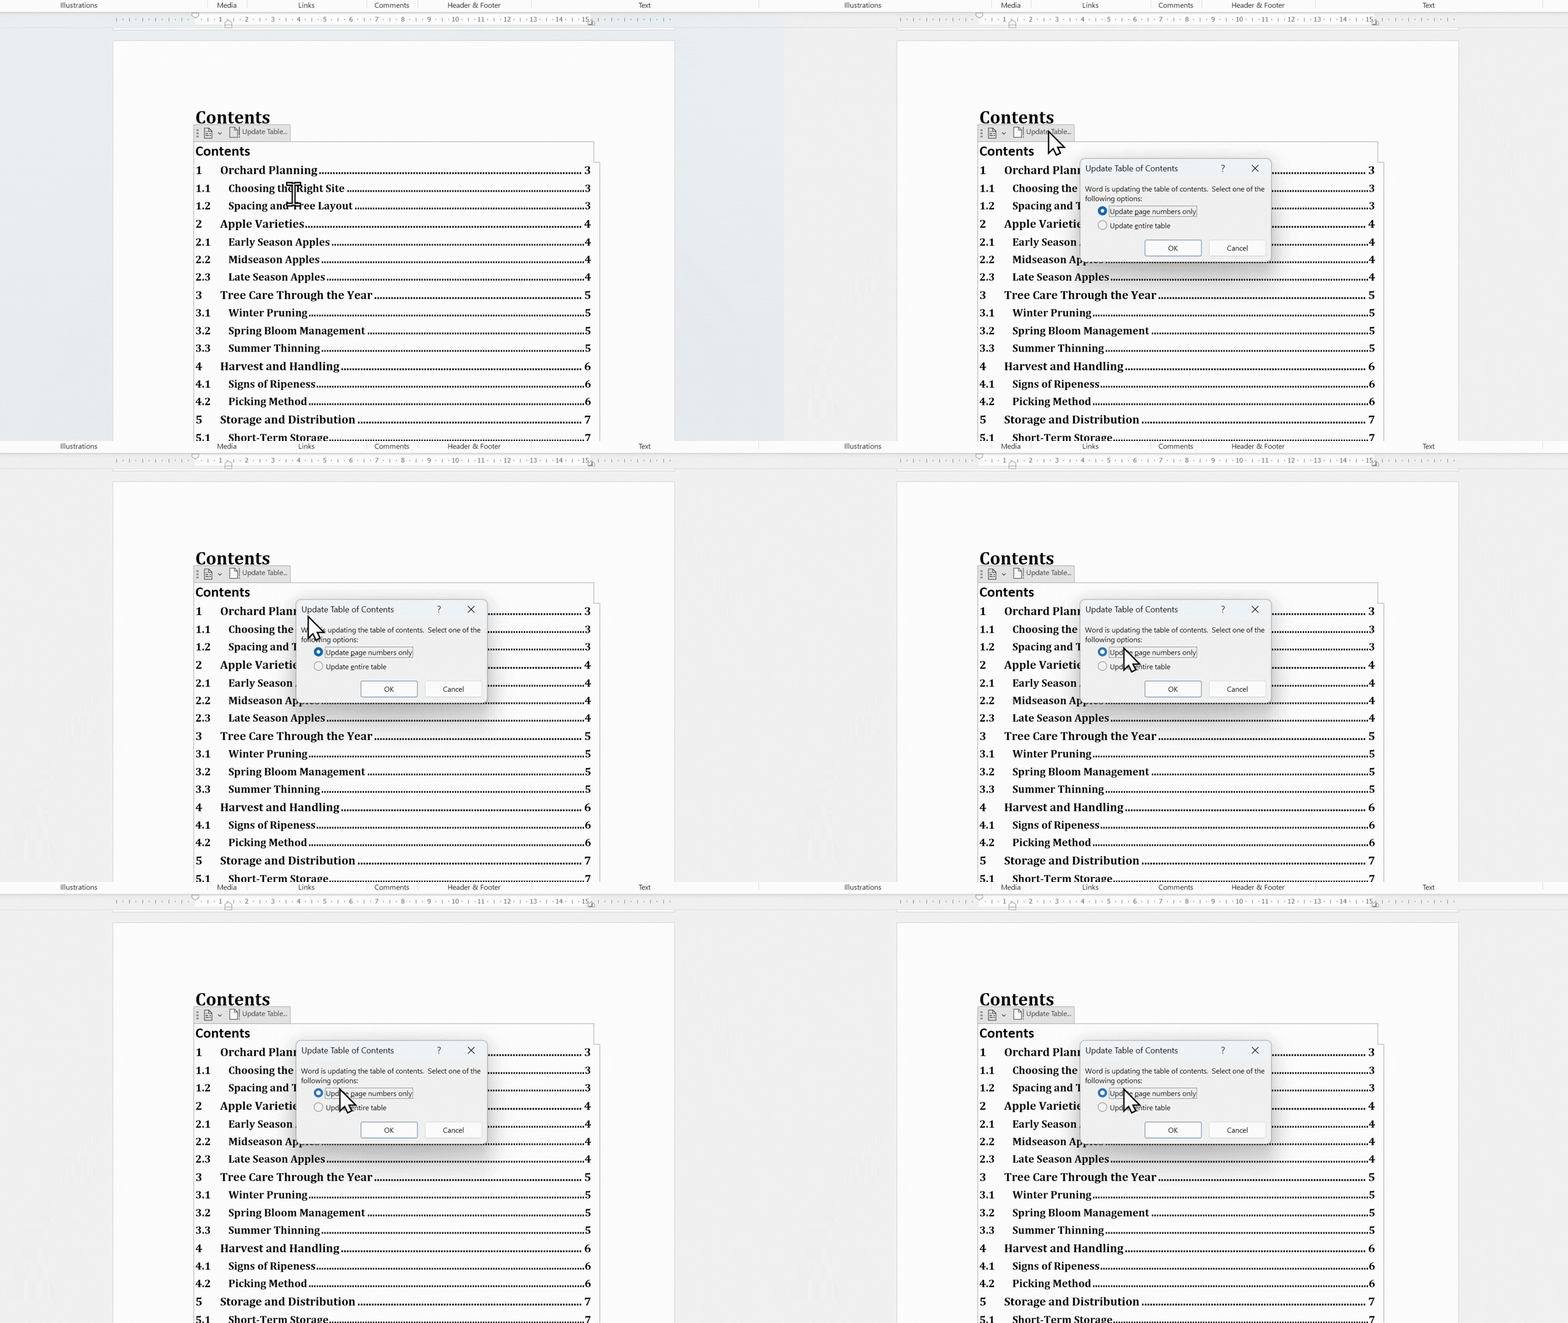
Choose Update entire table when headings were added, removed, renamed, or reorganized. This refreshes both the heading entries and the page numbers.
How to Edit Table of Contents in Word the Correct Way
Section titled “How to Edit Table of Contents in Word the Correct Way”You can click inside the table of contents and type directly, but that is not the correct long-term method. If you change text only inside the table of contents, the real heading in the document does not change. The next time the table is updated, the manual edit can disappear.
Step 1: Jump to the real heading.
Hold Ctrl and click the table of contents entry to jump directly to the matching heading in the document body.
Step 2: Edit the heading in the document body.
Change the actual heading text in the document, by editing the heading in the document body, not only inside the table of contents.
Step 3: Update the entire table.
Go back to the table of contents, select Update Table, and choose Update entire table. Word updates the table with the correct heading title.
How to Modify Heading Styles in Word
Section titled “How to Modify Heading Styles in Word”Heading styles make formatting faster because all headings of the same level can be updated at once. If every main section uses Heading 1, changing Heading 1 updates every main section heading in the document body.
Step 1: Open the Heading 1 style settings.
Go to the Home tab. In the Styles gallery, right-click Heading 1.
Step 2: Choose Modify.
Select Modify to open the Modify Style dialog box.
Step 3: Change the heading format.
Change the font, size, color, spacing, or other formatting, then select OK. Every Heading 1 paragraph updates automatically. If Heading 2 and Heading 3 are based on Heading 1, they may inherit part of the formatting change.
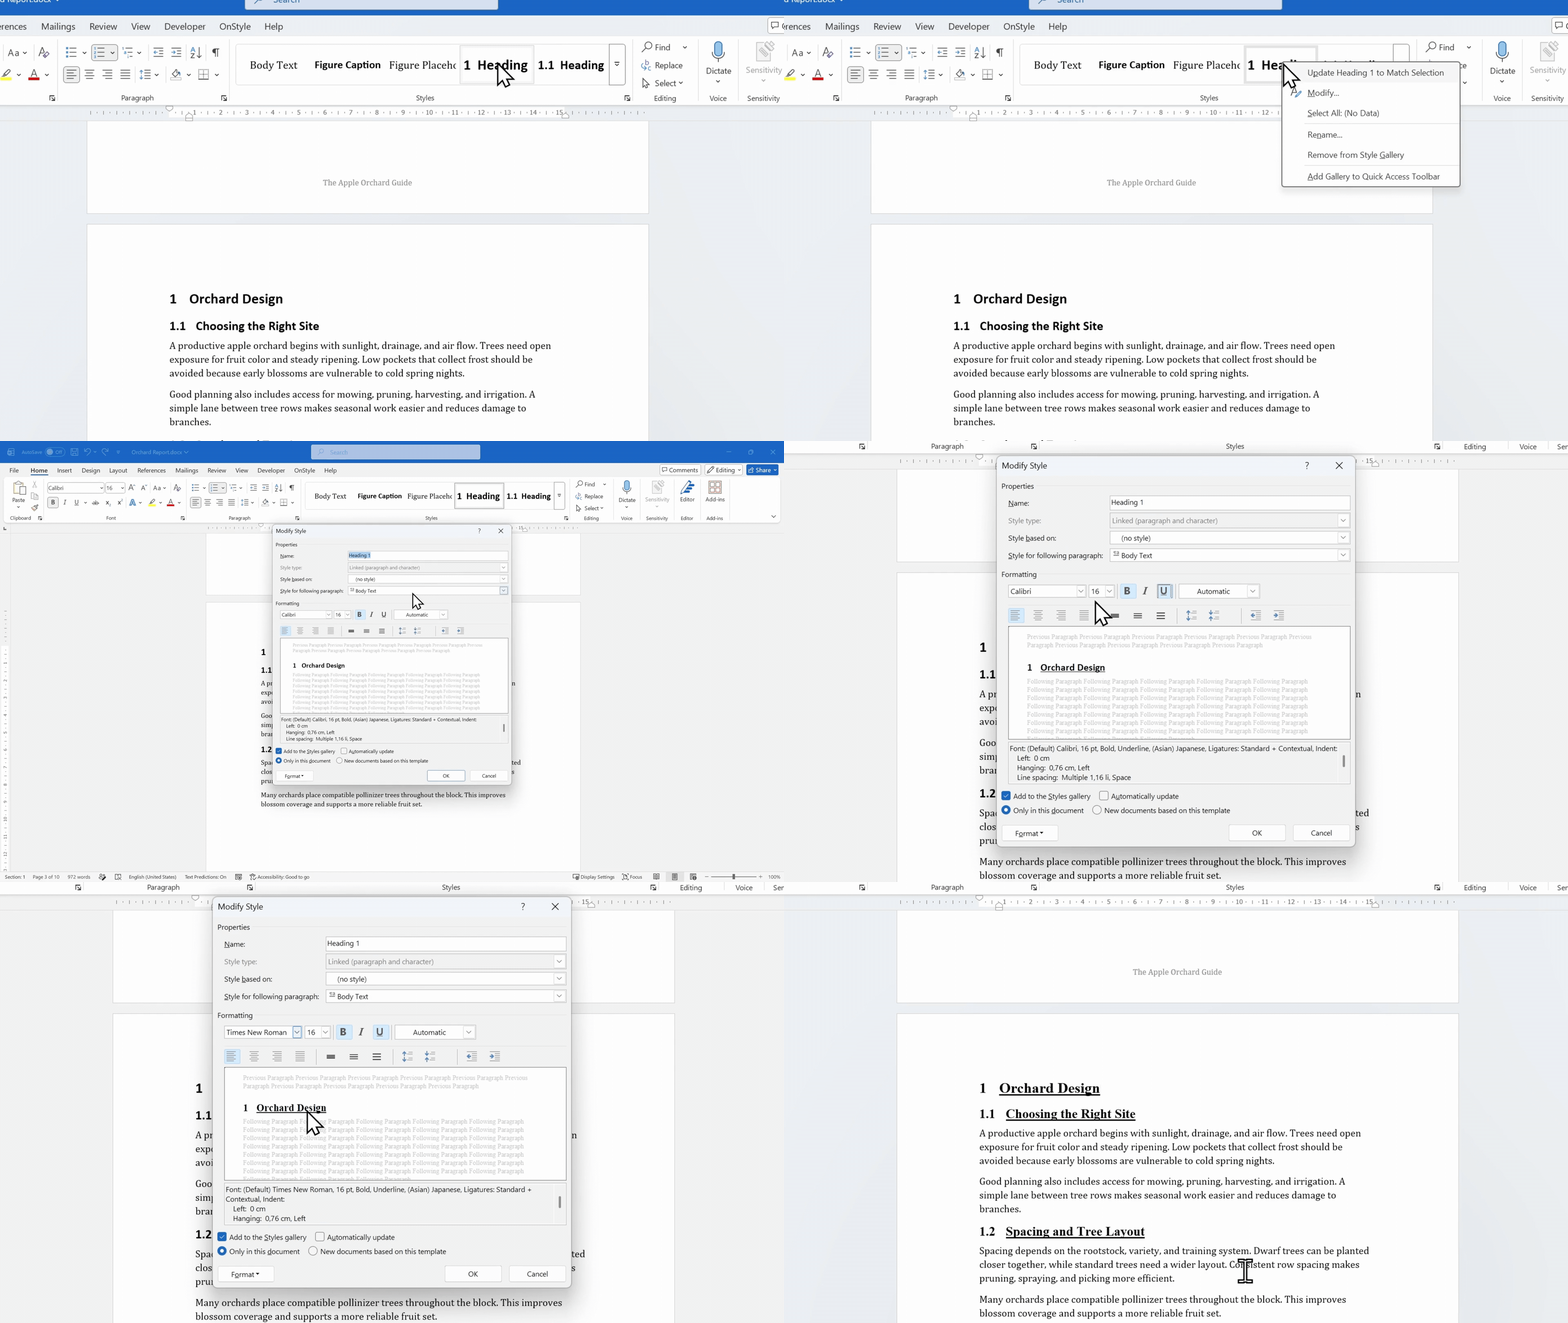
Changing heading styles controls how headings look in the document body. It does not control how entries look inside the table of contents. The table of contents uses separate TOC styles for its own formatting.
How to Customize the Table of Contents in Word
Section titled “How to Customize the Table of Contents in Word”Customizing the table of contents means changing the entries that appear inside the TOC, not changing the headings in the document body. The table of contents has its own settings and its own TOC styles.
Step 1: Open Custom Table of Contents.
Go to the References tab, select Table of Contents, then choose Custom Table of Contents. This opens the main settings window for the table of contents.
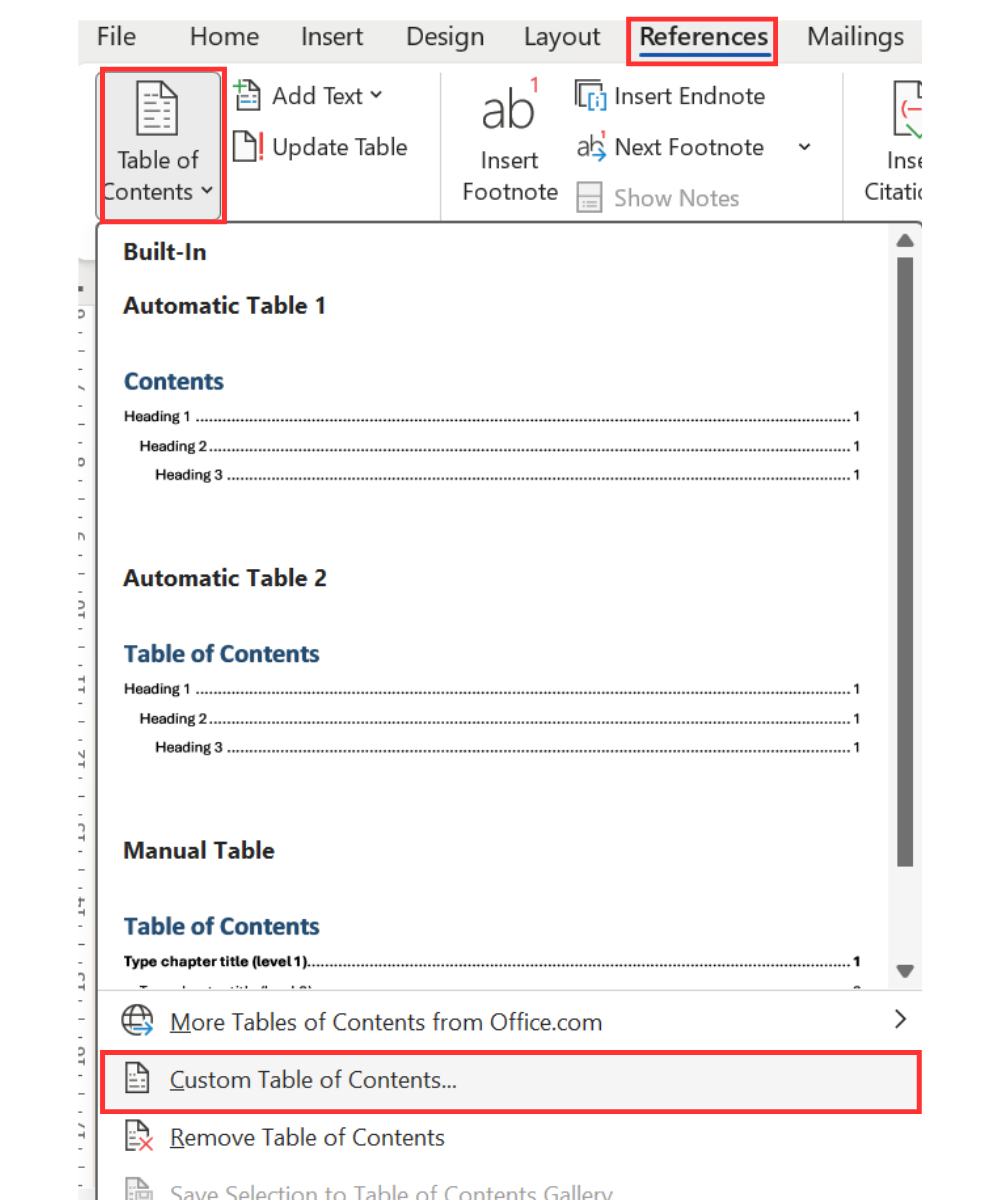
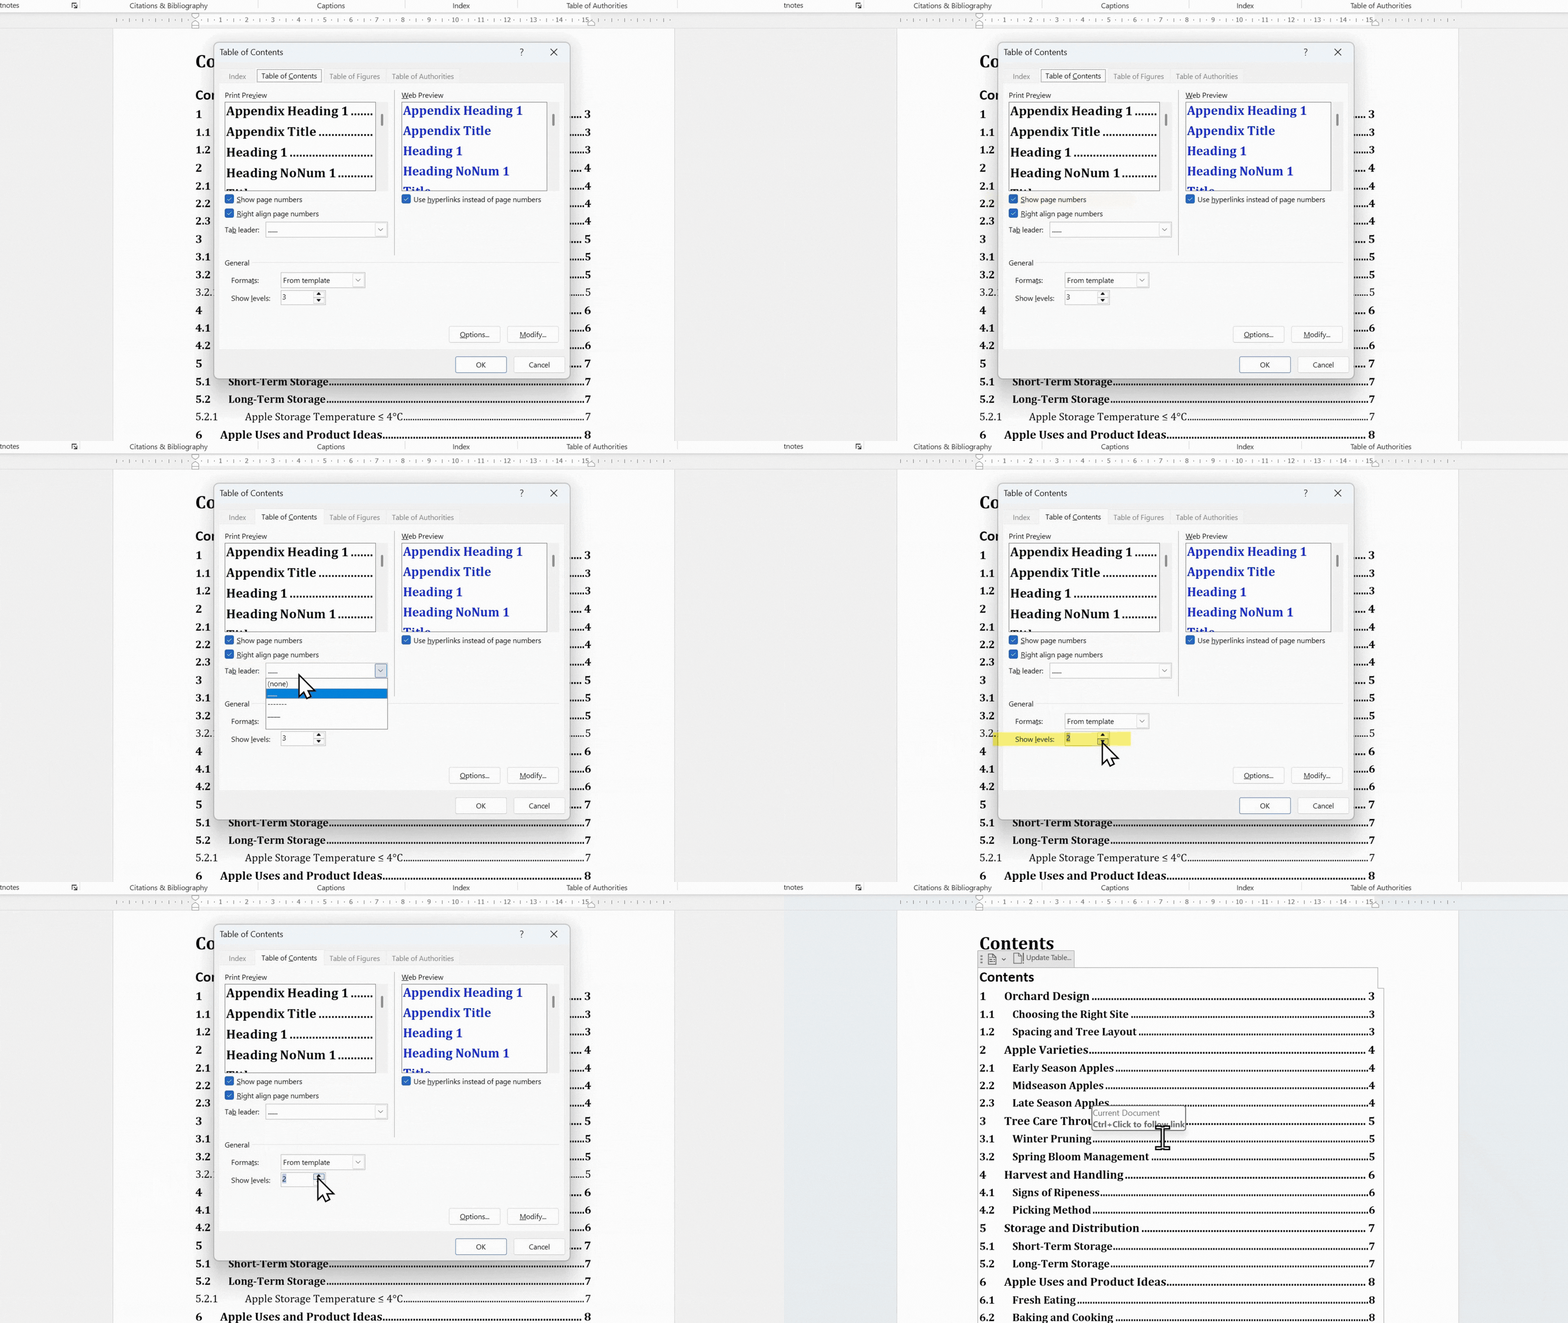
Step 2: Choose the table of contents settings.
In the Table of Contents dialog box, choose whether to show page numbers and whether to align them on the right. Use the Tab leader setting to choose dots, dashes, or no leader between each entry and its page number. Then use Show levels to control how many heading levels appear in the table of contents. For example, set the level to 2 if you only want Heading 1 and Heading 2 to appear. Finally, use the Formats menu to choose the overall style of the table of contents, or keep it set to the default template style.
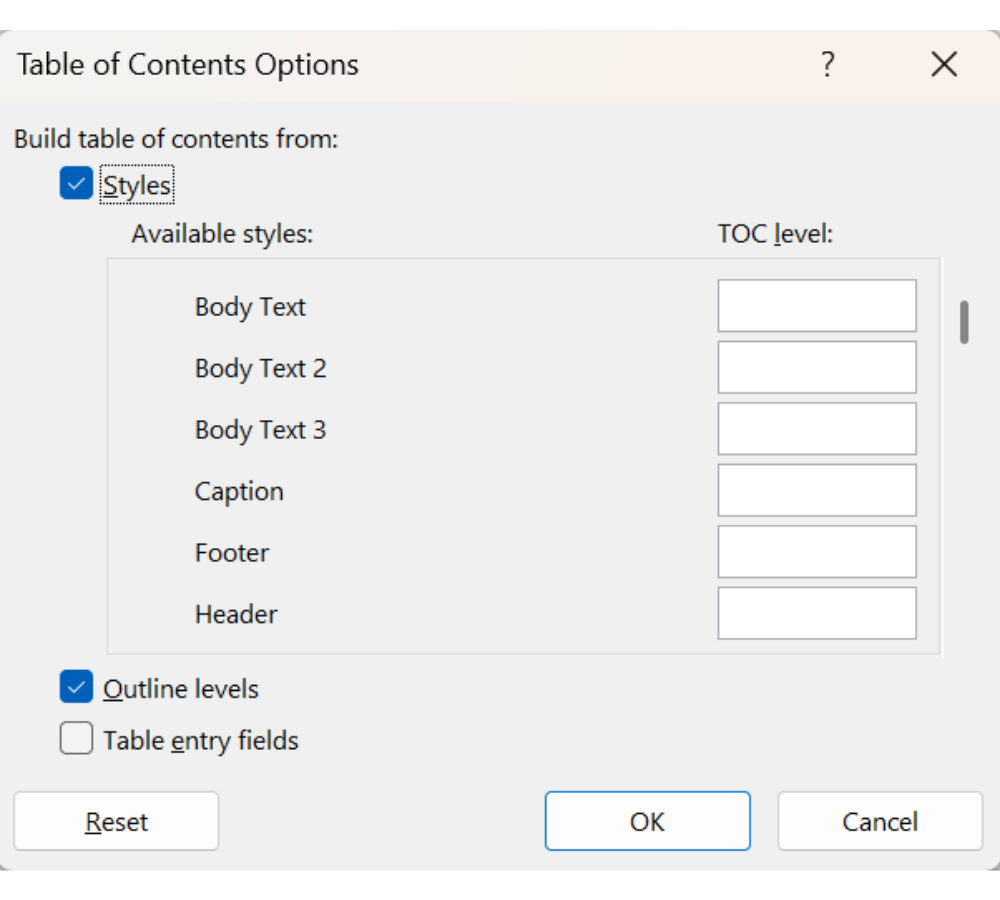
Step 3: Use Options when you need style mapping control.
Select Options if you want to control which styles are used to build the table of contents. Word usually maps Heading 1 to TOC level 1, Heading 2 to TOC level 2, and Heading 3 to TOC level 3. This is useful if a different style should appear in the table of contents or if a style should be removed from the TOC.
How to Modify TOC Styles in Word
Section titled “How to Modify TOC Styles in Word”If you want the table of contents itself to look different, modify the TOC styles. TOC styles control the formatting of the entries inside the table of contents.
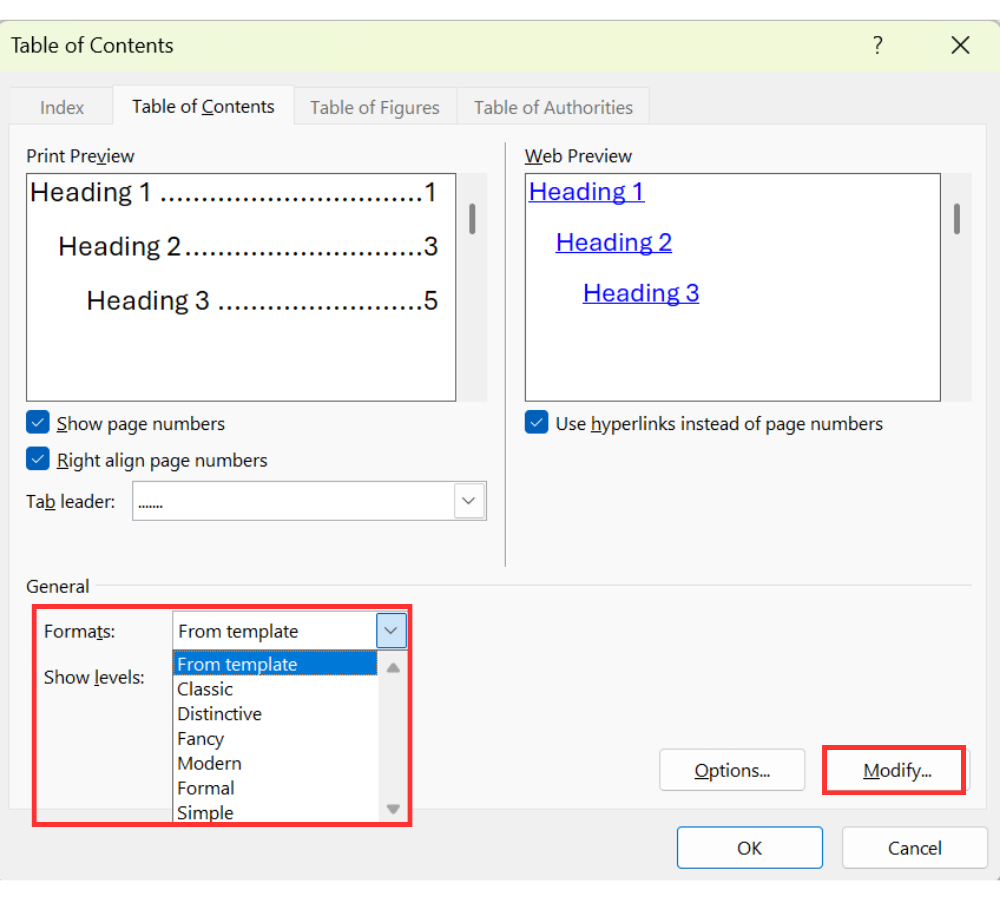
Step 1: Set Formats to From template.
In the Table of Contents dialog box, set the Formats menu to From template. If another built-in format is selected, Word may control the appearance through that preset, and the Modify button can be unavailable.
Step 2: Select Modify.
Select Modify to open the list of TOC styles.
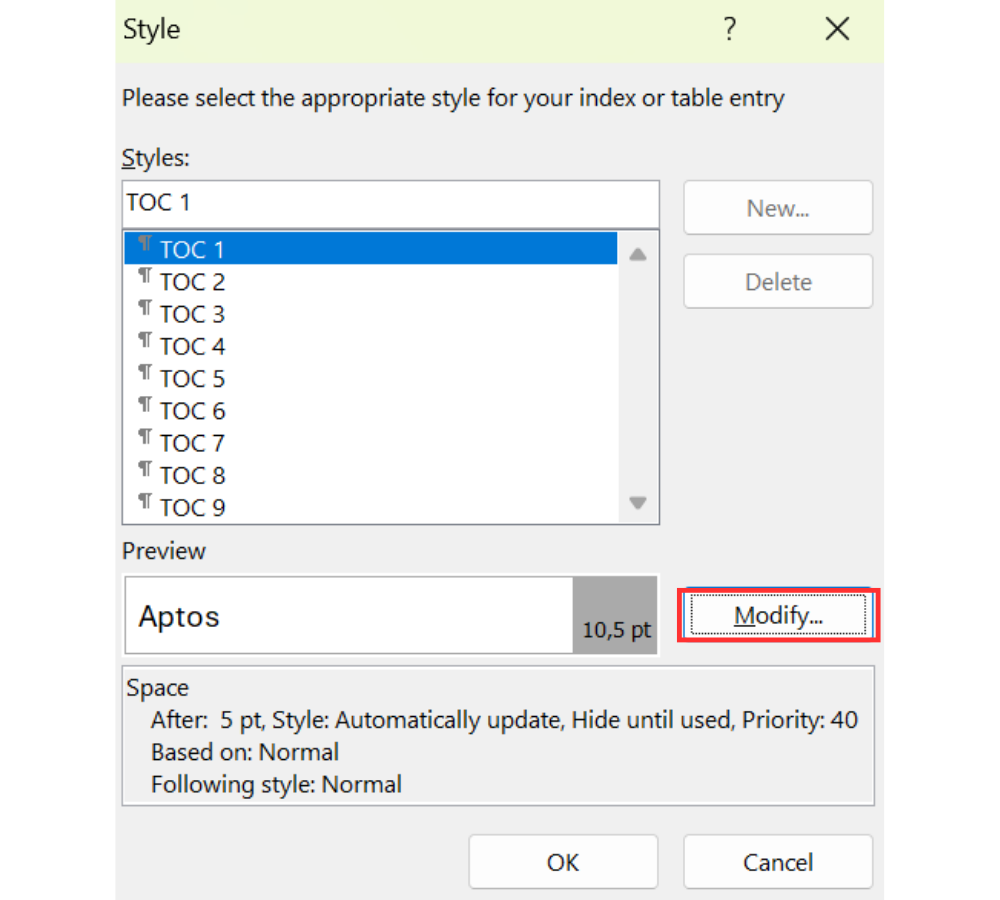
Step 3: Choose and modify the TOC style.
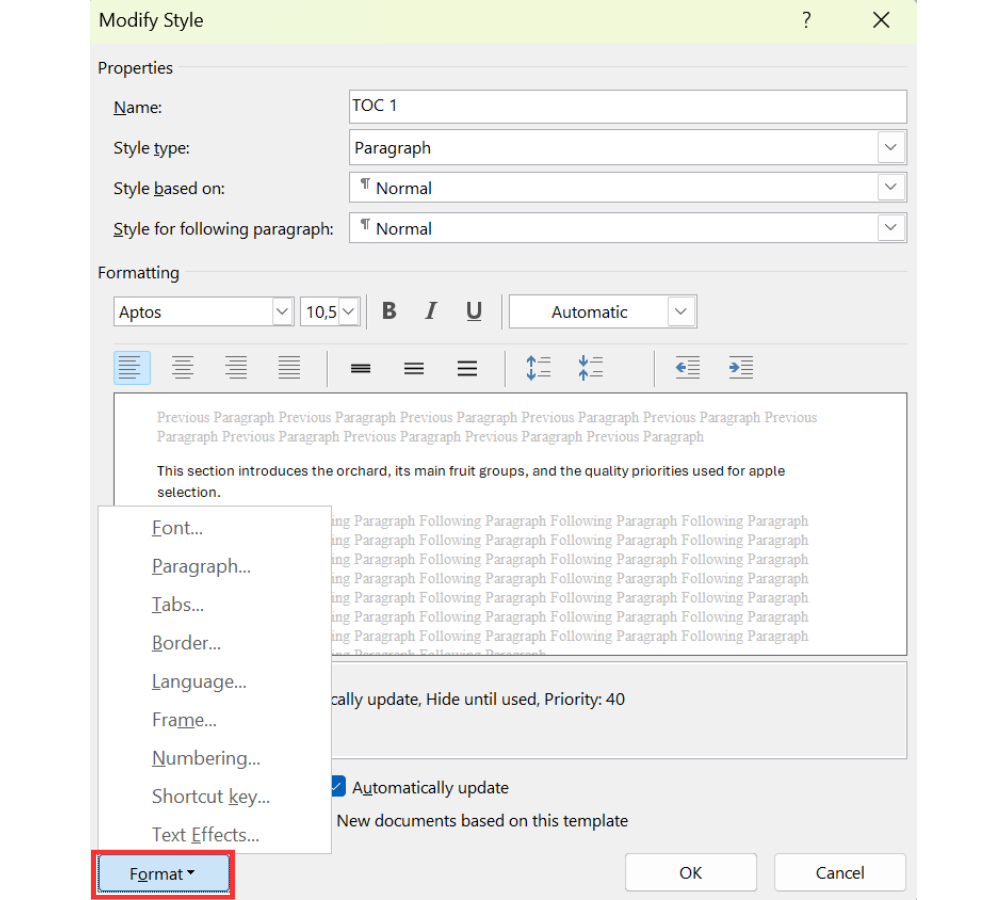
In the Style dialog box, select the TOC level you want to change, such as TOC 1, TOC 2, or TOC 3. TOC 1 controls level 1 entries, TOC 2 controls level 2 entries, and TOC 3 controls level 3 entries. Select Modify again, then change the formatting, such as font, size, bold, indentation, spacing, and other style properties.
Step 4: Use Format for detailed settings.
For more control, select Format. This gives access to detailed settings such as font, paragraph spacing, tabs, borders, and other formatting options.
Step 5: Apply the custom table of contents.
After making changes, select OK to close each dialog box. If Word asks whether you want to replace the current table of contents, select Yes.
How to Jump from the Table of Contents
Section titled “How to Jump from the Table of Contents”A Word table of contents is clickable. This makes it useful while editing and helpful for people reading the document electronically.
Step 1: Hold Ctrl.
Move the pointer over an entry in the table of contents and hold Ctrl.
Step 2: Click the entry.
Click the table of contents entry. Word jumps directly to that section.
This type of navigation is useful, but it is not always the best tool while writing and restructuring a long document. For that, the Navigation Pane is usually faster.
Table of Contents vs Navigation Pane in Word
Section titled “Table of Contents vs Navigation Pane in Word”The table of contents and the Navigation Pane both help users move through a long document, but they serve different purposes.
The table of contents is part of the document itself. It usually appears near the beginning and lists headings with page numbers. Readers can use it to understand the structure, jump to sections, or navigate a printed or exported PDF version.
The Navigation Pane is a working map inside Word. It appears on the side of the screen and helps you jump between headings, pages, or search results while writing and editing. It is useful for checking document structure, moving through long files, and reorganizing sections without adding anything visible to the document itself.
The Navigation Pane can show the full heading structure that Word detects in the document, while the table of contents only shows the heading levels you choose to include. For example, the Navigation Pane may show Heading 1, Heading 2, and Heading 3, while the table of contents may show only Heading 1 and Heading 2 if the TOC level is set to 2.
How to Use the Navigation Pane in Word
Section titled “How to Use the Navigation Pane in Word”Step 1: Open the View tab.
Go to the View tab.
Step 2: Turn on Navigation Pane.
Select Navigation Pane. Word opens the pane on the left side of the screen.
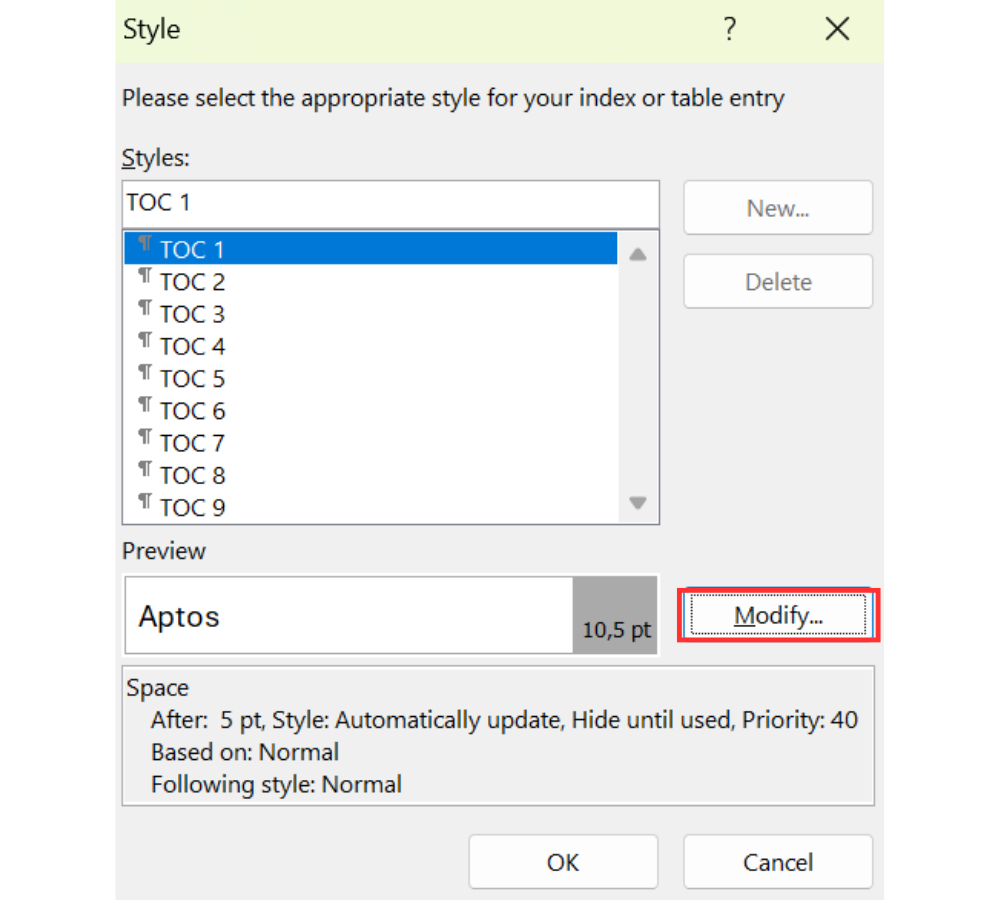
Step 3: Click headings to move through the document.
Click any heading in the Navigation Pane to jump directly to that section.
The Navigation Pane also helps check whether heading styles are applied correctly. If a heading is missing from the Navigation Pane, it probably does not have a heading style applied.
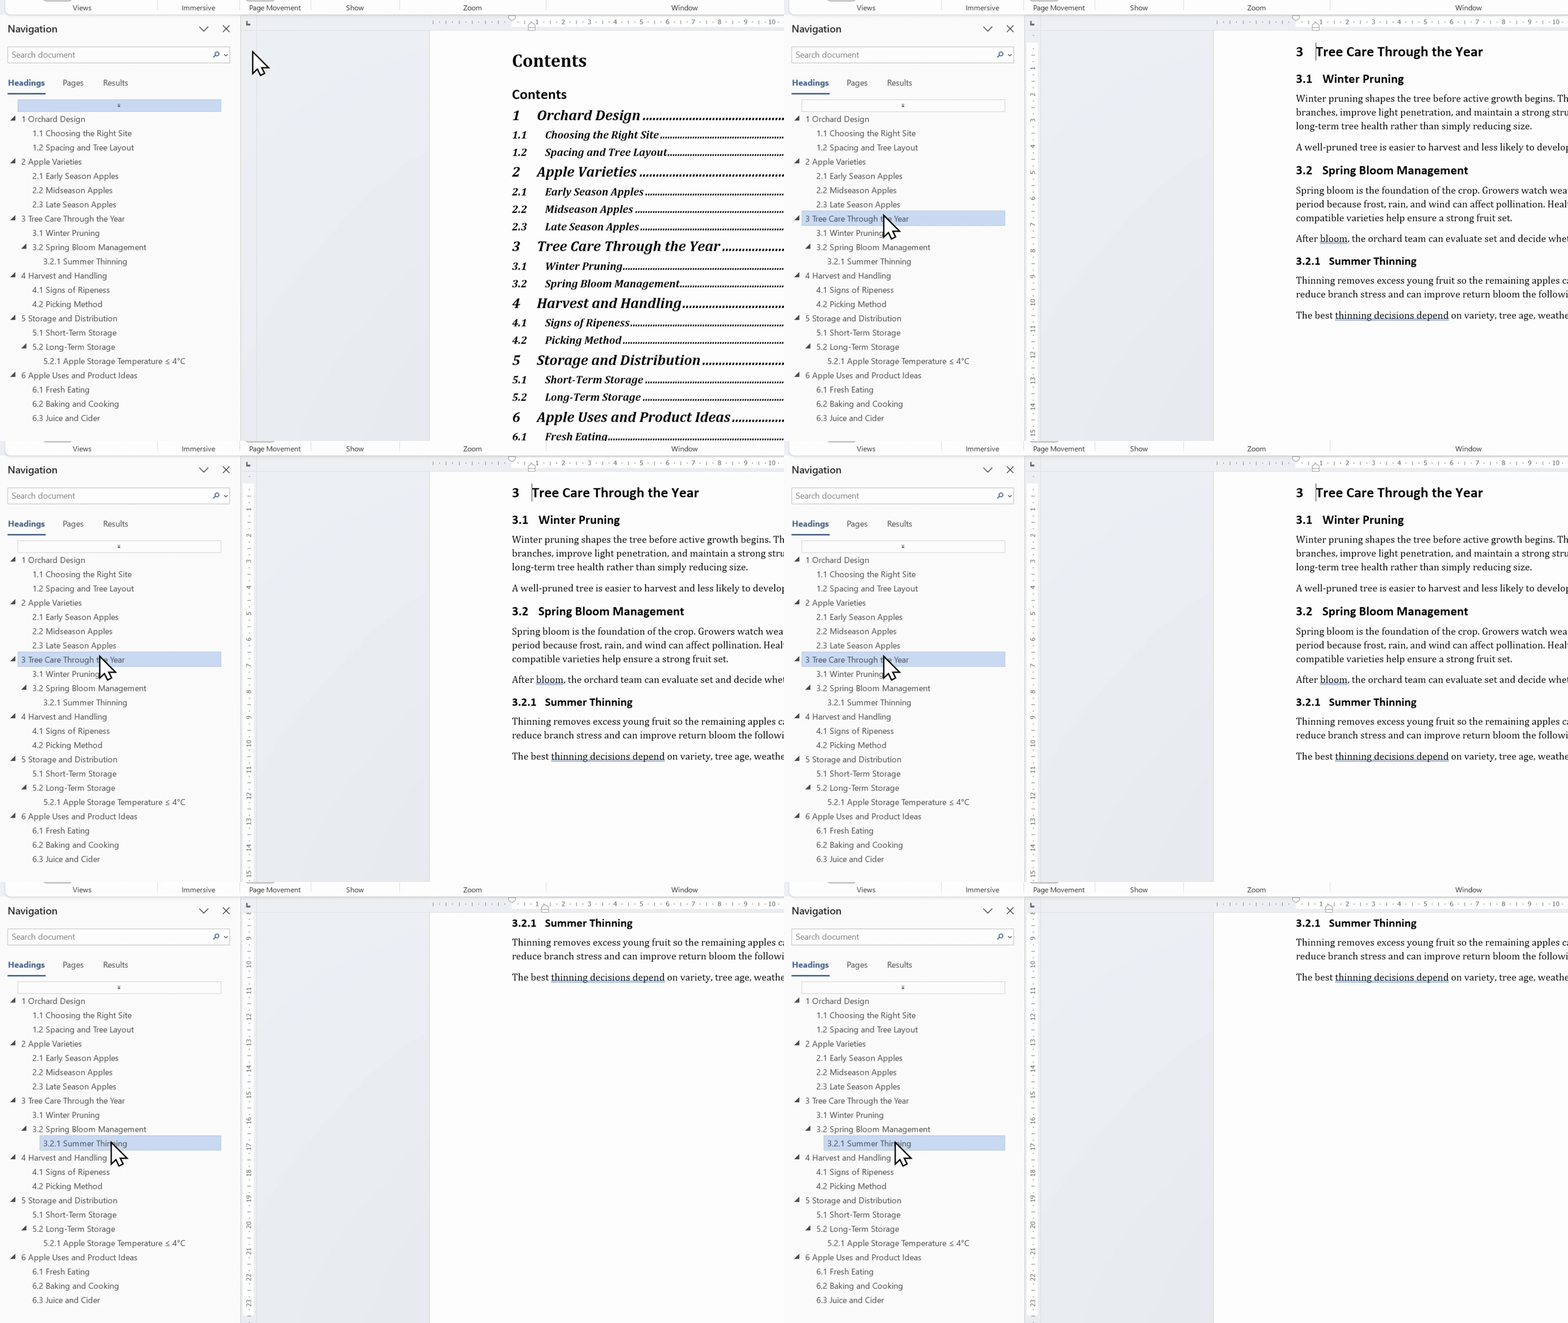
Use the Navigation Pane while building and editing the document. Use the table of contents when the document is ready to be shared, printed, exported, or formally read.
How OnStyle Creates a Standardized Table of Contents Faster
Section titled “How OnStyle Creates a Standardized Table of Contents Faster”The native Word method is useful for learning how a table of contents works. For standardized business, regulatory, or company-controlled documents, OnStyle provides a more controlled workflow.
OnStyle is a Microsoft Word add-in that helps documents follow predefined formatting and structure standards. Instead of manually choosing every TOC setting, OnStyle can use an assigned DocConfig to control how the table of contents should be created.
Step 1: Open OnStyle.
Go to the OnStyle tab. Before using the authoring tools, make sure the correct DocConfig is assigned. The DocConfig controls document standards such as styles, page layout, table of contents settings, and related formatting rules.

Not every OnStyle feature requires a DocConfig. However, for a correctly formatted, standardized table of contents, the DocConfig is needed because it controls the TOC title, title style, field format, heading levels, and related list settings.
Step 2: Make sure headings exist.
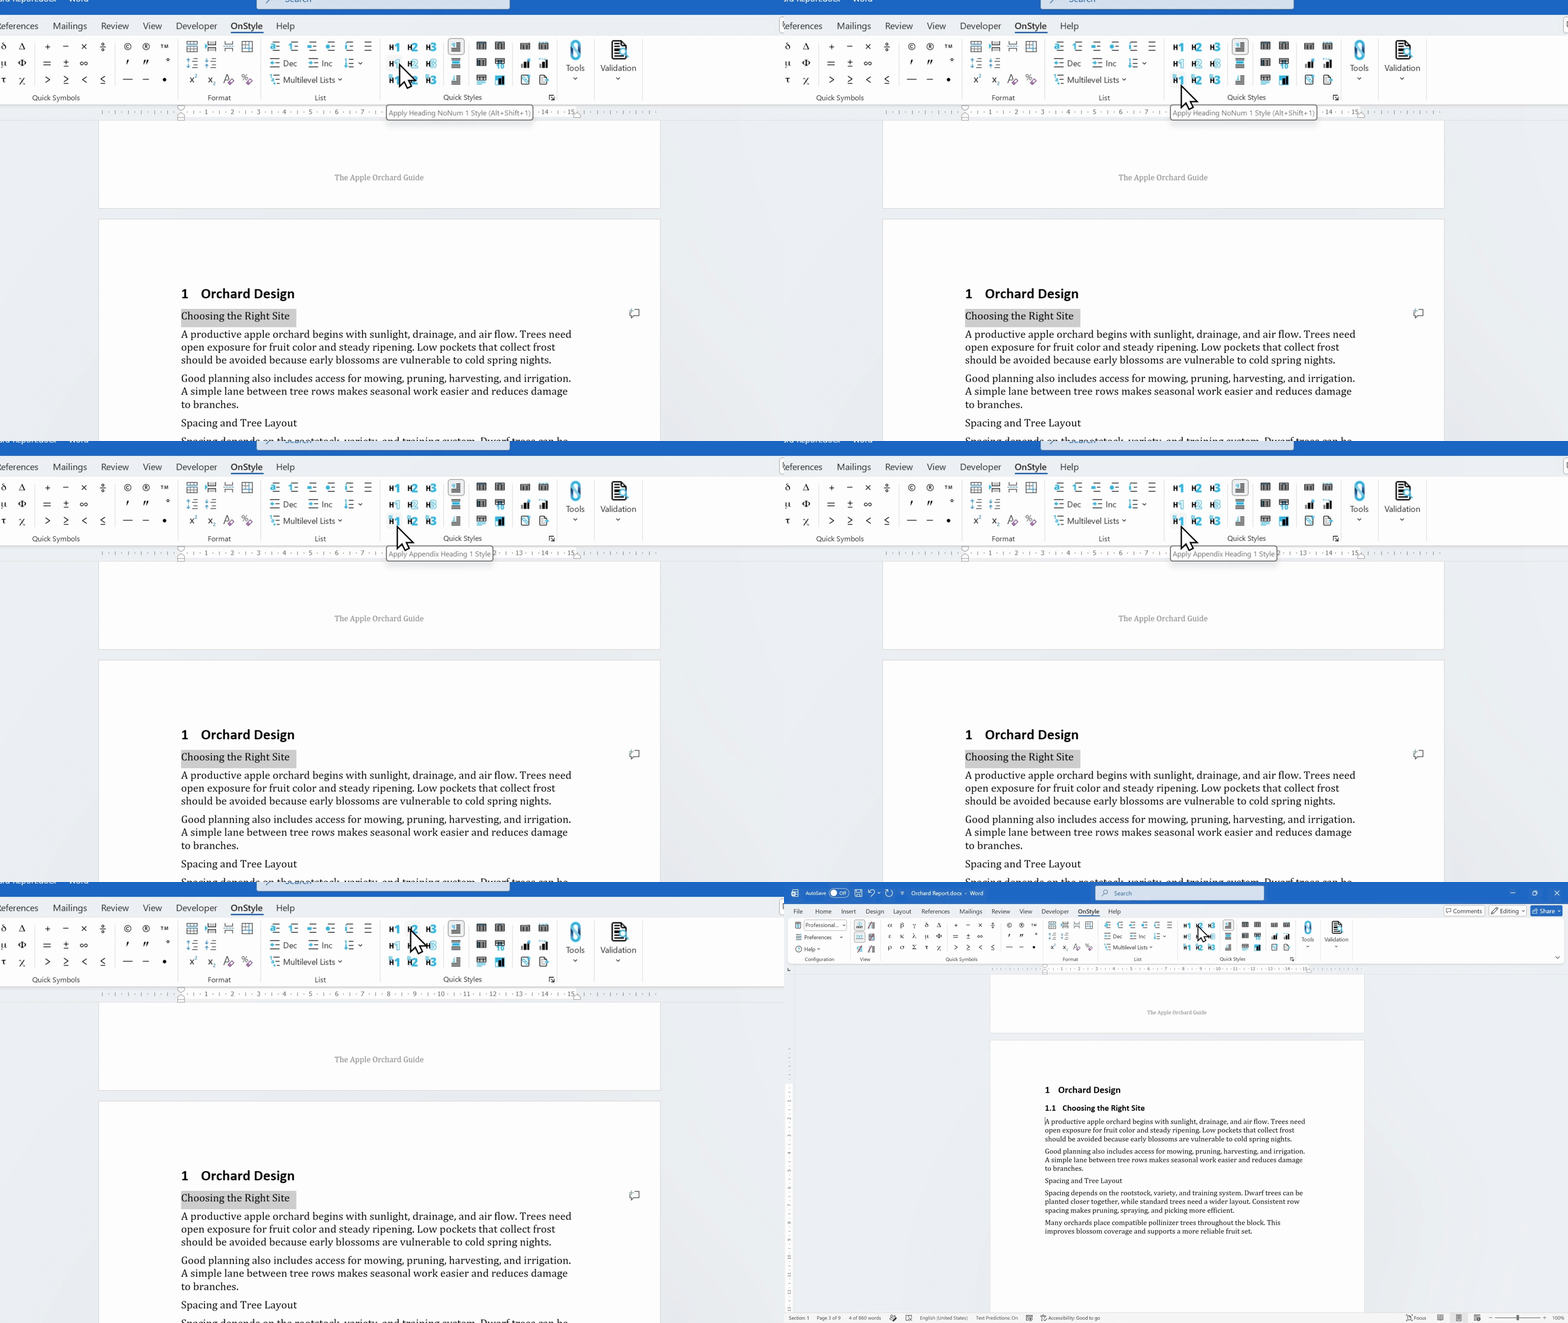
OnStyle needs headings before it can build the table of contents. Existing Word headings can work, and new headings can be created using OnStyle Quick Styles. Hover over the icons to see what each style does and which keyboard shortcut applies it.
Step 3: Insert the TOC through OnStyle.
Go to Tools > TOC. OnStyle provides several TOC-related insertion tools. One important option is Long TOC, which inserts numbered and non-numbered headings up to the third level. Hover over the options to see what each one does. For this workflow, choose Insert Long TOC or the configured TOC insertion option available in the document setup.
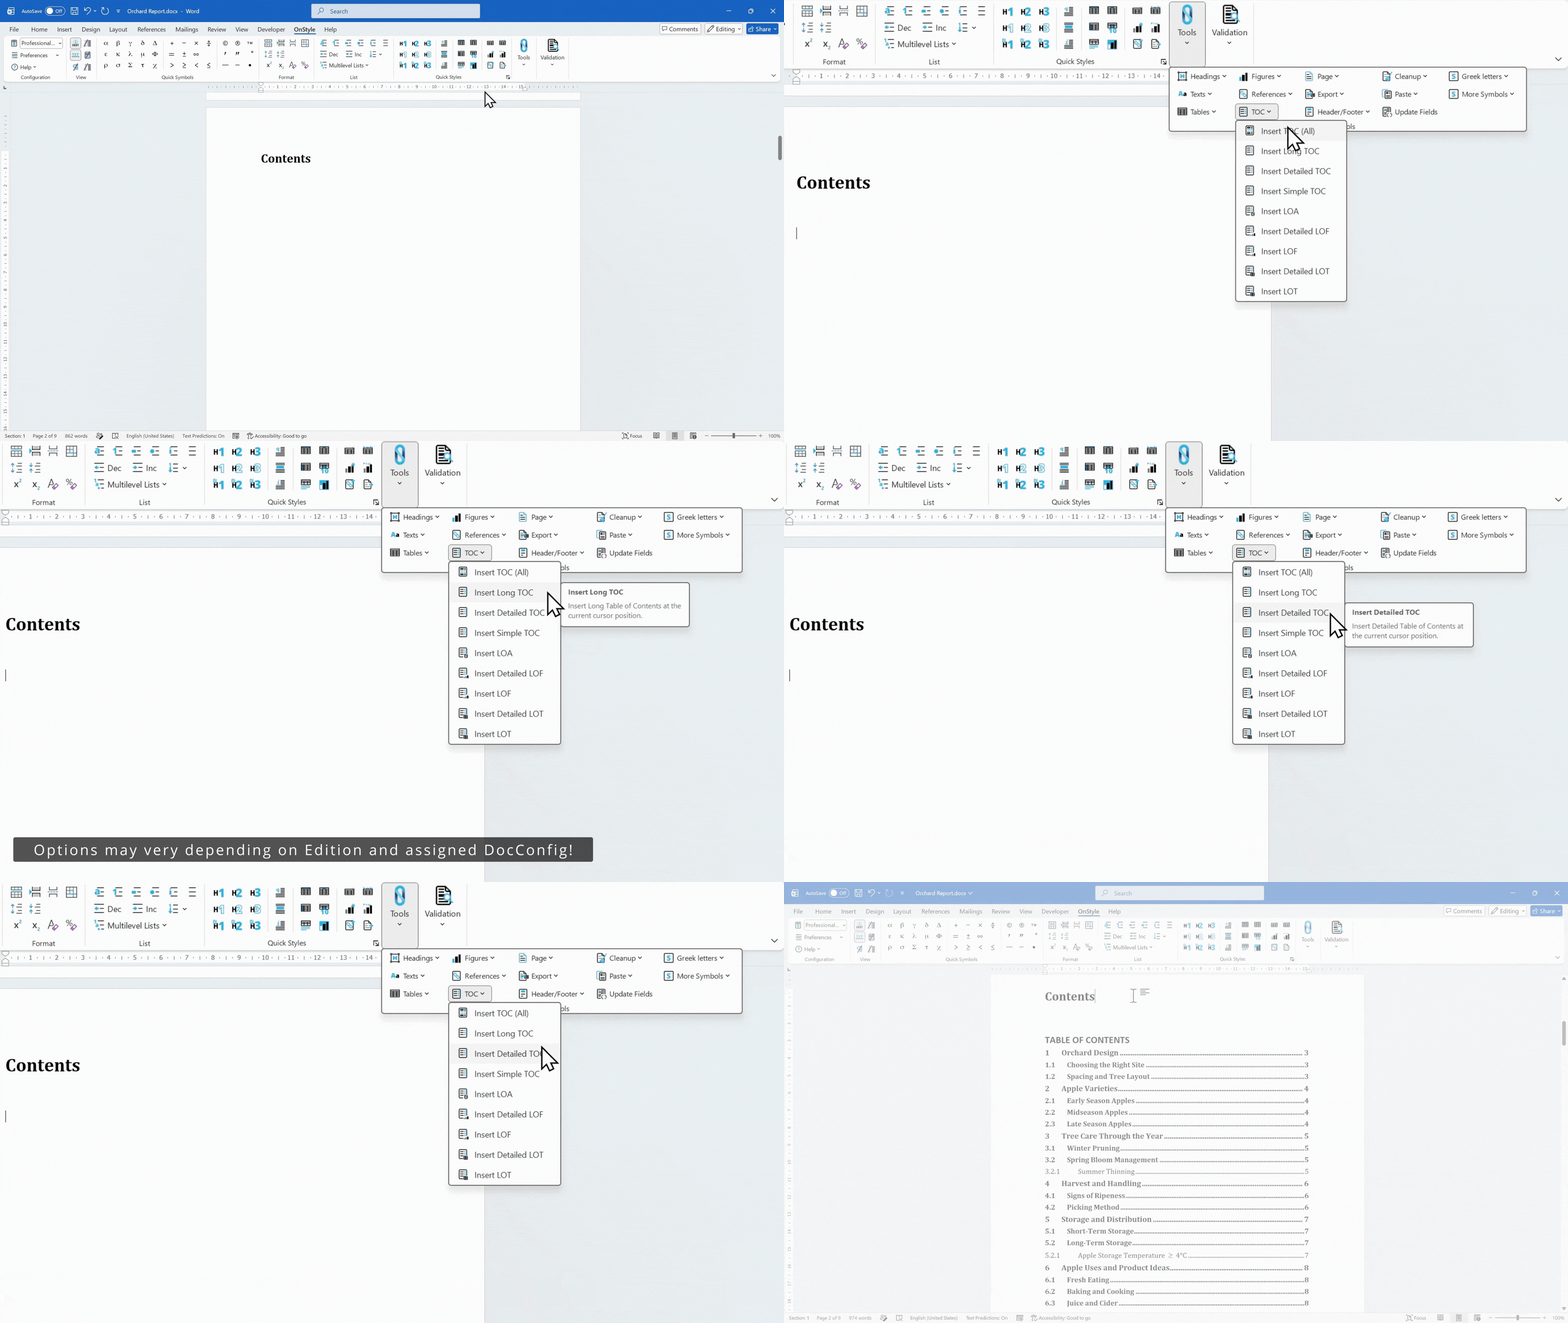
The advantage is consistency. Instead of manually choosing every field code, level, title, and tab leader, OnStyle inserts the table of contents package in the configured order and format.
Step 4: Check the TOC.
After the table of contents is created, go to Validation, choose the relevant Inspection Set or Inspection Group, and execute the inspection. Selecting the group title runs the inspections automatically.
Validation means checking the document for formatting, style, structure, and content issues. OnStyle can inspect more than 150 possible issues in a Word document.
For this topic, a relevant check is Symbol in TOC Source. This check identifies symbols in headings or captions used as TOC source content that may cause rendition or PDF issues.
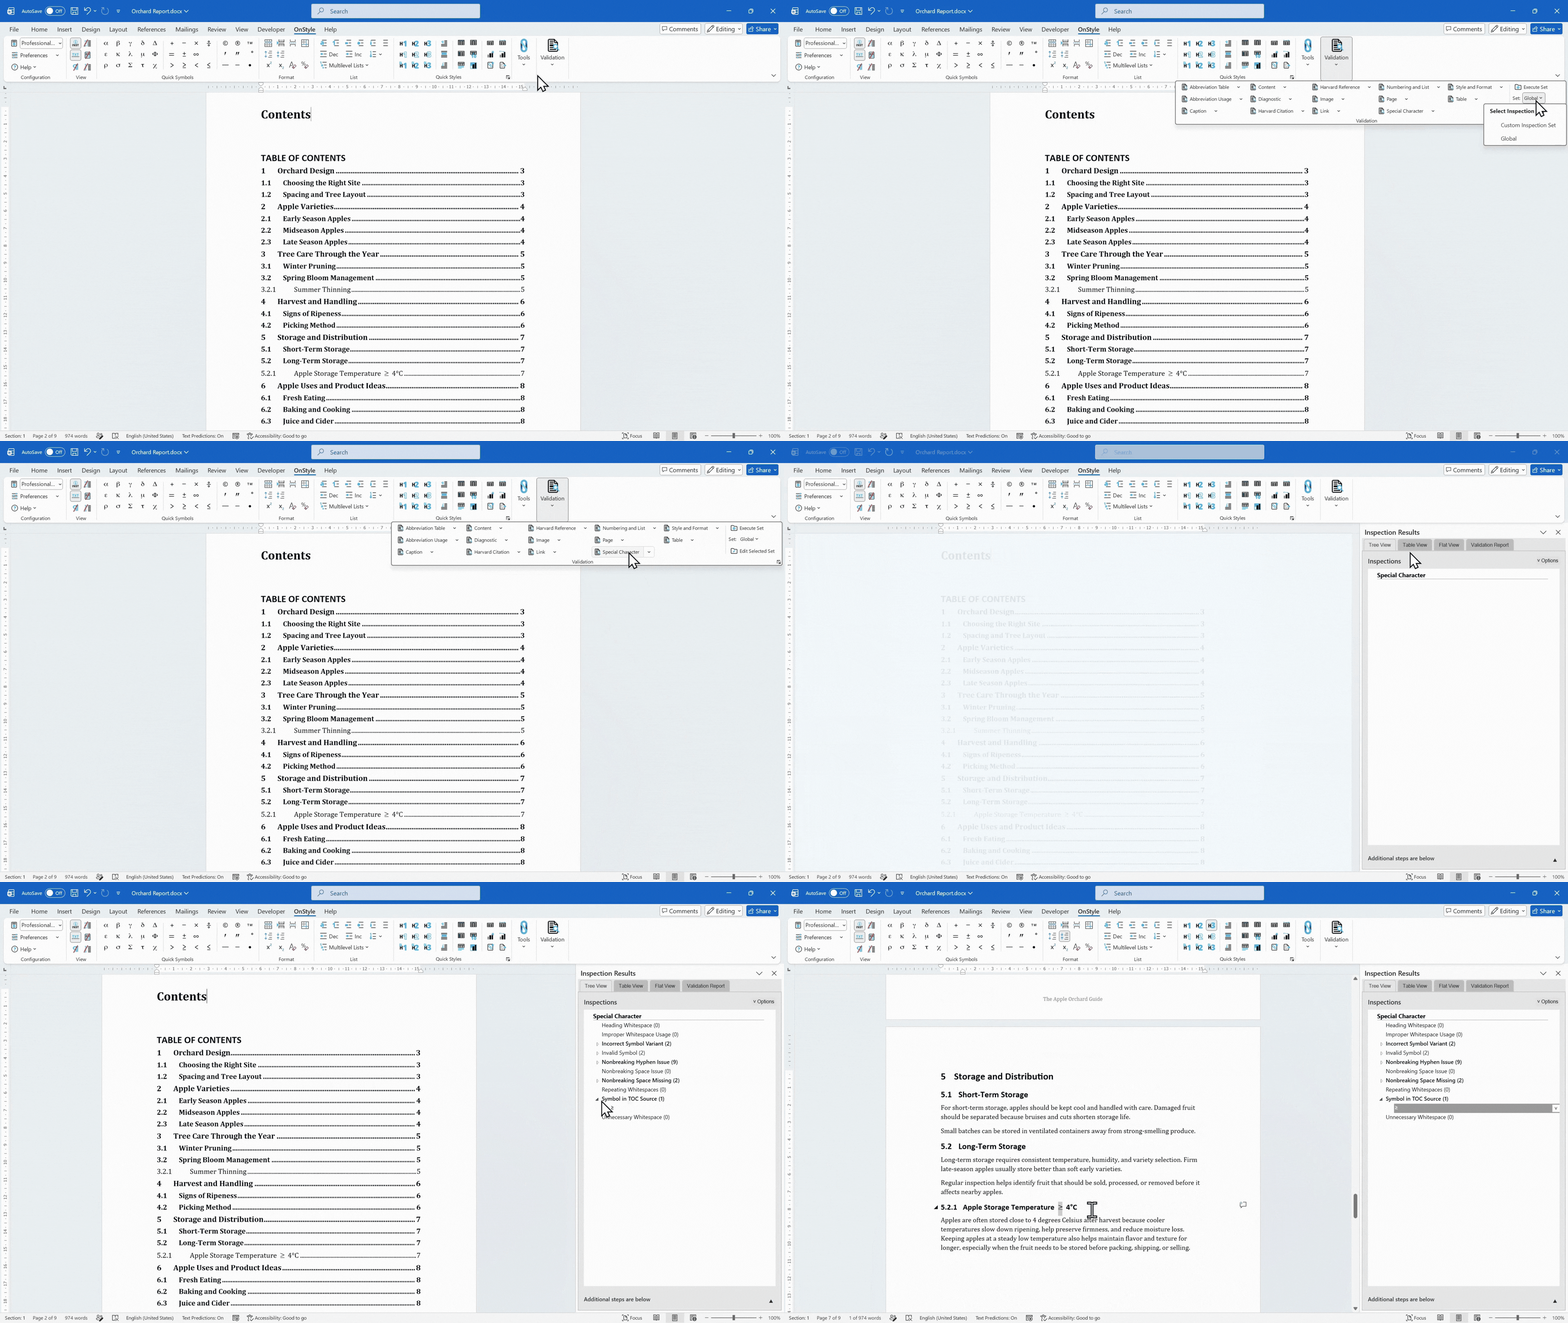
Step 5: Fix TOC issues automatically.
If OnStyle finds a Symbol in TOC Source issue, review the flagged text and remove or rewrite the symbol so the source text is cleaner. The available OnStyle correction for this issue is Remove Text, which can remove the flagged symbol or text. Check the wording carefully before applying it so important meaning is not removed.
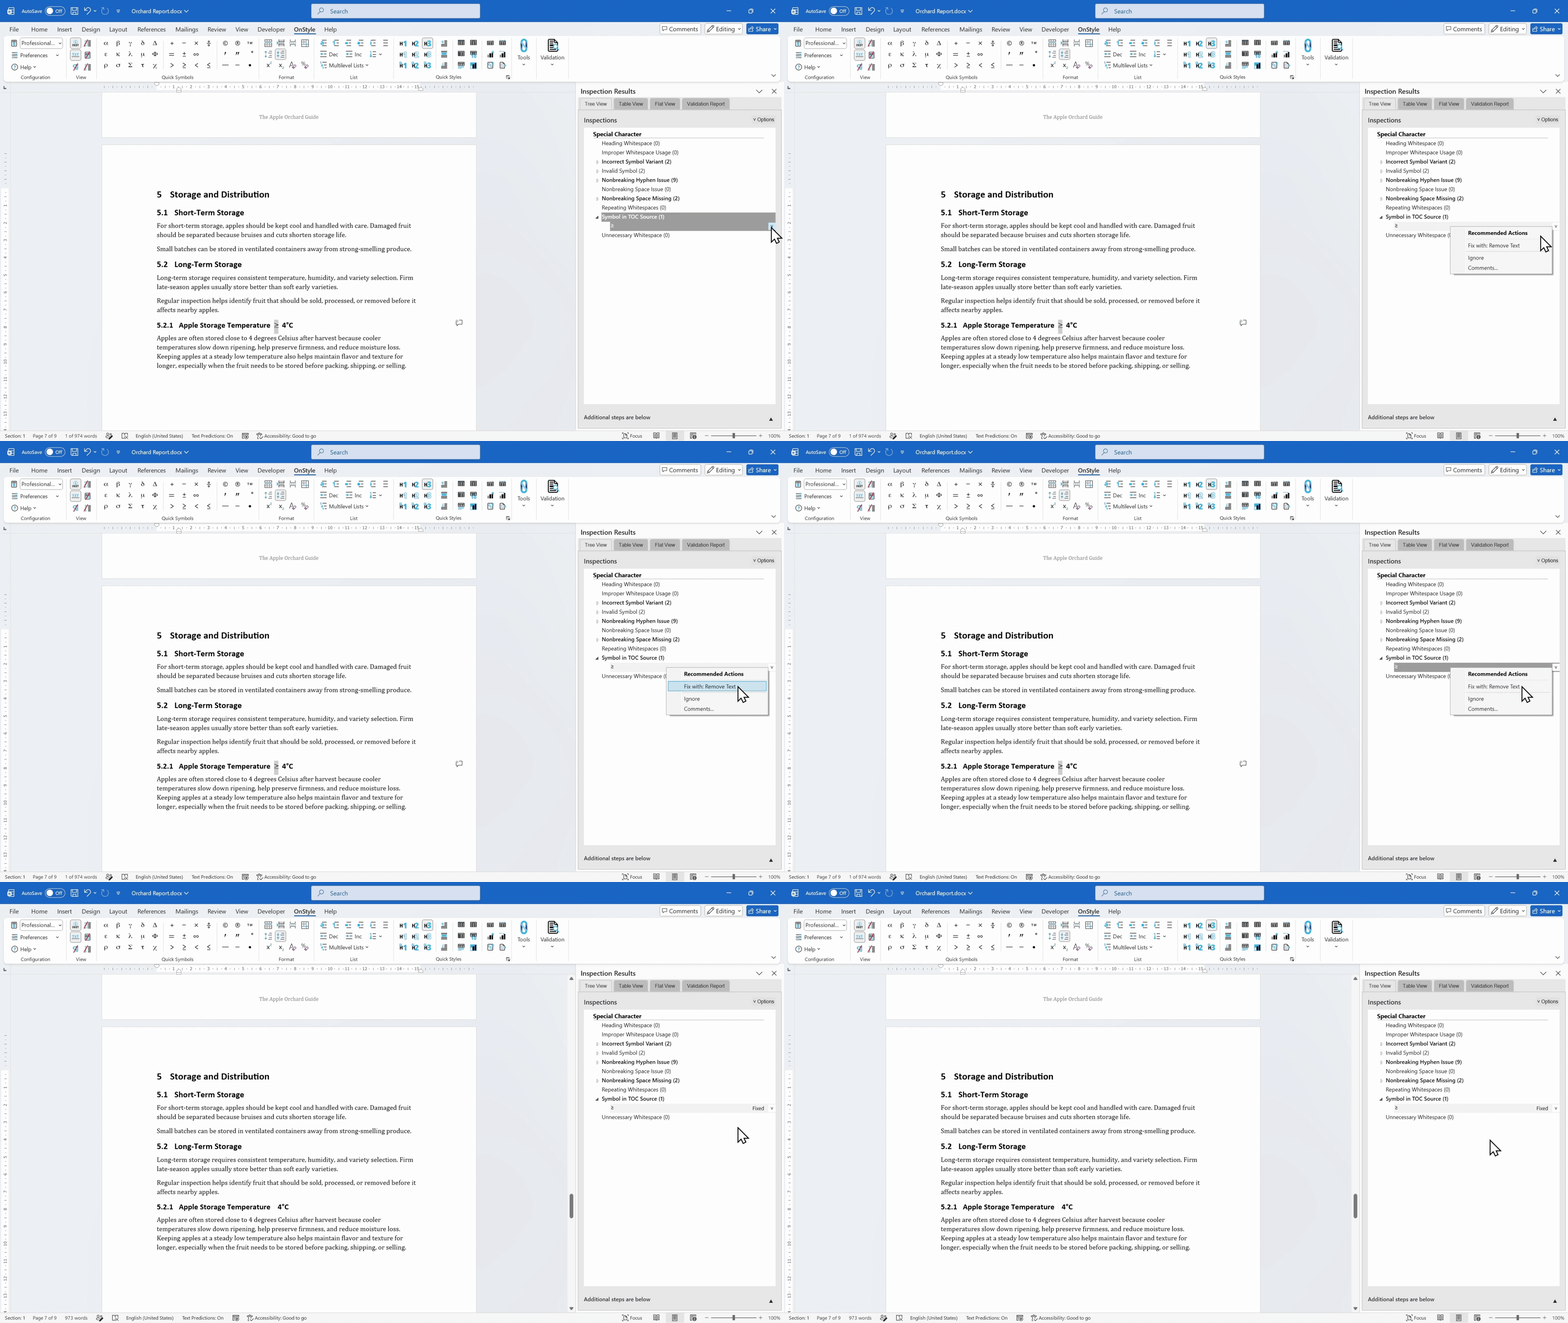
Step 6: Update document fields.
After editing headings, tables, figures, or captions, go to Tools and choose Update Fields. You can also use Alt+Ctrl+U. Update Fields refreshes the table of contents and other document fields in one step.
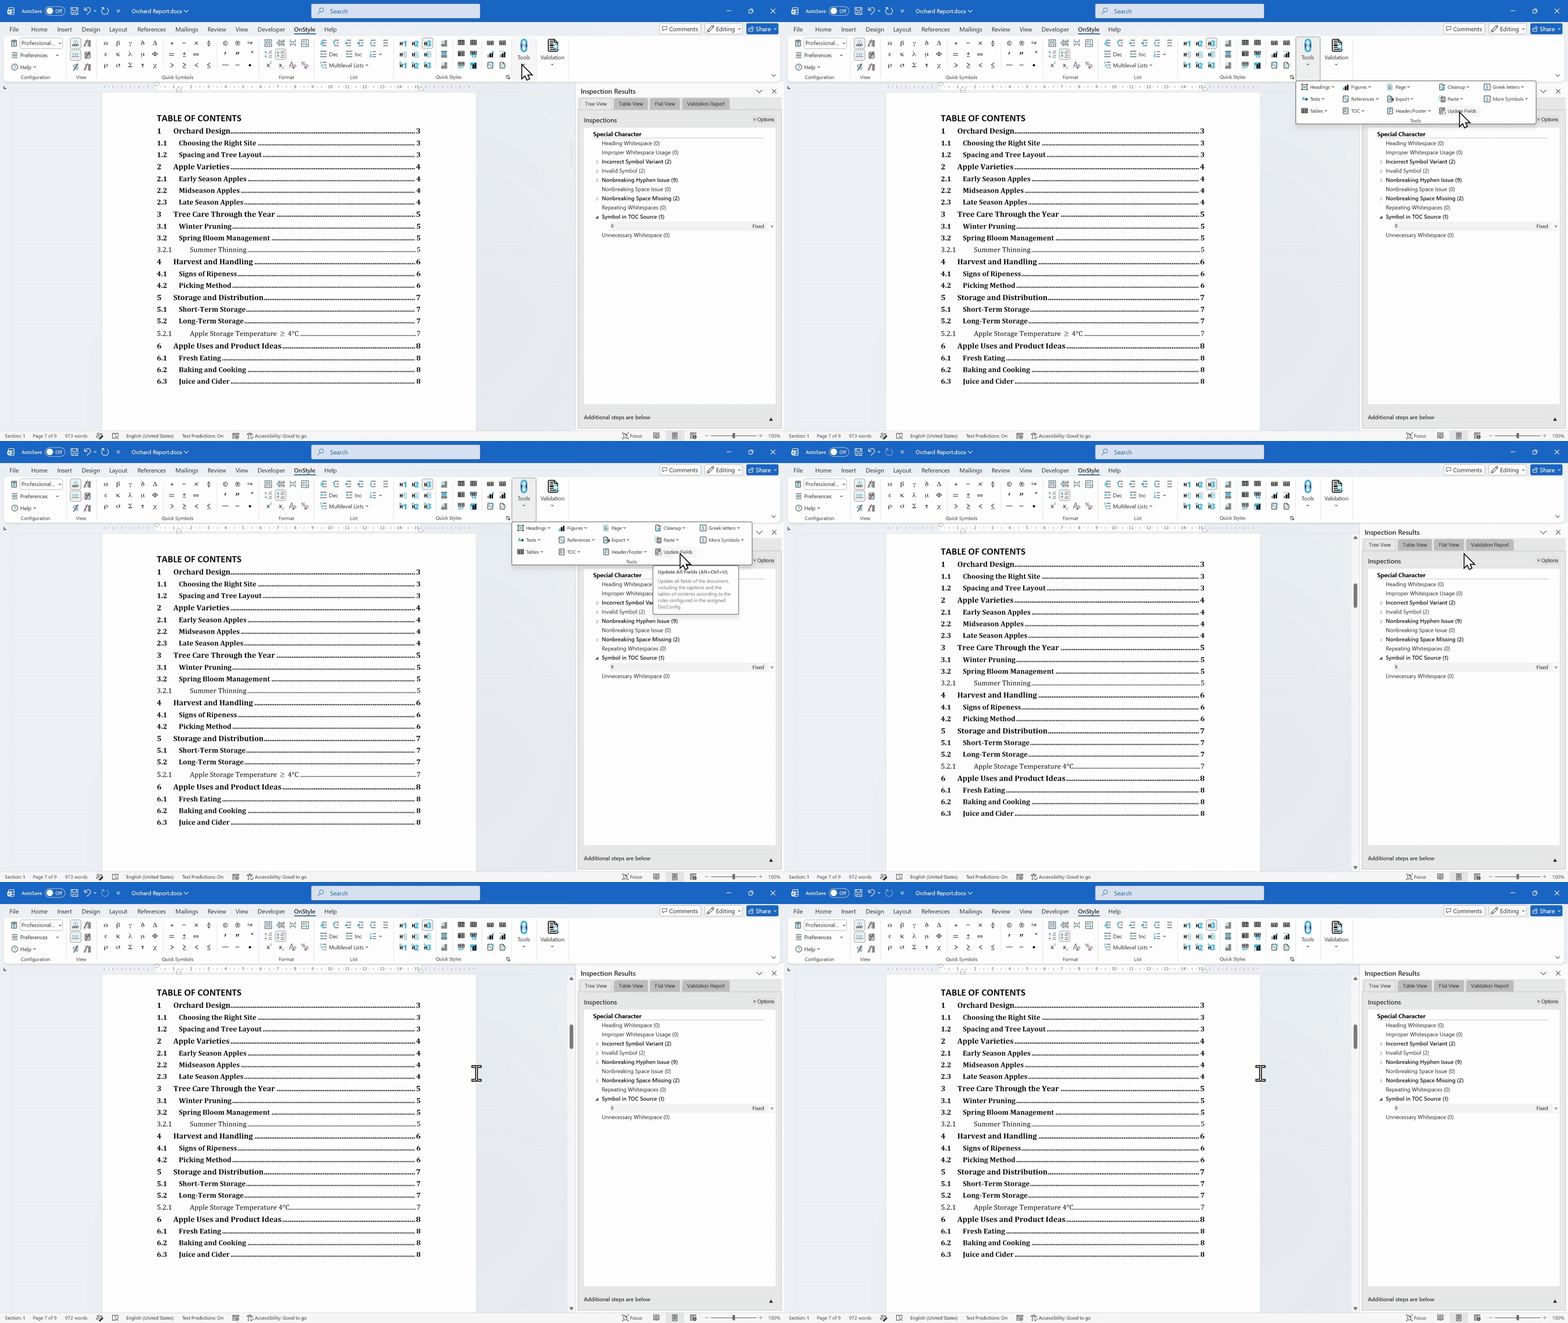
This is useful because Word’s normal table of contents update refreshes only the selected table of contents. OnStyle’s Update Fields refreshes the TOC together with other field-based content, such as lists of tables, lists of figures, captions, cross-references, and other fields. After changing headings, tables, figures, or captions, Update Fields is a safer one-step refresh for the whole document package.
Common Table of Contents Mistakes to Avoid
Section titled “Common Table of Contents Mistakes to Avoid”- Do not manually type the table of contents.
- Do not just make headings bold and large.
- Do not edit table entries only inside the table of contents.
Summary
Section titled “Summary”How to create an automatic table of contents in Word comes down to using heading styles, inserting the automatic table, and updating it whenever the document changes.
- Apply Heading 1, Heading 2, and Heading 3 where needed.
- Insert an automatic table of contents from the References tab.
- Use Update page numbers only when only page numbers changed.
- Use Update entire table when headings changed.
- Customize TOC levels, page numbers, tab leaders, and TOC styles when needed.
- Use Ctrl+Click and the Navigation Pane to move through long documents faster.
- For standardized documents, use OnStyle to apply configured heading styles, insert the configured TOC package, check TOC source quality, and refresh document fields with Update Fields.
With this workflow, readers can find the right section quickly, and you do not have to manage page numbers manually.